Getting Started with Landbot
Introduction to Landbot 🌍
Creating & Setting Up Your Account 👥
How to create your Landbot account, set it up and invite teammates
Common reasons for not receiving account activation email
Trial period
Account Settings
Build Your First Bot 🛠️
Builder Interface Tour
Getting started - build a bot
Managing Data in Your Chatbot: A Guide to Using Fields
Languages and Translations in Landbot
Organize your flow with Bricks
Using Flow Logic in Landbot
How to Test Your Bot - Complete Guide 🧪
How to "debug" (troubleshoot) your bot's flow to spot possible errors (for non coders)
Starting Point
How to Import a Chatbot Flow Without JSON – Use "Build It For Me" Feature
Launch and Share Your Bot 🚀
Build a bot
Bot's Settings
Bot General Settings
Web bots: Second Visit Settings
Custom System Messages
Hidden Fields (Get params / UTMs from url and use it as variables)
Landbot native SEO & Tracking tools
Typing Emulation (Message Delay)
Messages, Questions and Logic & Technical blocks
Messages
Media Block
Media block
How to display images with a variable URL source
How to embed a .gif file inside a message
Different ways to embed Videos in Landbot
Display video and hide button to continue until video has ended
Send a Message block - Simple Message
Goodbye block
Question blocks
Date Block
Scale Block
Buttons block
Ask for a Name block
Ask for an Email block
Ask a Question block
Ask for a Phone block
Forms block
Multiple-Choice Questions with the Buttons Block
Question: Address block
Question: Autocomplete block
Question: File block
Question: Number block
Question: Picture Choice block
Question: Rating block
Question: URL block
Question: Yes/No block
Logic & Technical blocks
Code Blocks
Dynamic Data
How to Use the Dynamic Data Block in Landbot
Get the array's index of the user selection and extract information from array
Formulas
How to Perform Basic Calculations
Get started with the Formulas block
Formulas Blocks Dashboard
Formulas - Regex
Formulas - Date
Formulas - String
Formulas - Logical
Formulas - Math
Formulas - Object
Formulas - Comparison
Formulas - Array
Persistent Menu
Trigger Automation
Webhook
How to Use the Webhook Block in Landbot: A Beginner's Guide
Webhook Block Dashboard
Webhook Block for Advanced Users
Landbot System Fields: Pre-created fields
Set a Field block
Any of the above Output
Global Keywords 🌍
Keyword Jump
Lead Scoring block
Jump To block
AB Test
Conditions block
Conditions block II (with Dates, Usage and Agents variables)
Close Chat block
How to ask a question based on a variable not being set (empty URL params)
Business Hours block
Custom Goals
Note block
Share & Embed
Redirect Users
How to open a new URL in another tab (window)
How to redirect visitors to a URL (web only)
How to add a Click-to-Call/Email/WhatsApp button
Redirect User Based on Language Input (DeepL)
Generate a URL that has variables from user answers
Popup on Exit Intent
Share
Customized Embed Actions
How to redirect user to another url in your site with Livechat open to continue conversation
How to Detect Visitors Browser
Customize and embed your WhatsApp Widget
Modifying Embed Size
Detect if bot was opened
Customized Behavior in Mobile Browsers
Load script and display bot on click button
Launch Bot On Exit Intent
Display Bot During Business Hours Only (Livechat & Popup)
Open / Close a Web bot (embedded)
Launching a bot depending on browser language
How to pass WordPress logged in user data to Landbot
Set the flow depending on the url path (for embedded landbots)
How to launch a Landbot by clicking a button
Open LiveChat bot as soon as page loads
Detect if a visitor is on Mobile/Tablet or Desktop
Embed
Embed your bot into your website and use a custom domain
Embed Landbot in an iframe
Landbot in Wix
Landbot in your web with Google Tag Manager
Landbot in Webflow
Embed in Sharetribe
Landbot in Shopify
Embedding Landbot in Carrd
Landbot in Wordpress
Landbot in Squarespace
Customizing the Proactive Message
Design section (web bots)
Verification & Security
Validate phone number with SMS verification (with Vonage Verify)
Cookie consent banner (full page / full page embed)
Add Captcha Verification (Non-Embedded Bots)
Bricks
How to disable a bot
Account Settings and Billing
Billing
Privacy and Security
Teammates
Agent Status and Log out
Roles & Permissions for Teammates
Manage Landbot Teammates - Add and Customize Agents
Startup Discounts
NGOs and Educational Organizations Discount
AI in Landbot
Landbot AI Agent
AI Agent - Interactive components
AI Agent Block
AI Agent Setup - Best Practices
Tips to migrate from old AI Assistants to AI Agents
How to create custom Instructions for your Landbot AI Agent with AI (ChatGPT, Claude...)
AI Agent In Action - Live Implementation Example
Capture, generate and use data with AI Agents
Structuring your AI Agent Knowledge Base
Custom AI Integrations
Create a JSON format response from OpenAI in WhatsApp
Responses API
Connect OpenAI Assistant with Landbot
AI in WhatsApp
How to build a FAQ chatbot with GPT-3
GPT-4 in Landbot
OpenAI
Prompt Engineering for GPT-3
Build a Customer Service Bot with ChatGPT and Extract Information
Google Gemini in Landbot
Build a Chatbot with DeepSeek
AI Task block Overview
Integrations with Landbot
Native Integrations
Airtable
Airtable integration block
Get data filtered from Airtable with a Brick- Shop example
20 different ways to GET and filter data from Airtable
How to add/update different field types in Airtable (POST, PATCH & PUT)
How to Create, Update, Retrieve and Delete records in Airtable (POST, PATCH, GET & DELETE)
Get more than 100 items from Airtable
Insert Multiple Records to Airtable with a Loop
How to Get an Airtable Token
Advanced filters formulas Airtable block
Airtable usecase: Create an event registration bot with limited availability
Update Multiple Records in Airtable Using a Loop
Reservation bot with Airtable
Calendly
Dialogflow
Dialogflow & Landbot course
Dialogflow & Landbot intro: What is NLP, Dialogflow and what can you do with it?
Dialogflow & Landbot lesson 1: Create your first agent and intent in Dialogflow
Dialogflow & Landbot lesson 2: Get the JSON Key
Dialogflow & Landbot lesson 3: Setting up of Dialogflow in Landbot
Dialogflow & Landbot lesson 4: Training phrases and responses for a FAQ
Dialogflow & Landbot lesson 5: Entities and Landbot variables
Dialogflow & Landbot lesson 6: Redirect user depending on Dialogflow response parameters (intent, entities and more)
Learn more about Dialogflow - Courses and communities
Integrations > Dialogflow Block
How to extract parameters from Dialogflow response with Formulas
Dialogflow Integration Dashboard
Dialogflow in Unsupported Languages (& Multilingual)
Dialogflow - How to get JSON Key
Google Sheets
Google Sheets Integration: Insert, Update and Retrieve data
How to use Google Sheets to create a simple verification system for returning visitors
How to Upload Document & store link
How to give unique Coupon Codes (with Google Spreadsheets)
Google Sheets Integration Dashboard
How to insert a new row with data and formulas in Google Sheets
How to use Google Spreadsheet as a Content Management System for your bot
Hubspot
MailChimp
Salesforce
Segment
SendGrid
Send an Email
Sendgrid Integration Dashboard
How to create a custom SendGrid email - (Custom "from" email)
Slack
Stripe
Zapier
How to Configure the Landbot and Zapier Integration Using the Zapier Block
Zapier Integration Dashboard
How to insert a row to Google Spreadsheet by Zapier
How to generate a document with PDFMonkey by Zapier
Send WhatsApp Templates from Zapier
How to Send Emails from Your Landbot Using Gmail via Zapier
Get Opt-ins (Contacts) from Facebook Leads using Zapier
How to extract data from an external source with Zapier and use it in Landbot
Zapier trigger
How to complete a digital signature flow by Zapier
Make a survey with Landbot and display the results in a Notion table using Zapier
Custom Integrations
ActiveCampaign
Google Calendar
Google Fonts
Google Maps
Embed Google Maps
Google Maps API Key for Address block
Extract Data With Google Maps Geocoding API
Calculate Distances With Google Maps API
Google Meet
IFTTT
Integrately
Intercom
Make
Connecting MySQL with Make.com (formerly Integromat)
Send WhatsApp Message Template from Make
Make Integration With Trigger Automation Block
How to send an email through Sendinblue by Make.com (formerly Integromat)
Get Opt-ins (Contacts) from Facebook Leads using Make
How to extract data from an external source with Make.com and use it in Landbot
OCR
Pabbly
Paragon
Pipedream
PDF Monkey
Store Locator Widgets
Xano
Zendesk
Send an Email with Brevo
How to integrate Landbot with n8n
How to Integrate Landbot with n8n using Webhooks
WhatsApp Channel
Getting started!
WhatsApp Testing
Build a WhatsApp Bot - Best Practices and User guide
Build a WhatsApp Bot - Best Practices for Developers
Types of Content and Media you can use in WhatsApp 🖼
1. WhatsApp Article Directory
WhatsApp Integration & Pricing FAQ
Adding & Managing your WhatsApp Channel
Meta Business Verification - Best Practices 🇬🇧
WhatsApp Number Deletion (WA Channel management)
Adding a WhatsApp number to your account
WhatsApp’s Messaging Policy: New Accepted Industry verticals
Meta processes guide: Meta Business Verification, Official Business Account (OBA) requests, Appeals
Additional Number integration: Limitations and Requirements (Number integration)
Existing WhatsApp Number Migration
Key Insights for Migrating to WhatsApp Business API Cloud
How to's, Compatibility & Workarounds
WhatsApp bots - Feature Compatibility Guide
WhatsApp - How to direct a user through a different bot flow on their second visit
WhatsApp - Get user out of error message loop
How to do Meta ads conversion tracking in WhatsApp bot using the Conversion API
Getting Subscribers: Opt-in, Contacts
How to get Opt-ins (Contacts) for your WhatsApp 🚀
WhatsApp Quality - Best Practices
Opt-In block for WhatsApp 🚀
Opt-in Check Block
Contact Subscribe Block: Manage Opt-ins and Audiences
New Contacts: Import, Segment, and Organize Easily
WhatsApp Channel Settings
Parent Bot/Linked Bot - Add a main bot to your WhatsApp number
WhatsApp Channel Panel (Settings)
Growth Tools for WhatsApp
Messaging and contacting your users
WhatsApp Campaigns 💌
WhatsApp's Message Templates
Audience block
WhatsApp Marketing Playbook: Best Practices for Leadgen
WhatsApp Error Logs: Troubleshooting guide
Audiences
WhatsApp for Devs
How to calculate the number of days between two selected dates (WhatsApp)
Creating a Loop in WhatsApp
Recognise the users input when sending a Message Template with buttons
Trigger Event if User Abandons Chat
Calculate Distances in WhatsApp
Send Automated Message Templates based on Dates
How to Let Users Opt-Out of Your WhatsApp Messages via API
reply from Slack: How to create an integration to allow agents reply WhatsApp users from Slack (with Node JS)
Set Up a Delay Timer in Bot
Notify Teammates of Chat via WhatsApp
Native blocks for WhatsApp
Reply Buttons block (WhatsApp)
Keyword Options 🔑 Assign keywords to buttons (WhatsApp and Facebook)
List Buttons Block (WhatsApp)
Collect Intent block
Send a WhatsApp Message Template from the Builder
WhatsApp Changes to Message Limits starting October 7, 2025
Other Channels - Messenger and APIChat
Facebook Messenger
The Facebook Messenger Ultimate Guide
Types of content you can use in Messenger bots 🖼
How to Preview a Messenger bot
API Chat (for Developers)
Human Takeover & Inbox
Metrics and Data Management
Metrics Section
How to export the data from your bots
Export data: How to open a CSV file
Bot's Analyze Section
For Developers & Designers
JavaScript and CSS
CSS and Design Customizations
Design Customizations
Advanced (Custom CSS & Custom JS)
Components CSS Library Index
Background Class CSS
Identify Blocks CSS
Buttons Class CSS
Header Class CSS
Media Class CSS
Message Bubble Class CSS
Miscellaneous Classes CSS
CSS Customization Examples: "Back to School" Theme
Get started guide for CSS Design in Landbot
CSS Customization Examples: Call To Action: WhatsApp
CSS Examples: Lead Gen
CSS Customization Examples: "Translucid"
CSS Customization Examples: "Minimalist" Theme
Dynamic Data CSS
Form Block CSS
CSS for Typewriter Effect
CSS Customization Examples: Carrd Embed Beginner
Dynamically Change a Bot's Background
Proactive Message Customizations with Javascript and CSS
Landbot v3 - Web CSS - RTL
CSS Customization Examples: Video Bubble
Dynamically Change Any Style
CSS Customization Examples: CV Template
Change Landbot custom CSS dynamically from parent page onload
Widget/Bubble Customizations with Javascript and CSS
JavaScript
How to change Avatar dynamically
Javascript in WhatsApp
Landbot JavaScript Integration
Different ways to format numbers with JS
How to display an HTML Table and a List in Landbot v3 web
Trigger a Global Keyword with JS (web v3)
Create Dynamic Shopping Cart with JS and CSS
Add a Chart (with Chart JS library) in your Landbot
Different ways to format numbers with JS (WhatsApp)
Pop up modal to embed third party elements
Landbot API
Send WhatsApp Messages with Landbot API
How to "send" a user to a specific point in the flow with Javascript and with the API
APIs
Get Opt-ins (Contacts) using Landbot API
MessageHooks - Landbot Webhooks
Resume flow based on external process with Landbot API (Request, Set, Go)
Tracking
Google Analytics - Track Events (Not embedded)
Google Analytics - Track Events (Embedded)
Meta Pixel - Track Events (only Embedded)
How Track Google Analytics Events in Landbot with Google Tag Manager (GTM)
Google Adwords - How to track Google Adwords in Landbot
Set a timer to get the time spent during the flow
Workarounds and How To's
Workflows
How to build an event registration Landbot (to be used in one screen by many attendees) (web only)
How to let user select a time of booking (with a minimum 45 minutes notice)
Send Files Hosted in Landbot to Your Google Drive with Make
Two-Step Email Verification
Fixing Web Bot Loading Issues for iOS Devices in Meta Campaigns with Disclaimers
Progress Bar Workaround
How to Add User Verification to Your Chatbot
How to set up questions with a countdown
HTML Template for Emails
Creating a Simple Cart in WhatsApp
Creating Masks for User Input (2 examples)
More Topics
Table of Contents
- All Categories
- Build a bot
- Messages, Questions and Logic & Technical blocks
- Logic & Technical blocks
- Webhook
- How to Use the Webhook Block in Landbot: A Beginner's Guide
How to Use the Webhook Block in Landbot: A Beginner's Guide
 Updated
by Abby
If you already know how to use REST API or if you're looking for something more advanced check out our article for advanced users here
Prefer watching to reading? No problem, we've got you covered 👇
Landbot’s native integrations (like Airtable, Mailchimp, and Google Sheets) cover many common use cases.
But when you need to connect to other systems—whether it’s your CRM, a custom database, or an internal tool—the Webhook Block provides the flexibility to integrate with (almost) any REST API
What is a webhook?
In Landbot the webhook block is a REST API block, it allows you to send, receive, update, or delete data in third parties and receive a response that can be used in the flow.
If you're looking for polling and getting realtime updates to your hook you may want to check out MessageHooks
In this article we'll explain how to use an API while we go through each part of the webhook block with a real example, you can follow along with the weather API we'll be using - it's free but you need to sign up to get an API key
How do APIs work?
Here's a graphic to get an idea, just replace 'CLIENT' with 'Webhook block' 😉
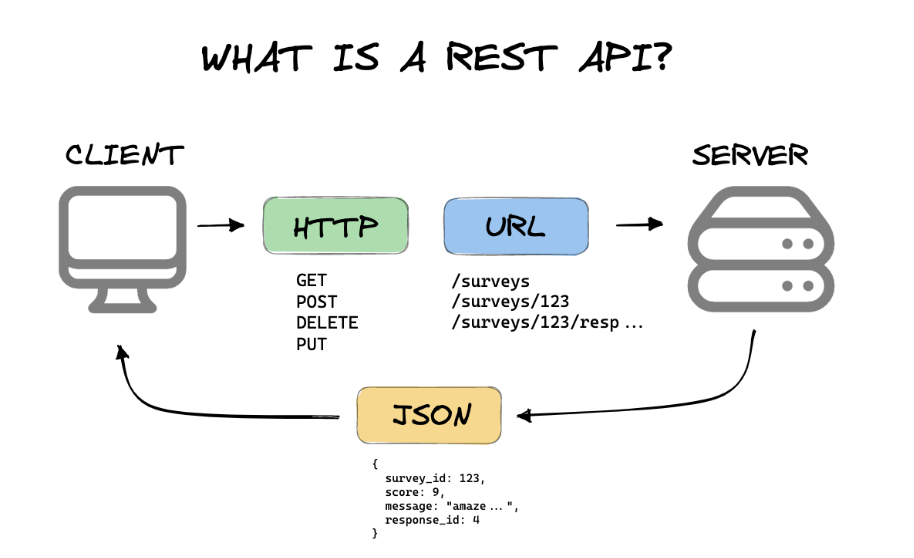
API Basics
| Term | Definition |
|---|---|
| API key | A unique passcode of letters and numbers that grants access to an API |
| Endpoint | The digital location where an API receives requests about its resources (the url) |
| Request method | Uses HTTP methods (GET, POST, PUT, DELETE) to tell the API what you want it to do |
| Parameters | Adds extra information, such as variables to the endpoint and is used to filter the response |
| Request body | Some APIs require data to be in JSON format, in that case we will use the request body |
| API call | Process of a client (the webhook block) making an API request to a server |
| Status code | A number code that appears in the body of an API response that tells you if your request was successful or not |
| API server | Authenticates and processes API requests before delivering an appropriate response |
| API response | A response generated by the API server and returned to the client (the webhook block) |
API keys
Like a password, an API key is a string of letters and numbers that serves as a unique access code or authentication token. You'll need one to access most APIs. It's a security measure to help track and control API usage, so only authorized users or applications can access the data. Similar to how you need a password to access your apps, you need an API key to access APIs.
This will usually go in the Header section of the webhook. The key as well as the value format (Bearer vs Token) will depend on the API you are connecting to
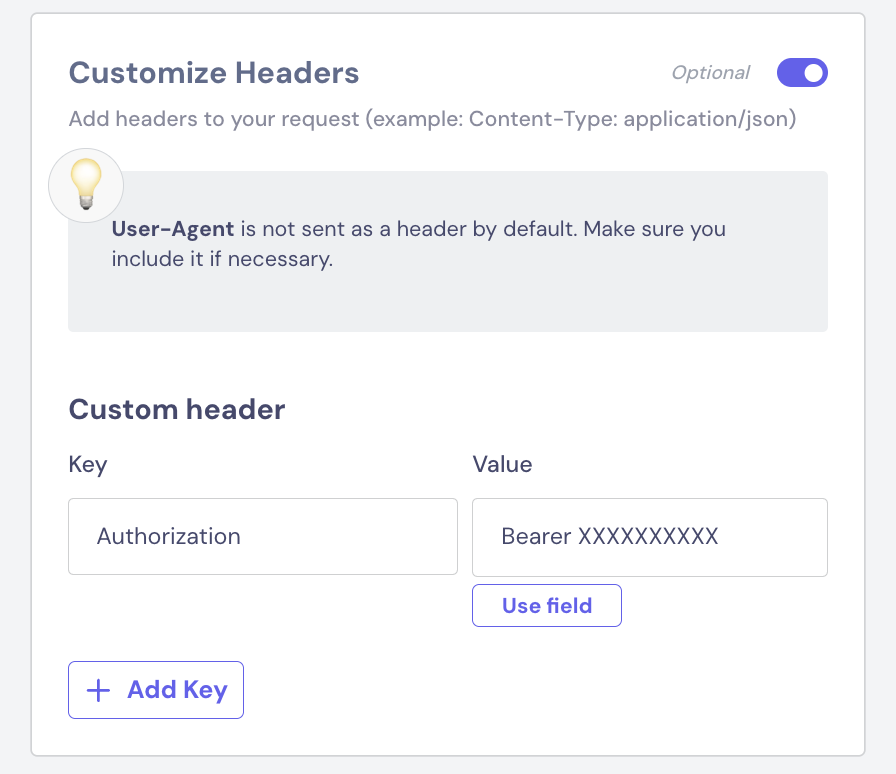
In our weather example we'll toggle off Customize Headers, since our API key is going in the Parameter section, however this isn't very common.
Endpoints
An endpoint is where an API connects with another application, usually in the form of a specific URL or web address. Endpoints serve as the location for where requests are received and responses to those requests are sent. They're a clear and standardized way for users to work with APIs.
Our weather example endpoint looks like this:
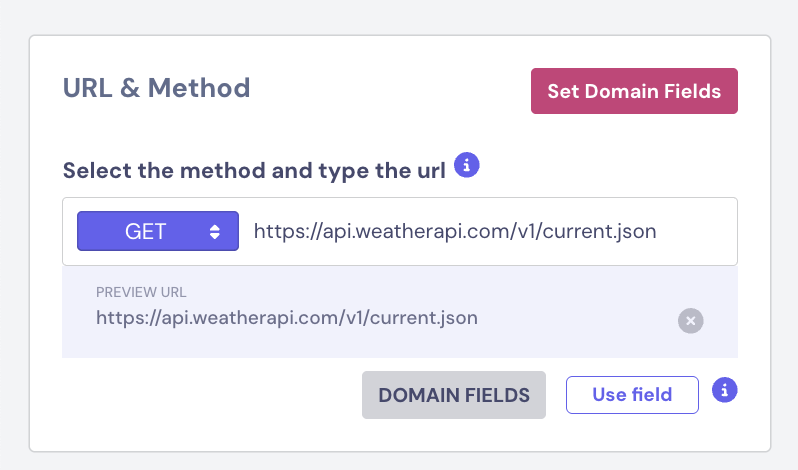
If you're following along with the weather API you'll notice an HTTP error, the webhook only accepts HTTPS, so we'll just add an S after HTTP and it will work correctly
Request methods
To communicate what you want to accomplish via the API endpoint, you need to make a request. There are four specific HTTP methods you can use:
- GET: This is used to retrieve specific data from the API.
- POST: This tells the API you want to add, or post, new data to the server.
- PUT: This is used to update (overwrite) existing resources on the API.
- DELETE: This is used to delete existing data from the server.
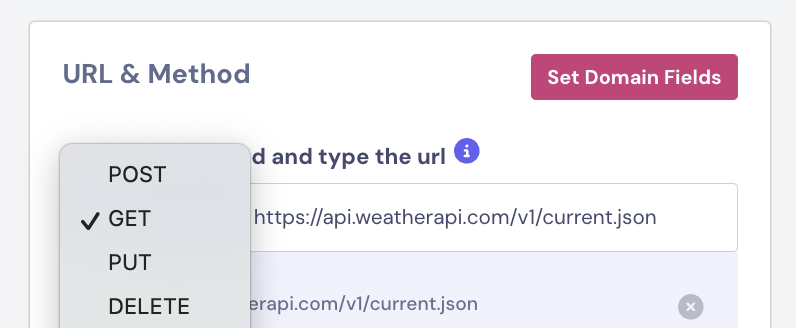
You'll notice there are more methods, however these are used for testing purposes and are for very advanced users
Parameters
Parameters define how an API request should be processed. They act like filters or modifiers, telling the API exactly what data you want or how to handle your request.
How these are set up, and which parameters you can use will depend on the API, as each API is set up differently
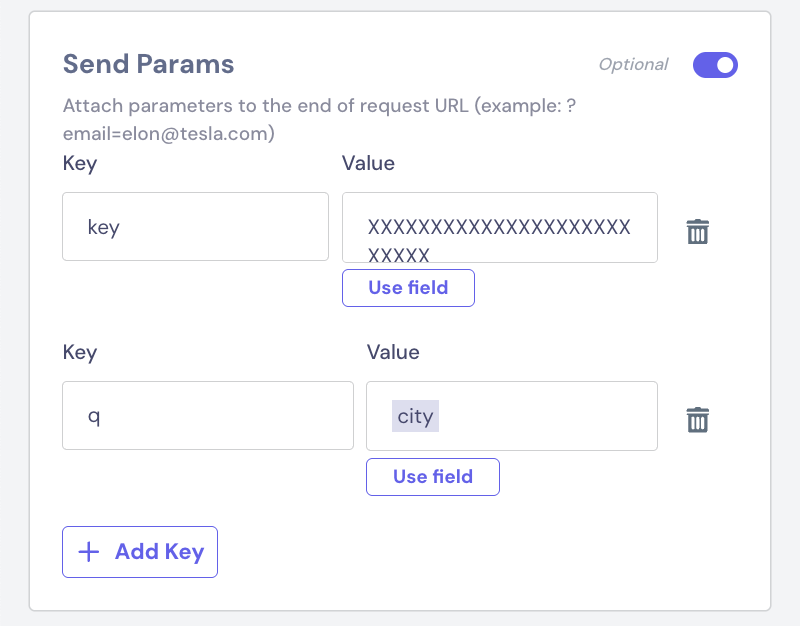
In our example the parameters are - key (our API key) and q with the value of the city where we want to check the weather
Request body
Some APIs will require us to send the data in JSON format, to do this we can use the request body
Imagine we collected the user name, email and phone number and we want to send all of that to our CRM, here's how we can do that:
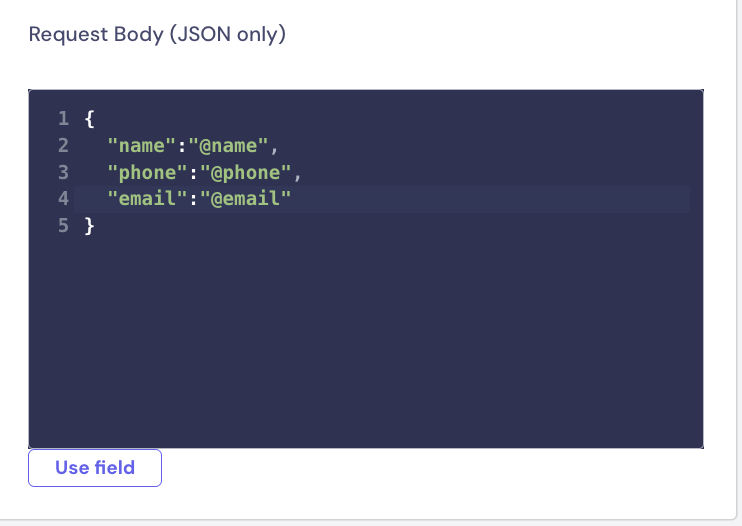
When adding variables to the webhook block they should be added like this: "@field", they will be sent in their original format, meaning if the variable is an integer even though we add the quoatation marks, it will still be sent as an integer
So if we have the variable @name it should be added in the webhook as: "@name"
Our weather example doesn't require us to send data in JSON format so we'll toggle this off
API calls
An API call is the process of making a request, the API retrieving the data you requested, and then getting a response from the API. The only thing you have to do is make the request using one of the above HTTP methods.
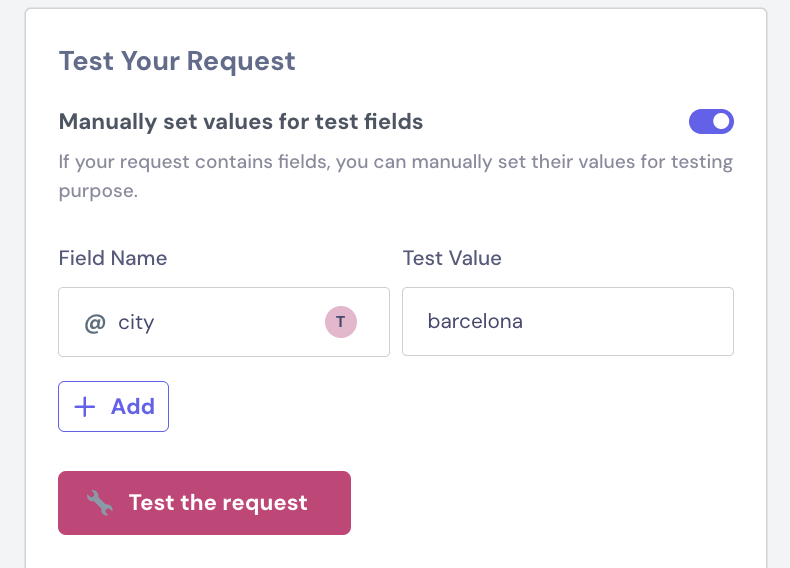
In Landbot we'll do this by clicking 'Test the request', if we're testing a request that has parameters, they will need to be manually added in this section for the test
For our weather example we'll add the @city variable to test
Status codes
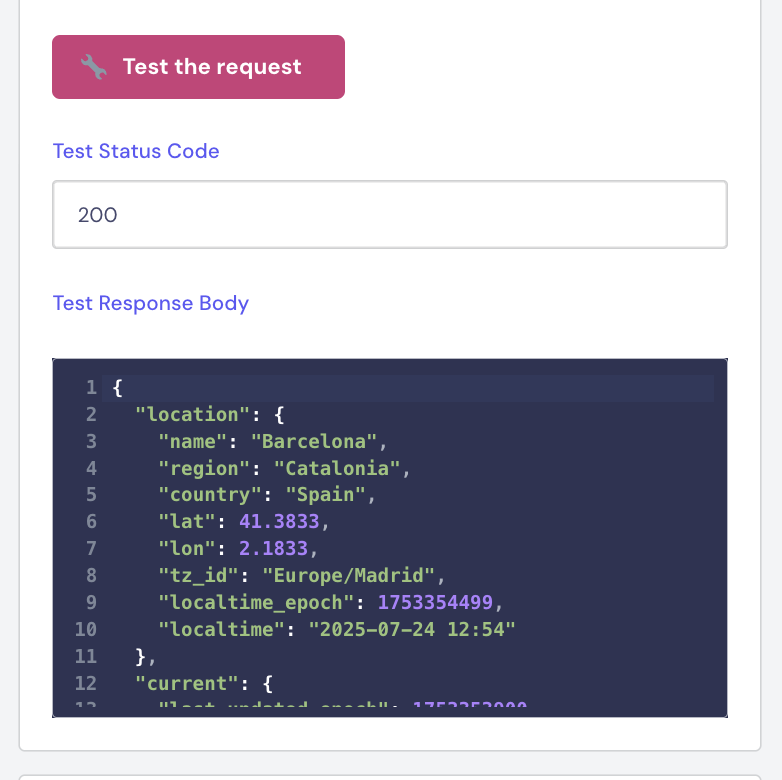
With every request you make, you'll receive a status code. This three-digit number tells you whether or not your request was successful. The first number in the code represents the category of the status. If the code starts with a 2, your request was successfully processed. If the code starts with a 4, something went wrong. Status codes allow you to understand the outcome of your request and figure out your next move based on the response.
Saving the API response
By default the webhook block saves the entire API response (you'll still need to add a variable to store it), unless we're testing the flow we rarely want to save the entire response
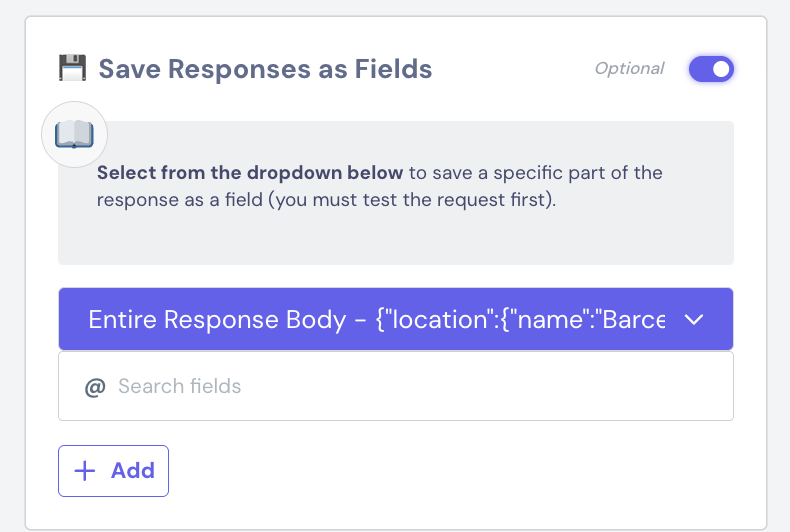
After we've tested the request we can click on the purple banner (we can only click after testing) and save the part that is useful for us
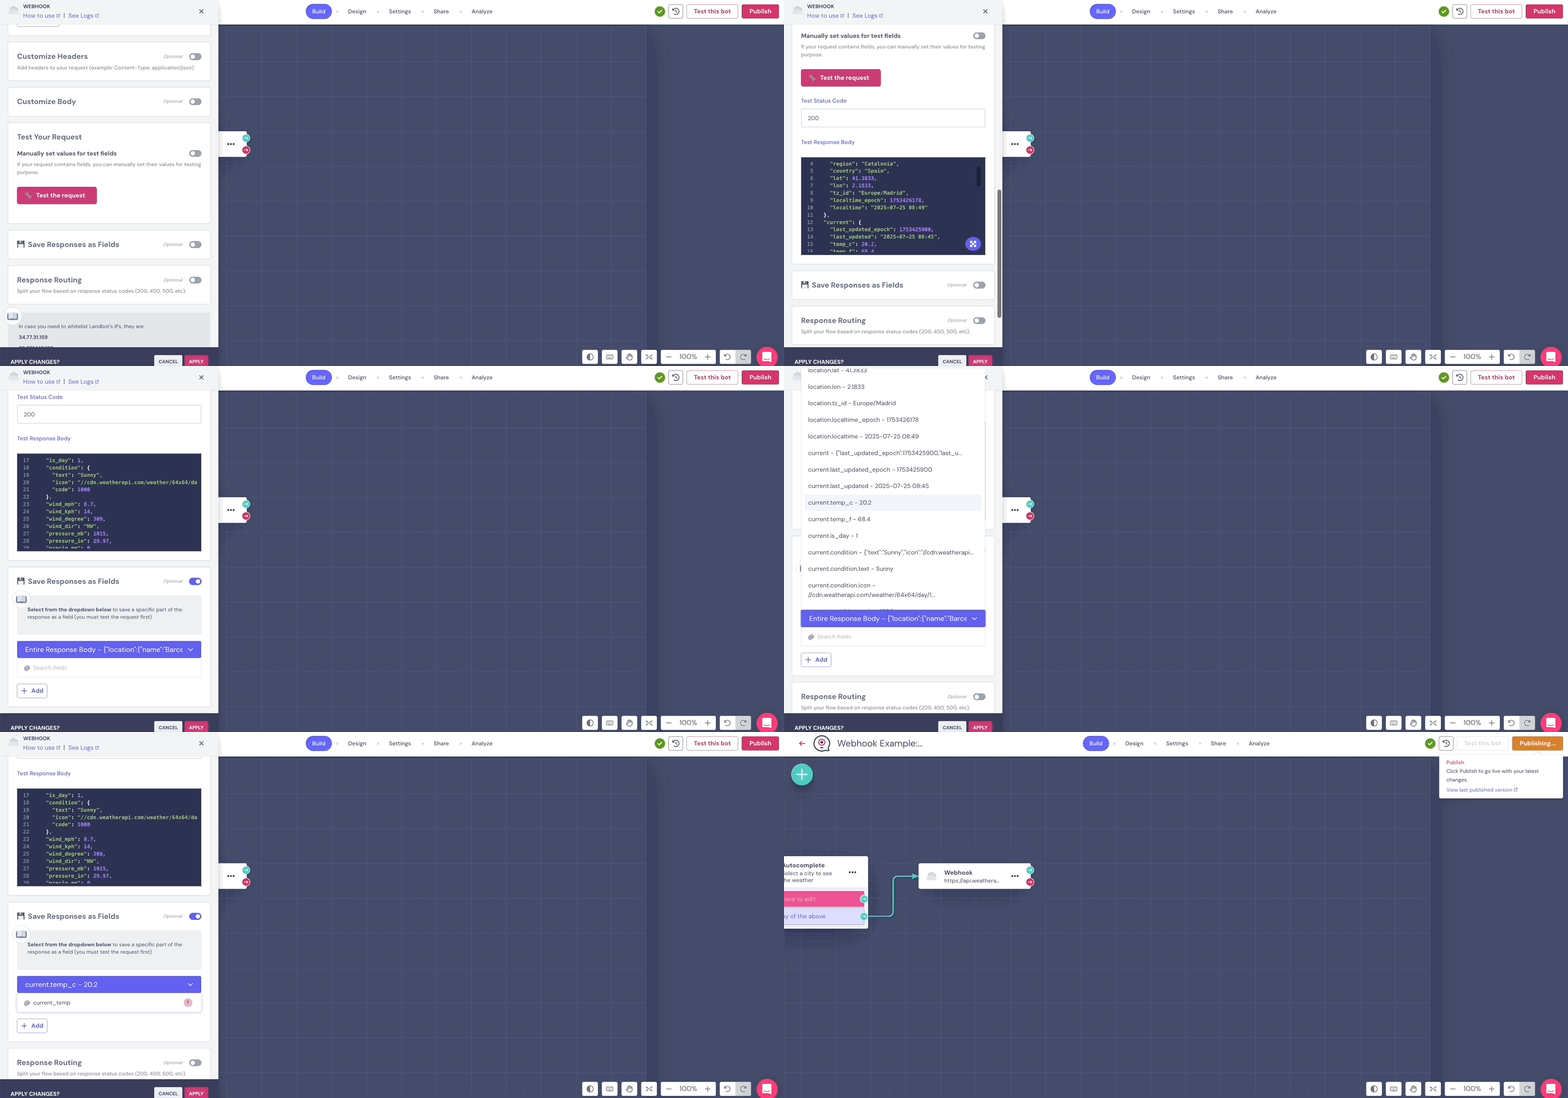
In our example I'll just save the current weather, we don't need to display any extra information
FAQS & Troubleshooting
Is this compatible with all channels?
What if the response takes longer than 60 seconds?
Why am I getting a 500 error?
How can I send files?
How do I add a listener?
How can I connect to chatgpt?
Why am I not getting a response from Make/Zapier?
How can I display the data from the webhook as buttons?
My bot flow is stopping at the webhook block
If that's not it, make sure the red output is also connected to the flow!
