Getting Started with Landbot
Introduction to Landbot 🌍
Creating & Setting Up Your Account 👥
How to create your Landbot account, set it up and invite teammates
Common reasons for not receiving account activation email
Trial period
Account Settings
Build Your First Bot 🛠️
Builder Interface Tour
Getting started - build a bot
Managing Data in Your Chatbot: A Guide to Using Fields
Languages and Translations in Landbot
Organize your flow with Bricks
Using Flow Logic in Landbot
How to Test Your Bot - Complete Guide 🧪
How to "debug" (troubleshoot) your bot's flow to spot possible errors (for non coders)
Starting Point
How to Import a Chatbot Flow Without JSON – Use "Build It For Me" Feature
Launch and Share Your Bot 🚀
Build a bot
Bot's Settings
Bot General Settings
Second Visit Settings
Custom System Messages
Hidden Fields (Get params / UTMs from url and use it as variables)
Landbot native SEO & Tracking tools
Typing Emulation (Message Delay)
Messages, Questions and Logic & Technical blocks
Messages
Media Block
Media block
How to display images with a variable URL source
How to embed a .gif file inside a message
Different ways to embed Videos in Landbot
Display video and hide button to continue until video has ended
Send a Message block - Simple Message
Goodbye block
Question blocks
Date Block
Scale Block
Buttons block
Ask for a Name block
Ask for an Email block
Ask a Question block
Question: Phone block
Forms block
How to set up Multiple Choice questions
Question: Address block
Question: Autocomplete block
Question: File block
Question: Number block
Question: Picture Choice block
Question: Rating block
Question: URL block
Question: Yes/No block
Logic & Technical blocks
Code Blocks
Dynamic Data
Dynamic Data (Arrays)
Get the array's index of the user selection and extract information from array
Formulas
How to Perform Basic Calculations
Get started with the Formulas block
Formulas Blocks Dashboard
Formulas - Regex
Formulas - Date
Formulas - String
Formulas - Logical
Formulas - Math
Formulas - Object
Formulas - Comparison
Formulas - Array
Persistent Menu
Trigger Automation
Webhook
How to Use the Webhook Block in Landbot: A Beginner's Guide
Webhook Block Dashboard
Webhook Block for Advanced Users
Landbot System Fields
Set a Field block
Any of the above Output
Global Keywords 🌍
Keyword Jump
Lead Scoring block
Jump To block
AB Test
Conditions block
Conditions block II (with Dates, Usage and Agents variables)
Close Chat block
How to ask a question based on a variable not being set (empty URL params)
Business Hours block
Custom Goals
Note block
Share & Embed
Redirect Users
How to open a new URL in another tab (window)
How to redirect visitors to a URL (web only)
How to add a Click-to-Call/Email/WhatsApp button
Redirect User Based on Language Input (DeepL)
Generate a URL that has variables from user answers
Popup on Exit Intent
Share
Customized Embed Actions
How to redirect user to another url in your site with Livechat open to continue conversation
How to Detect Visitors Browser
Customize and embed your WhatsApp Widget
Modifying Embed Size
Detect if bot was opened
Customized Behavior in Mobile Browsers
Load script and display bot on click button
Launch Bot On Exit Intent
Display Bot During Business Hours Only (Livechat & Popup)
Open / Close a Web bot (embedded)
Launching a bot depending on browser language
How to pass WordPress logged in user data to Landbot
Set the flow depending on the url path (for embedded landbots)
How to launch a Landbot by clicking a button
Open LiveChat bot as soon as page loads
Detect if a visitor is on Mobile/Tablet or Desktop
Embed
Embed your bot into your website and use a custom domain
Embed Landbot in an iframe
Landbot in Wix
Landbot in your web with Google Tag Manager
Landbot in Webflow
Embed in Sharetribe
Landbot in Shopify
Embedding Landbot in Carrd
Landbot in Wordpress
Landbot in Squarespace
Customizing the Proactive Message
Design section (web bots)
Verification & Security
Validate phone number with SMS verification (with Vonage Verify)
Cookie consent banner (full page / full page embed)
Add Captcha Verification (Non-Embedded Bots)
Bricks
How to disable a bot
Account Settings and Billing
Billing
Privacy and Security
Landbot's Privacy & Security Policies
Compliance with the GDPR - General Data Protection Regulation
Landbot's Abuse Policy - How to Report an Abusive Use of Landbot
Delete Customer Data in Flow
Teammates
Agent Status and Log out
Roles & Permissions for Teammates
Manage Landbot Teammates - Add and Customize Agents
Startup Discounts
NGOs and Educational Organizations Discount
AI in Landbot
Landbot AI Agent
AI Agents Overview
Connect AI Agents to Rule-Based Bots
How to Create an AI Agent to Detect User Intent
AI Agent Setup - Best Practices
Jump To in AI Agents
Tips to migrate from old AI Assistants to AI Agents
How to create custom Instructions for your Landbot AI Agent with AI (ChatGPT, Claude...)
AI Agent In Action - Live Implementation Example
Capture, generate and use data with AI Agents
How to write documents for the AI Agent Knowledge Base
Custom AI Integrations
Create a JSON format response from OpenAI in WhatsApp
Responses API
Connect OpenAI Assistant with Landbot
AI in WhatsApp
How to build a FAQ chatbot with GPT-3
GPT-4 in Landbot
OpenAI
Prompt Engineering for GPT-3
Build a Customer Service Bot with ChatGPT and Extract Information
Google Gemini in Landbot
Build a Chatbot with DeepSeek
How to Build a Hybrid AI Bot
Integrations with Landbot
Native Integrations
Airtable
Airtable integration block
Get data filtered from Airtable with a Brick- Shop example
20 different ways to GET and filter data from Airtable
How to add/update different field types in Airtable (POST, PATCH & PUT)
How to Create, Update, Retrieve and Delete records in Airtable (POST, PATCH, GET & DELETE)
Get more than 100 items from Airtable
Insert Multiple Records to Airtable with a Loop
How to Get an Airtable Token
Advanced filters formulas Airtable block
Airtable usecase: Create an event registration bot with limited availability
Update Multiple Records in Airtable Using a Loop
Reservation bot with Airtable
Calendly
Dialogflow
Dialogflow & Landbot course
Dialogflow & Landbot intro: What is NLP, Dialogflow and what can you do with it?
Dialogflow & Landbot lesson 1: Create your first agent and intent in Dialogflow
Dialogflow & Landbot lesson 2: Get the JSON Key
Dialogflow & Landbot lesson 3: Setting up of Dialogflow in Landbot
Dialogflow & Landbot lesson 4: Training phrases and responses for a FAQ
Dialogflow & Landbot lesson 5: Entities and Landbot variables
Dialogflow & Landbot lesson 6: Redirect user depending on Dialogflow response parameters (intent, entities and more)
Learn more about Dialogflow - Courses and communities
Integrations > Dialogflow Block
How to extract parameters from Dialogflow response with Formulas
Dialogflow Integration Dashboard
Dialogflow in Unsupported Languages (& Multilingual)
Dialogflow - How to get JSON Key
Google Sheets
Google Sheets Integration: Insert, Update and Retrieve data
How to use Google Sheets to create a simple verification system for returning visitors
How to Upload Document & store link
How to give unique Coupon Codes (with Google Spreadsheets)
Google Sheets Integration Dashboard
How to insert a new row with data and formulas in Google Sheets
How to use Google Spreadsheet as a Content Management System for your bot
Hubspot
MailChimp
Salesforce
Segment
SendGrid
Send an Email
Sendgrid Integration Dashboard
How to create a custom SendGrid email - (Custom "from" email)
Slack
Stripe
Zapier
How to Configure the Landbot and Zapier Integration Using the Zapier Block
Zapier Integration Dashboard
How to insert a row to Google Spreadsheet by Zapier
How to generate a document with PDFMonkey by Zapier
Send WhatsApp Templates from Zapier
How to send an email with Gmail by Zapier
Get Opt-ins (Contacts) from Facebook Leads using Zapier
How to extract data from an external source with Zapier and use it in Landbot
Zapier trigger
How to complete a digital signature flow by Zapier
Make a survey with Landbot and display the results in a Notion table using Zapier
Custom Integrations
ActiveCampaign
Google Calendar
Google Fonts
Google Maps
Embed Google Maps
Google Maps API Key for Address block
Extract Data With Google Maps Geocoding API
Calculate Distances With Google Maps API
Google Meet
IFTTT
Integrately
Intercom
Make
Connecting MySQL with Make.com (formerly Integromat)
Send WhatsApp Message Template from Make
Make Integration With Trigger Automation Block
How to send an email through Sendinblue by Make.com (formerly Integromat)
Get Opt-ins (Contacts) from Facebook Leads using Make
How to extract data from an external source with Make.com and use it in Landbot
OCR
Pabbly
Paragon
Pipedream
PDF Monkey
Store Locator Widgets
Xano
Zendesk
Send an Email with Brevo
WhatsApp Channel
Getting started!
WhatsApp Testing
Build a WhatsApp Bot - Best Practices and User guide
Build a WhatsApp Bot - Best Practices for Developers
Types of Content and Media you can use in WhatsApp 🖼
1. WhatsApp Article Directory
WhatsApp Integration & Pricing FAQ
Adding & Managing your WhatsApp Channel
Facebook Business Verification - Best Practices 🇬🇧
WhatsApp Number Deletion (WA Channel management)
Adding a WhatsApp number to your account
WhatsApp’s Messaging Policy: New Accepted Industry verticals
Meta processes guide: FBM verification, Official Business Account (OBA) requests, Appeals
Additional Number integration: Limitations and Requirements (Number integration)
Existing WhatsApp Number Migration
Key Insights for Migrating to WhatsApp Business API Cloud
How to's, Compatibility & Workarounds
WhatsApp bots - Feature Compatibility Guide
WhatsApp - How to direct a user through a different bot flow on their second visit
WhatsApp - Get user out of error message loop
How to do Meta ads conversion tracking in WhatsApp bot using the Conversion API
Getting Subscribers: Opt-in, Contacts
How to get Opt-ins (Contacts) for your WhatsApp 🚀
WhatsApp Quality - Best Practices
Opt-In block for WhatsApp 🚀
Opt-in Check Block
Contact Subscribe Block: Manage Opt-ins and Audiences
New Contacts: Import, Segment, and Organize Easily
WhatsApp Channel Settings
Parent Bot/Linked Bot - Add a main bot to your WhatsApp number
WhatsApp Channel Panel (Settings)
Growth Tools for WhatsApp
Messaging and contacting your users
WhatsApp Campaigns 💌
WhatsApp's Message Templates
Audience block
WhatsApp Marketing Playbook: Best Practices for Leadgen
WhatsApp Error Logs: Troubleshooting guide
Audiences
WhatsApp for Devs
How to calculate the number of days between two selected dates (WhatsApp)
Creating a Loop in WhatsApp
Recognise the users input when sending a Message Template with buttons
Trigger Event if User Abandons Chat
Calculate Distances in WhatsApp
Send Automated Message Templates based on Dates
reply from Slack: How to create an integration to allow agents reply WhatsApp users from Slack (with Node JS)
Set Up a Delay Timer in Bot
Notify Teammates of Chat via WhatsApp
Native blocks for WhatsApp
Other Channels - Messenger and APIChat
Facebook Messenger
The Facebook Messenger Ultimate Guide
Types of content you can use in Messenger bots 🖼
How to Preview a Messenger bot
API Chat (for Developers)
Human Takeover & Inbox
Metrics and Data Management
Metrics Section
How to export the data from your bots
Export data: How to open a CSV file
Bot's Analyze Section
For Developers & Designers
JavaScript and CSS
CSS and Design Customizations
Design Customizations
Advanced (Custom CSS & Custom JS)
Components CSS Library Index
Background Class CSS
Identify Blocks CSS
Buttons Class CSS
Header Class CSS
Media Class CSS
Message Bubble Class CSS
Miscellaneous Classes CSS
CSS Customization Examples: "Back to School" Theme
Get started guide for CSS Design in Landbot
CSS Customization Examples: Call To Action: WhatsApp
CSS Examples: Lead Gen
CSS Customization Examples: "Translucid"
CSS Customization Examples: "Minimalist" Theme
Dynamic Data CSS
Form Block CSS
CSS for Typewriter Effect
CSS Customization Examples: Carrd Embed Beginner
Dynamically Change a Bot's Background
Proactive Message Customizations with Javascript and CSS
Landbot v3 - Web CSS - RTL
CSS Customization Examples: Video Bubble
Dynamically Change Any Style
CSS Customization Examples: CV Template
Change Landbot custom CSS dynamically from parent page onload
Widget/Bubble Customizations with Javascript and CSS
JavaScript
How to change Avatar dynamically
Javascript in WhatsApp
Landbot JavaScript Integration
Different ways to format numbers with JS
How to display an HTML Table and a List in Landbot v3 web
Trigger a Global Keyword with JS (web v3)
Create Dynamic Shopping Cart with JS and CSS
Add a Chart (with Chart JS library) in your Landbot
Different ways to format numbers with JS (WhatsApp)
Pop up modal to embed third party elements
Landbot API
Send WhatsApp Messages with Landbot API
How to "send" a user to a specific point in the flow with Javascript and with the API
APIs
Get Opt-ins (Contacts) using Landbot API
MessageHooks - Landbot Webhooks
Resume flow based on external process with Landbot API (Request, Set, Go)
Tracking
Google Analytics - Track Events (Not embedded)
Google Analytics - Track Events (Embedded)
Meta Pixel - Track Events (only Embedded)
How Track Google Analytics Events in Landbot with Google Tag Manager (GTM)
Google Adwords - How to track Google Adwords in Landbot
Set a timer to get the time spent during the flow
Workarounds and How To's
Workflows
How to build an event registration Landbot (to be used in one screen by many attendees) (web only)
How to let user select a time of booking (with a minimum 45 minutes notice)
Send Files Hosted in Landbot to Your Google Drive with Make
Two-Step Email Verification
Fixing Web Bot Loading Issues for iOS Devices in Meta Campaigns with Disclaimers
Progress Bar Workaround
How to Add User Verification to Your Chatbot
How to set up questions with a countdown
HTML Template for Emails
Creating a Simple Cart in WhatsApp
Creating Masks for User Input (2 examples)
More Topics
Table of Contents
- All Categories
- Getting Started with Landbot
- Build Your First Bot 🛠️
- How to Test Your Bot - Complete Guide 🧪
How to Test Your Bot - Complete Guide 🧪
 Updated
by Dilyara
Testing is a crucial part of building any chatbot 🏗️ Whether you're creating a simple lead capture flow or a complex automation with integrations, you'll want to ensure everything runs smoothly before your users interact with it!
This guide walks you through how to test your Landbot on the Web, WhatsApp, Facebook Messenger, and API Channel.
🌐 Testing a Web Bot
There are two main ways to test your Web bot during the building process:
1. Preview Mode: “Test this bot” Button
Landbot’s built-in Preview lets you instantly test your bot without leaving the Builder interface.
In the top-right corner of the bot builder, click “Test this bot" to open a draft preview of your bot in a modal window.
Any updates to the flow will reflect here once the changes are saved in the draft ✅

Ideal for quickly testing changes during development without publishing them and affecting live users 🧪
It's also recommended if you don't want to generate real conversations or impact analytics.
2. Share the Bot via URL (Live Bot)
Once your bot is structurally ready, test it in a real web environment using the bot's public URL. To find the link, go to the Share > Share with a link section:
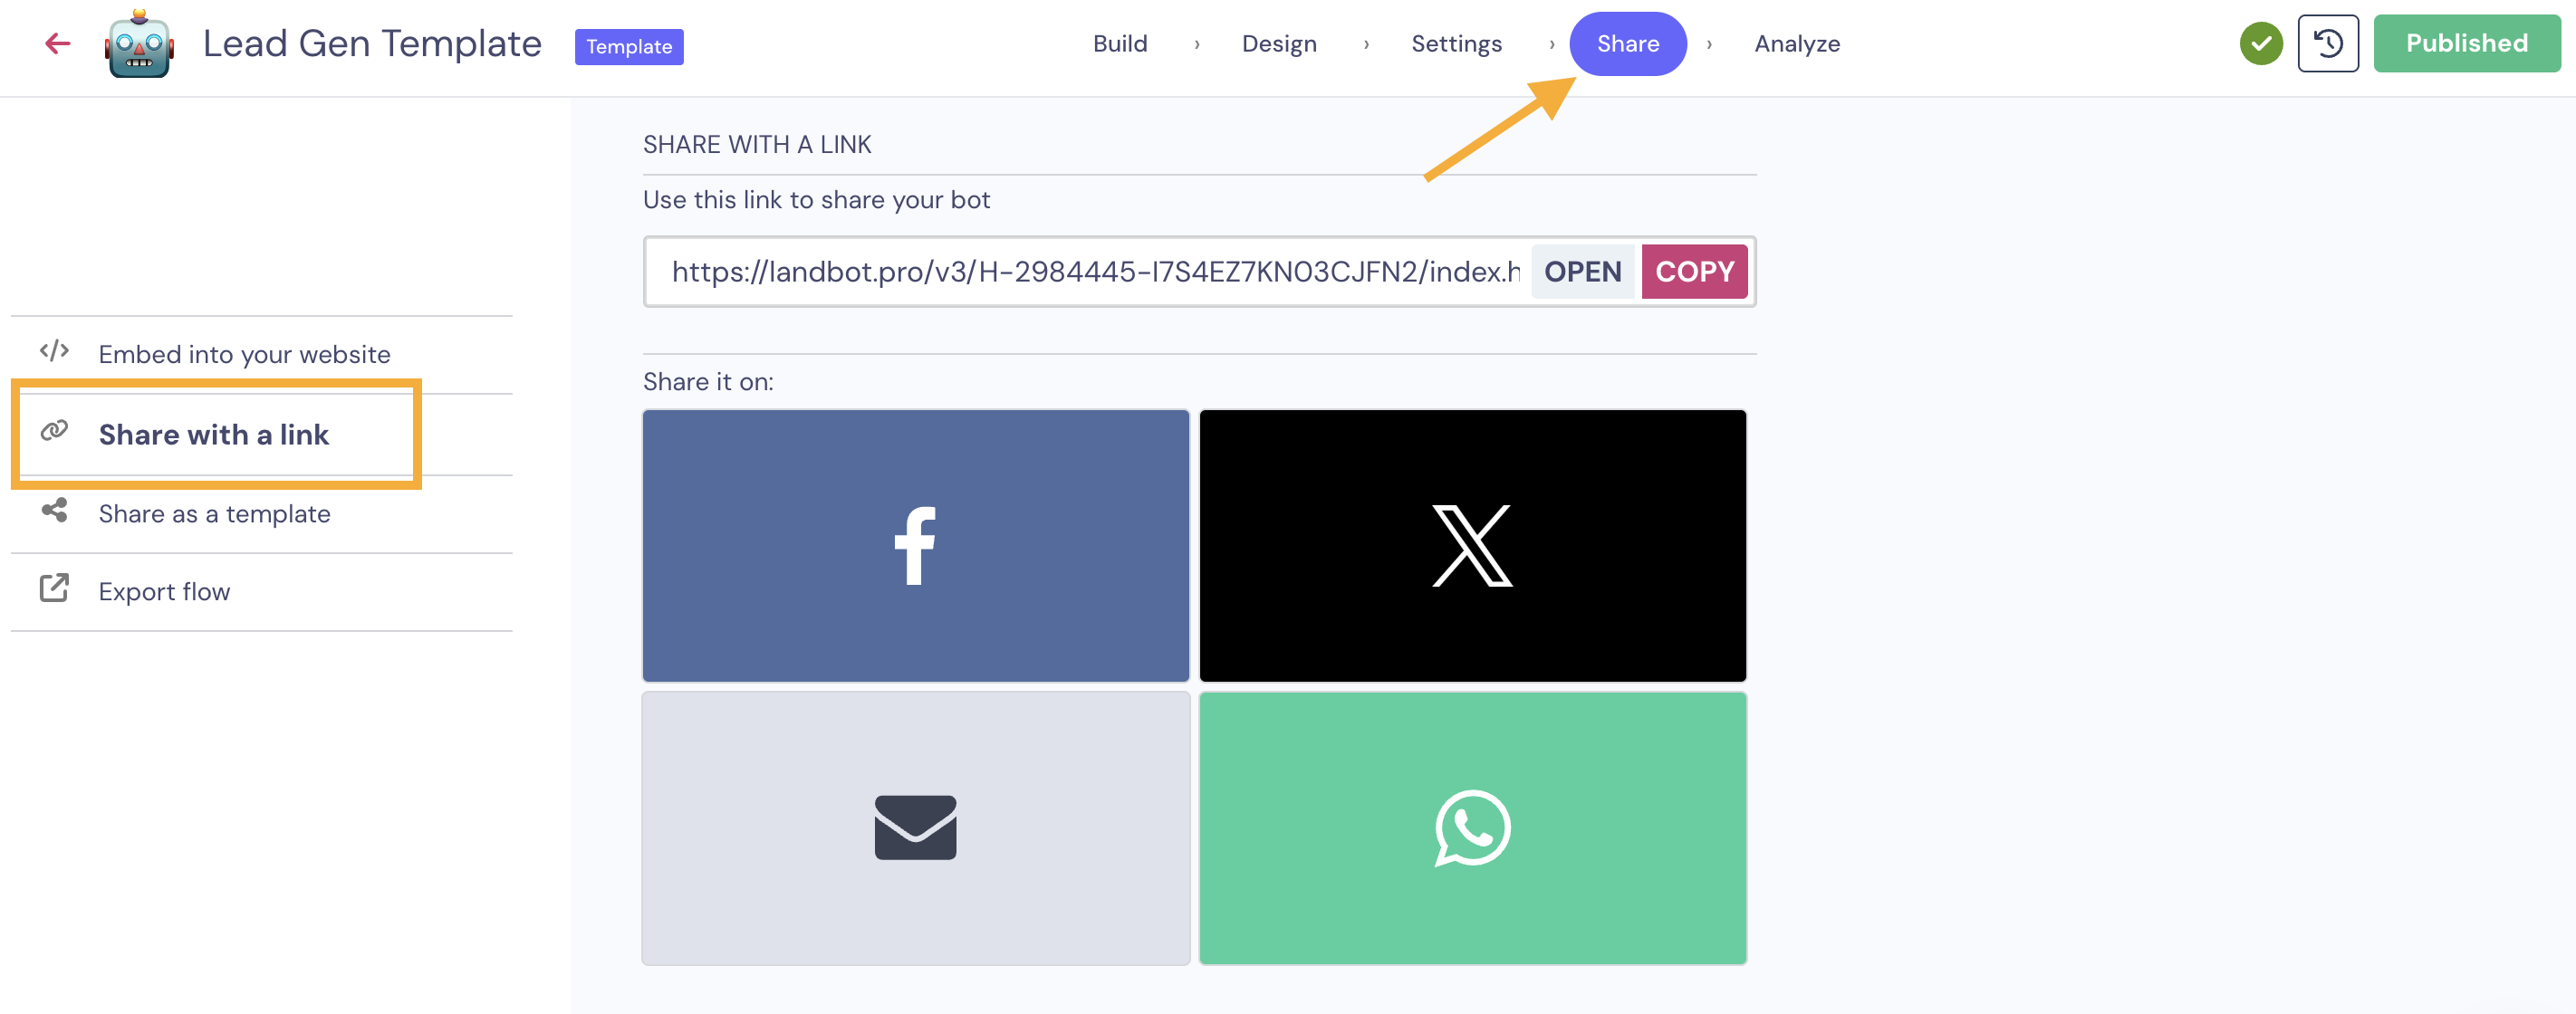
This method is best when you’re ready to test real-world behaviour, check integrations, or share the bot with teammates, clients, or stakeholders.
😉 Remember to publish the changes so they are reflected in the live version:

This is the live bot that end users would see, and it's helpful for testing how the bot behaves in its final environment - whether that's a standalone page or embedded in your website.
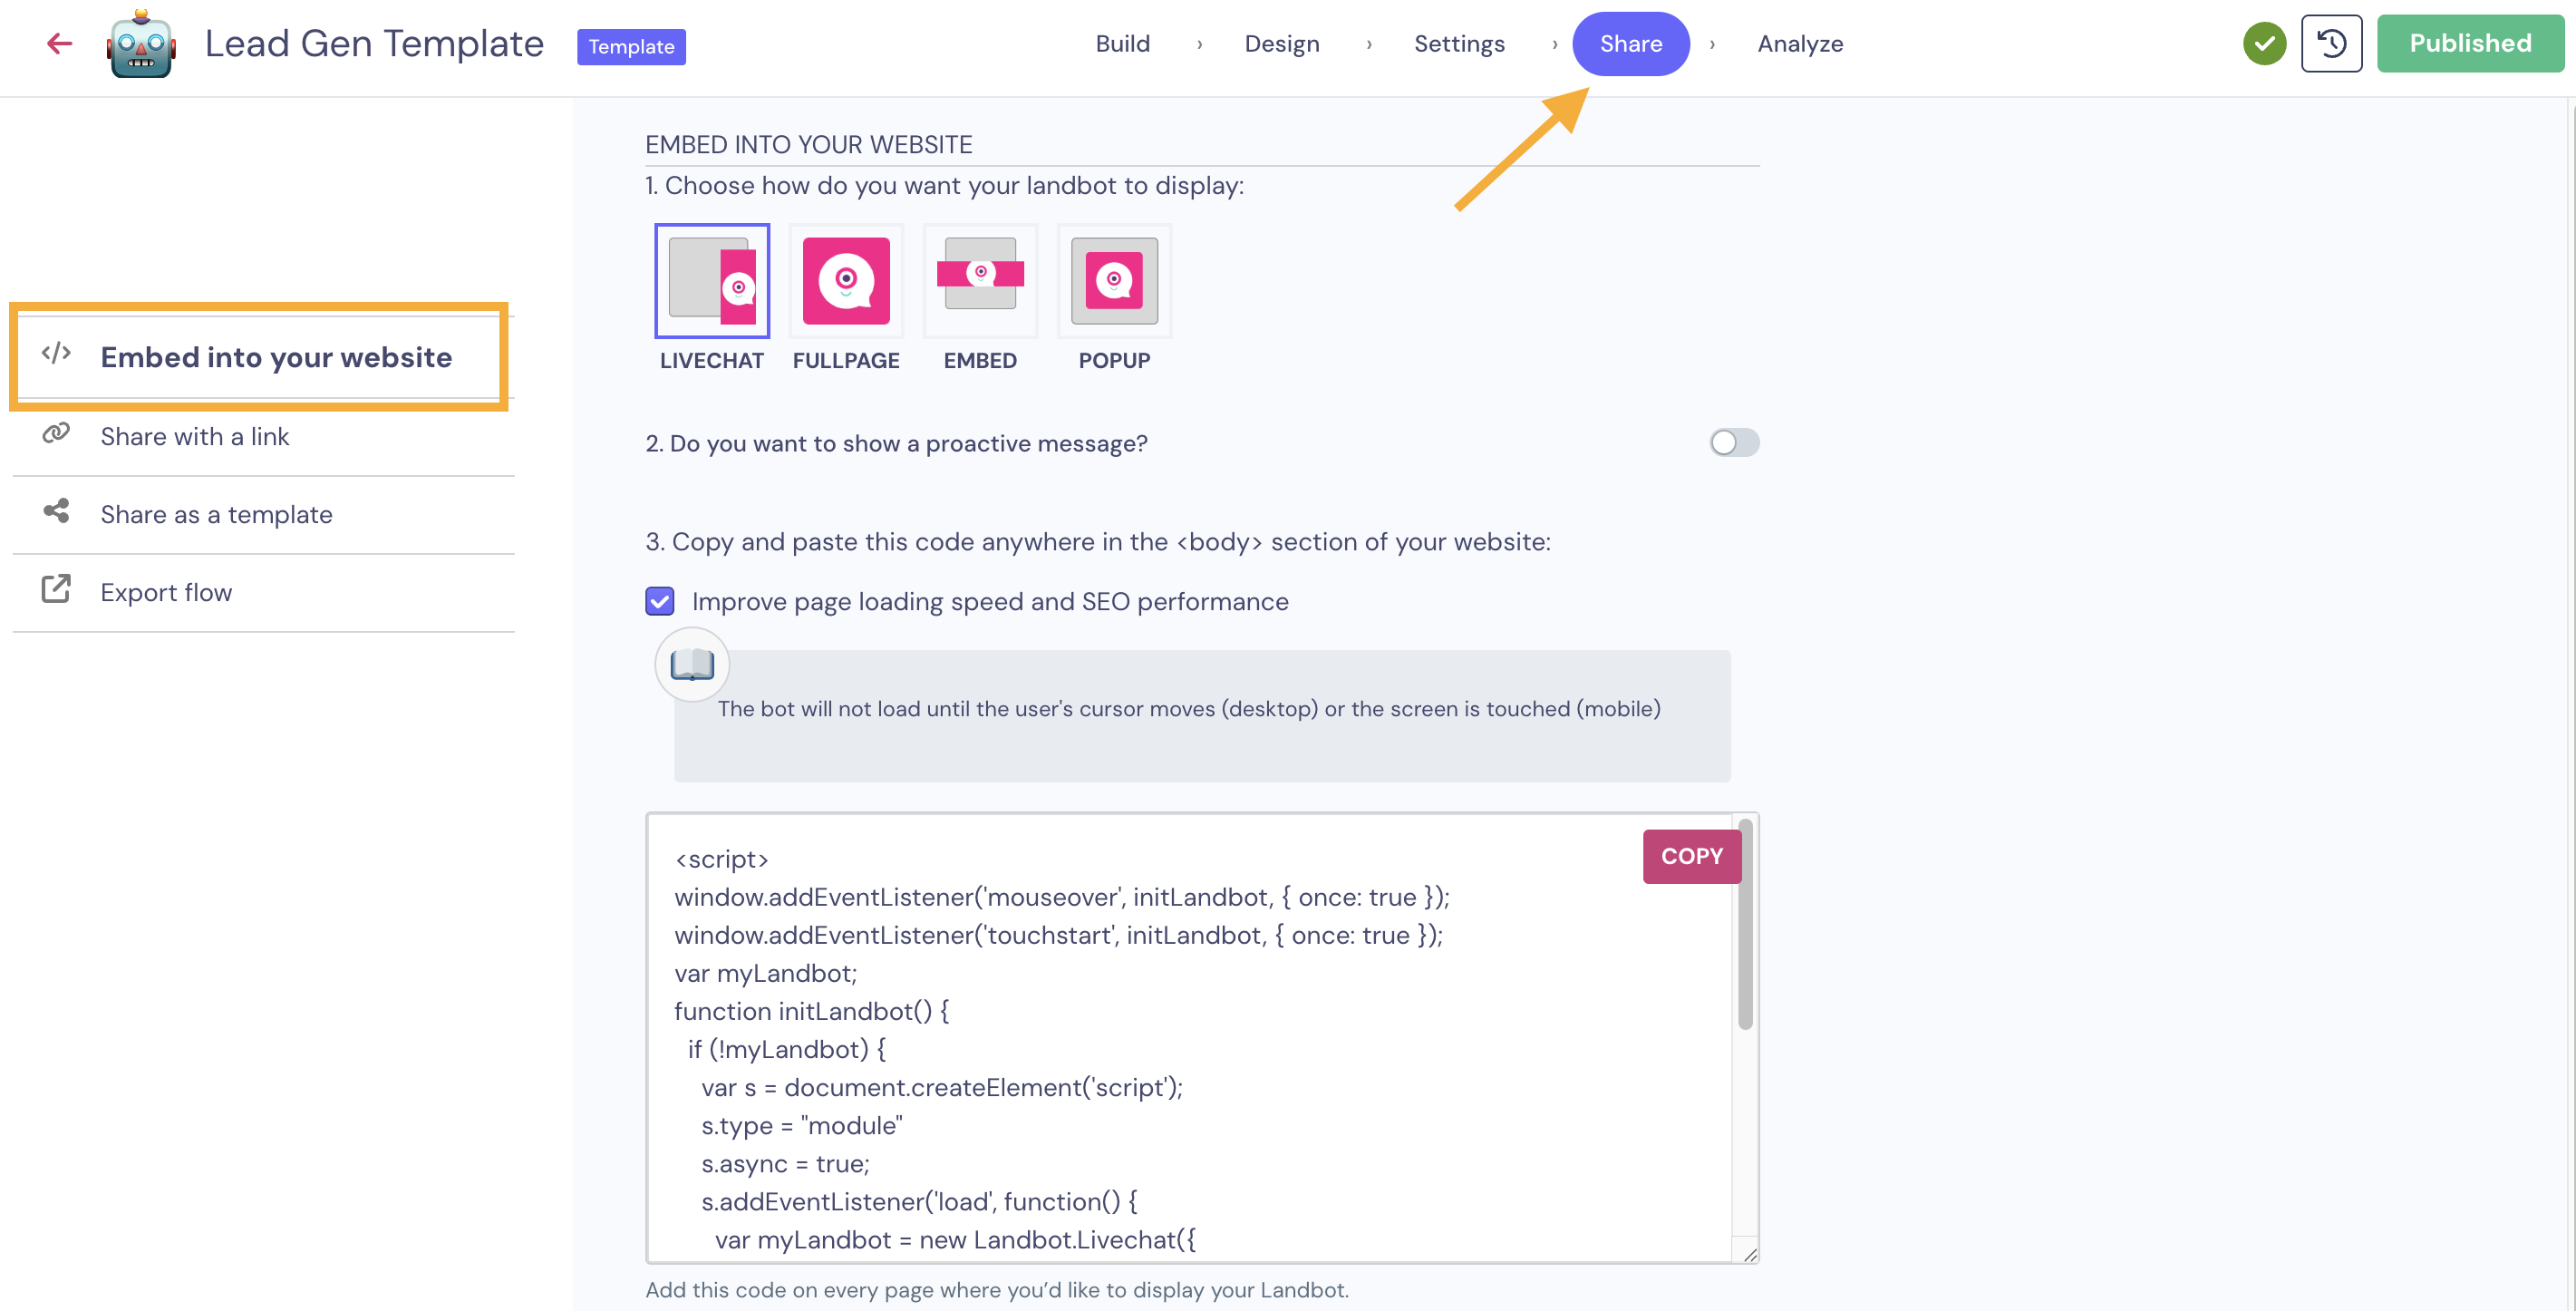
You can find the embed code in the Share > Embed into your website section:
✨ Testing an AI Web Agent
If you're building an AI web agent, the testing process is very similar to testing a traditional rule-based web bot.
There are two primary ways to test your AI Web Agent:
1. Test Button
While editing your AI agent, use the Test button located at the top-right corner of the Builder to interact with the assistant in a controlled environment.
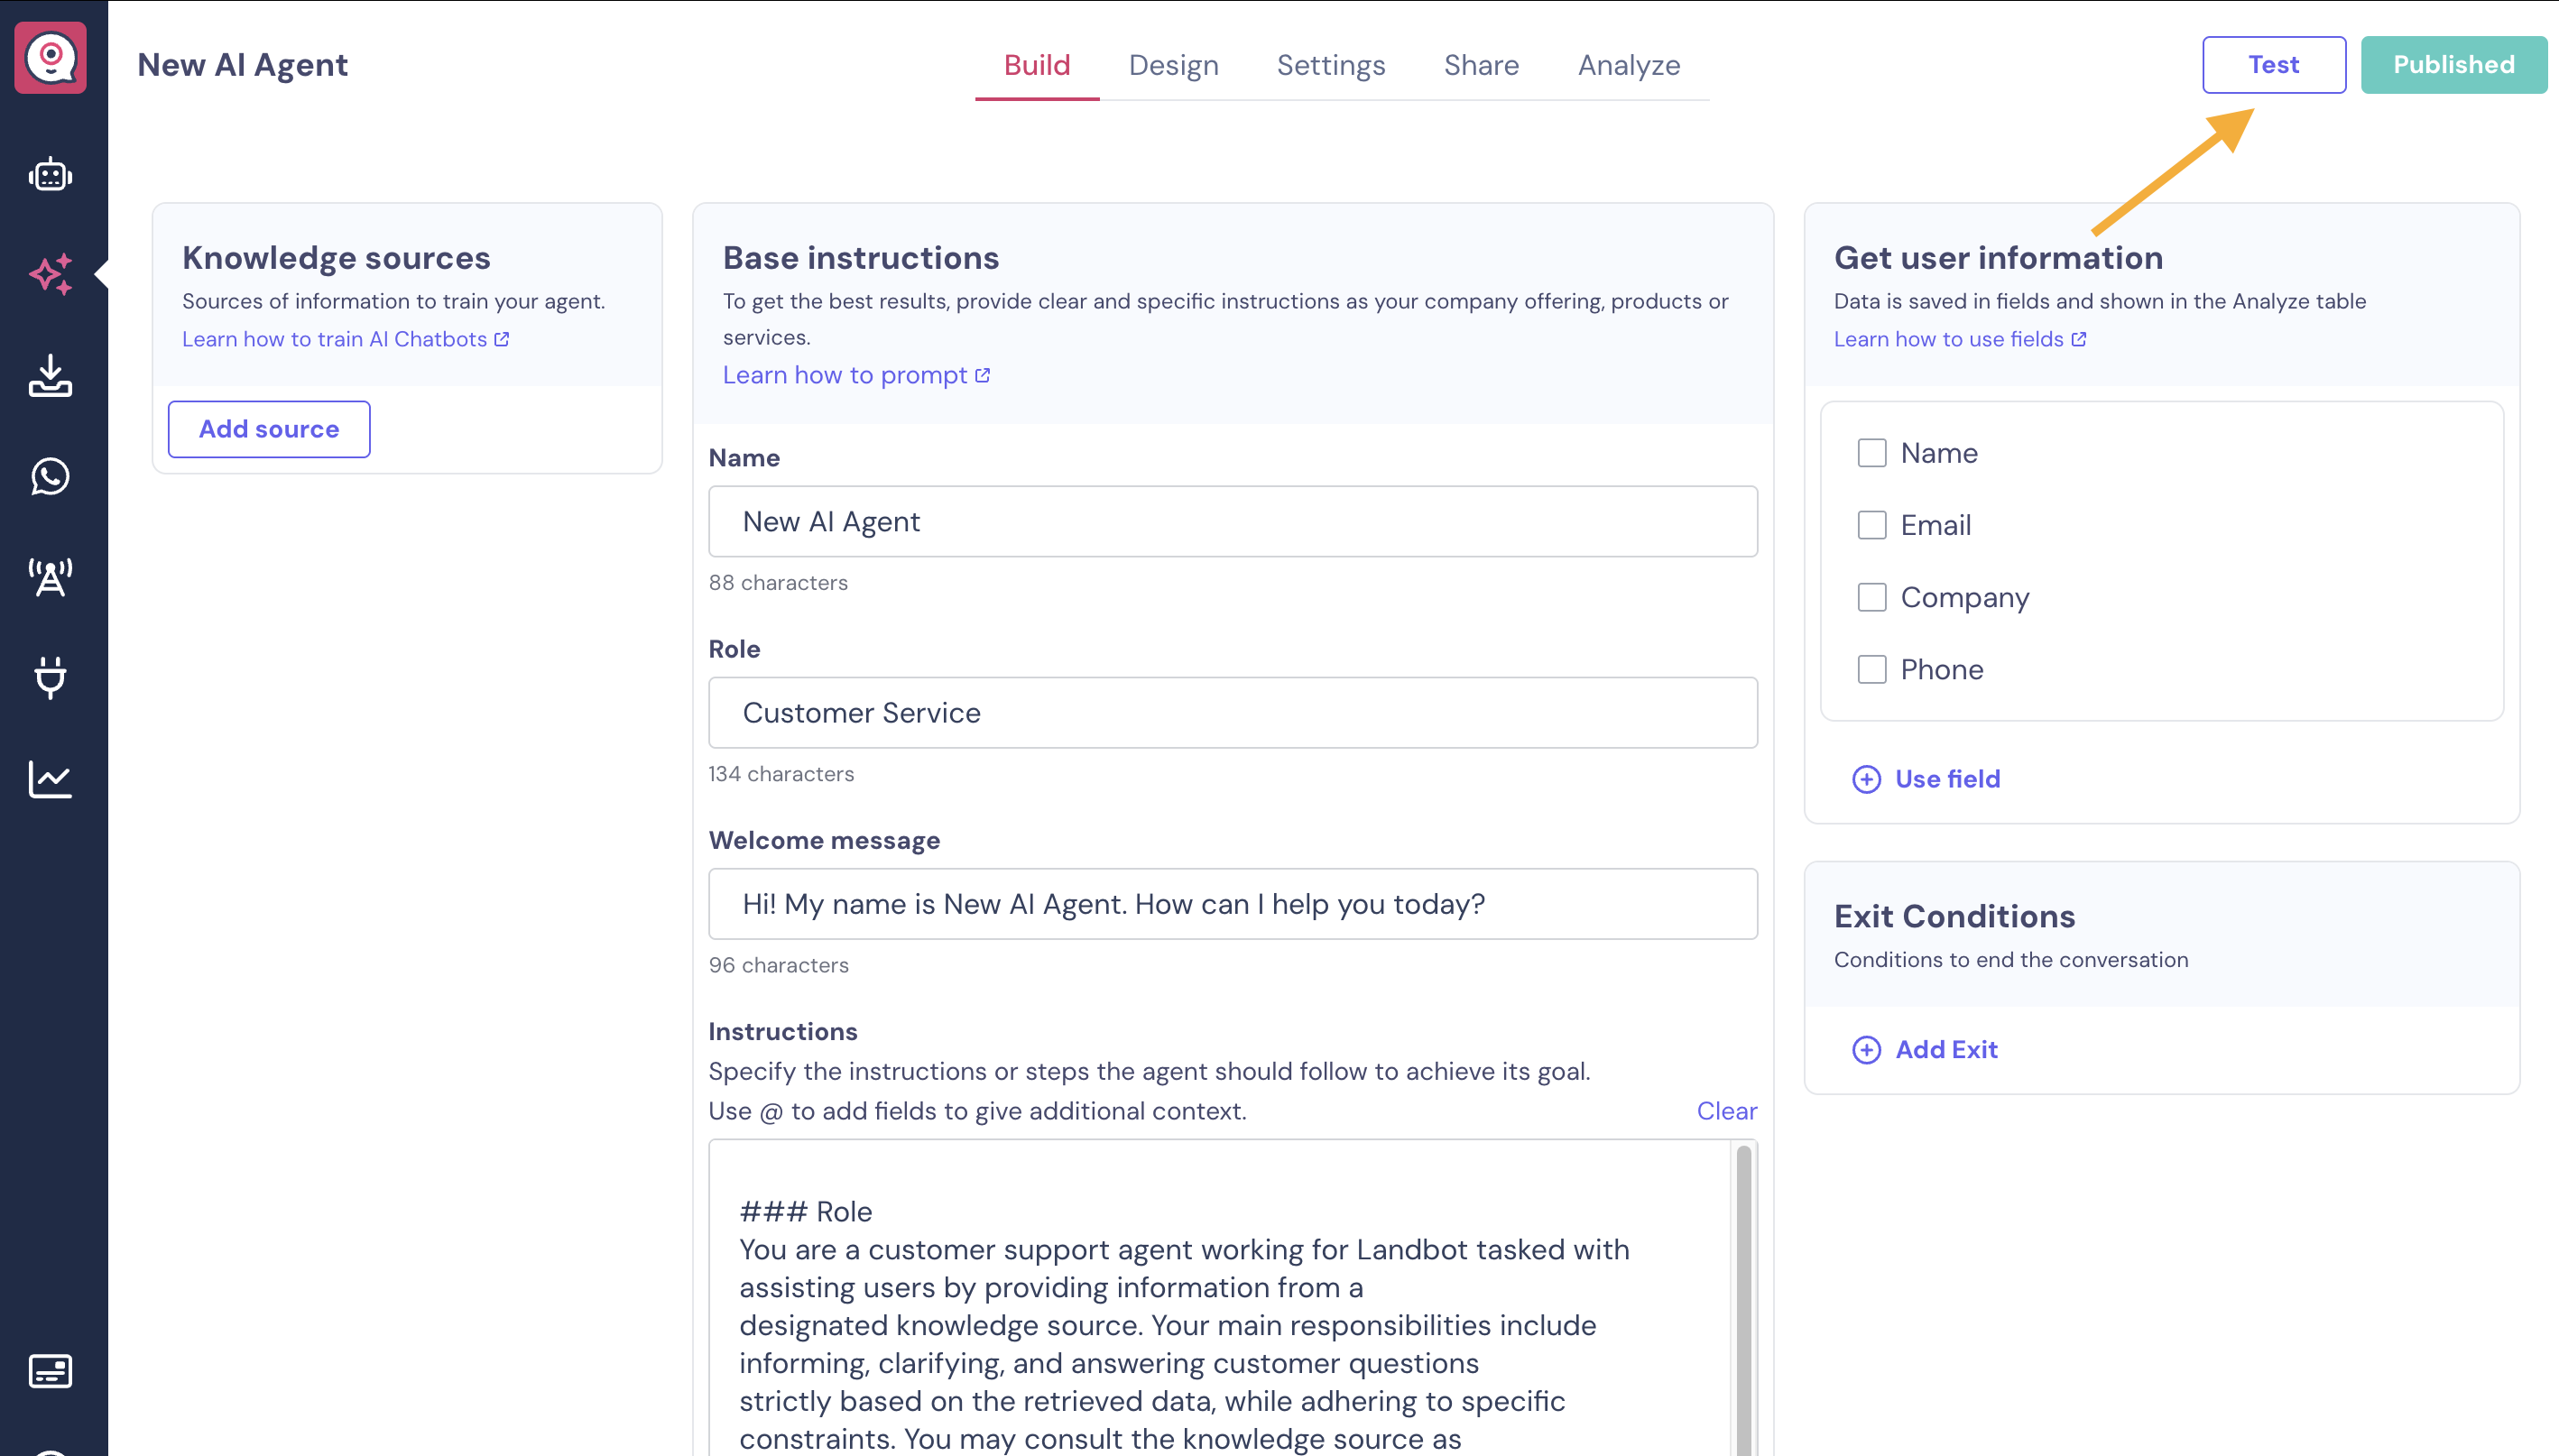
How it works:
- Click Test to launch a preview of the AI agent.
- Ask questions, trigger fallback logic, and observe how it handles intents.
- Validate whether the assistant understands user prompts and responds as expected.
✅ Best for: Real-time testing of AI behavior, context memory, fallback handling, and variable extraction.
Pro Tip: During testing, try intentionally vague or complex prompts to evaluate the agent’s ability to clarify and stay on task.
2. Share via URL or Embed
Once your AI agent is behaving correctly in Test mode, try it in a real-world environment using one of the two sharing methods:
🔗 Share URL
- Navigate to the Share tab.
- Copy the public link and open it in a browser.
🧩 Embed the Agent
- From the same Share tab, grab the embed code to integrate the agent into your website.
- Use this to test how the assistant feels in context—e.g., on a landing page or support section.
✅ Best for: Testing performance in real user environments, across devices and screen sizes.
Pro Tip: Use incognito mode or a different browser to simulate a new user session and verify how the AI agent handles first-time interactions.
💬 Testing a WhatsApp Bot
1. Using the “Test this bot” Button (No Integration Required)
With the WhatsApp Testing feature, you can test your bot without needing to connect your own phone number.
In the Builder section of your WhatsApp chatbot, you’ll see a "Test this bot" button in the top-right corner: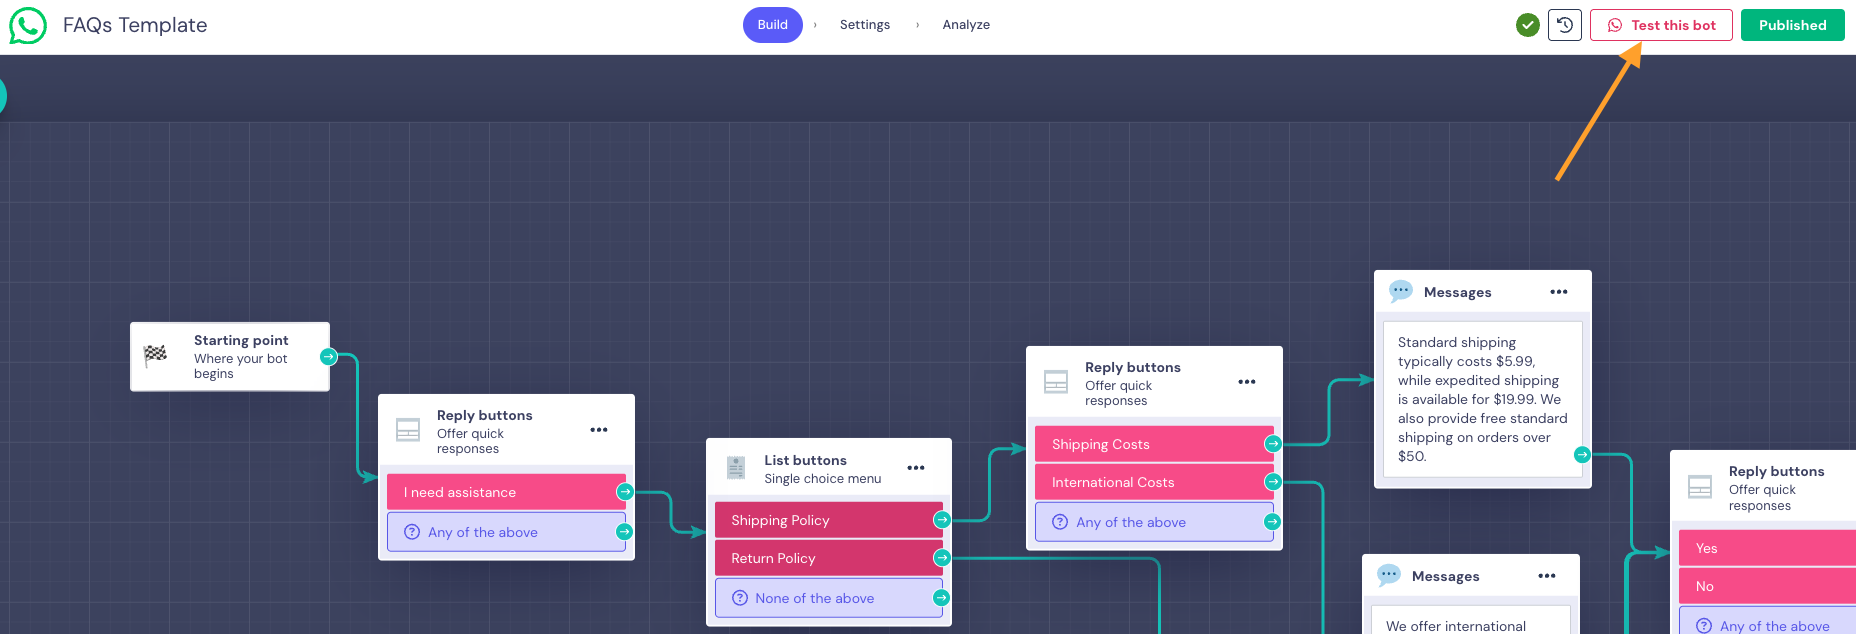
- Click on "Test this bot".
- You’ll be prompted to enter the phone number where you'd like to test the bot.
- After entering your number, you’ll receive a message from Landbot’s test number on WhatsApp - just open the app to start interacting with your bot.
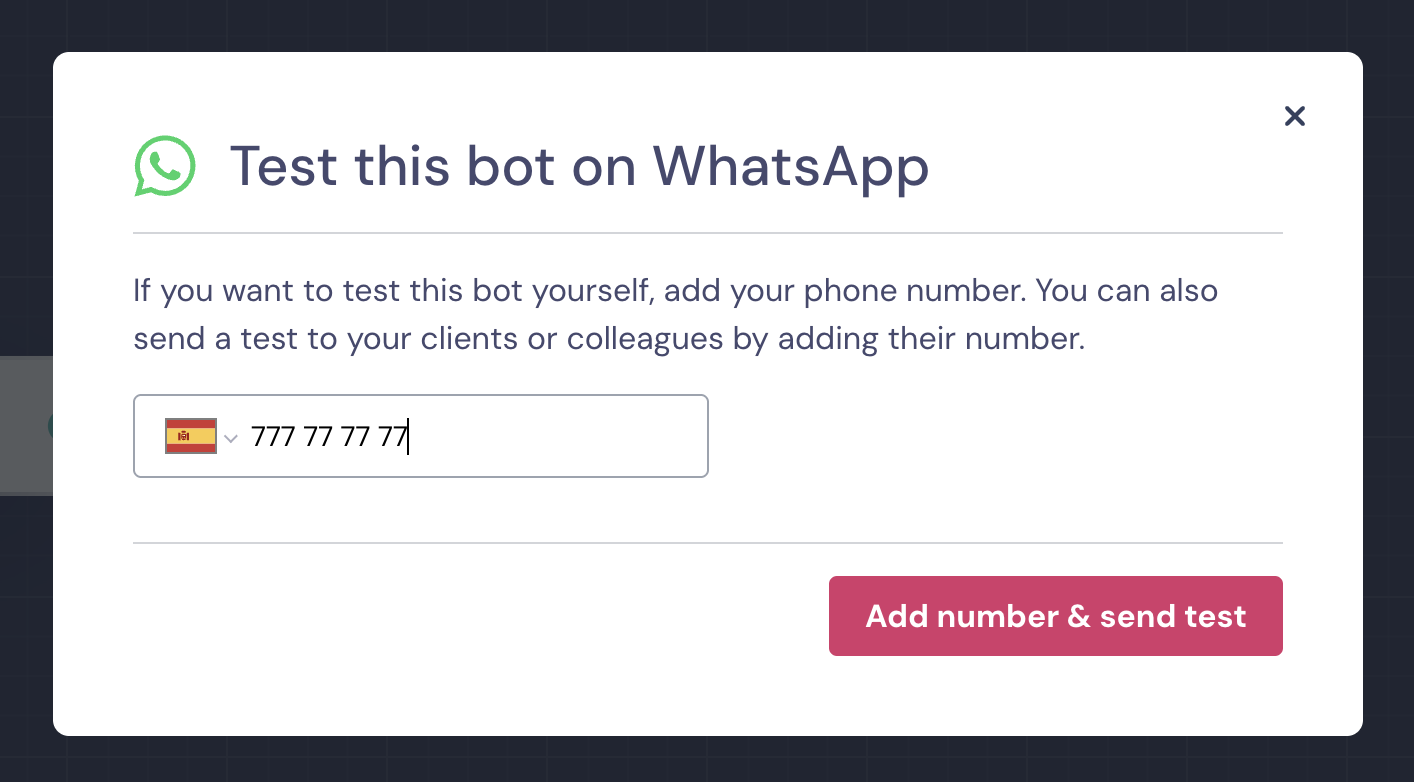
✅ Ideal for quickly previewing your bot during setup.
2. Using Your Own Phone Number (Full Integration via Meta Cloud API)
Alternatively, you can test your WhatsApp bot by integrating your own phone number! This requires completing the setup process through the Meta Cloud API.
During the Trial period, you’ll have access to up to 100 conversations to test your WhatsApp integration. This gives you the chance to experience how your users will interact with your bot in a real-world scenario.
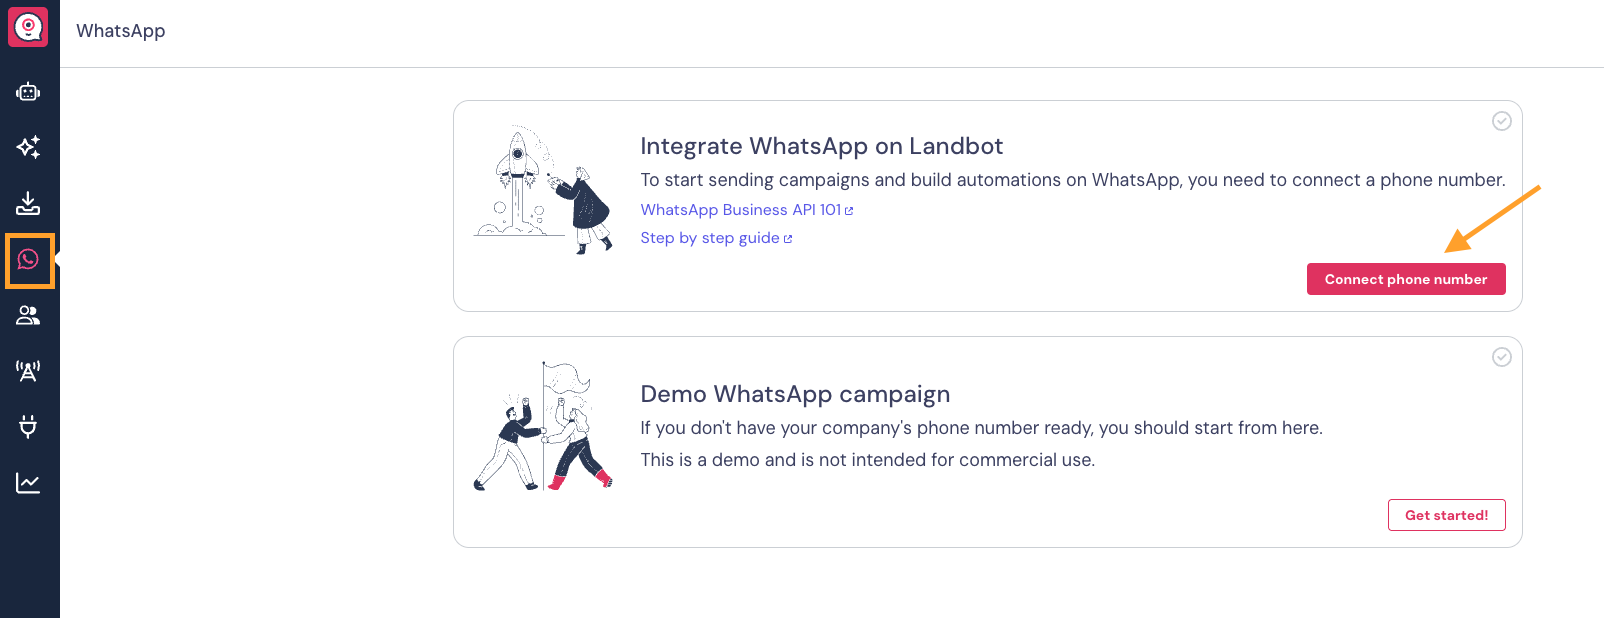
Once your number is integrated, any messages sent to it will be automatically handled by the connected bot — just like in a live production environment.
✅ Best option for end-to-end testing with your own audience.
✨ Testing an AI WhatsApp Agent
- You can easily test your AI WhatsApp Agent without needing to integrate your own phone number.
In the AI Agent configuration page, click the “Test this bot” button located in the top-right corner.

You’ll be prompted to enter the phone number where you’d like to receive the test message:
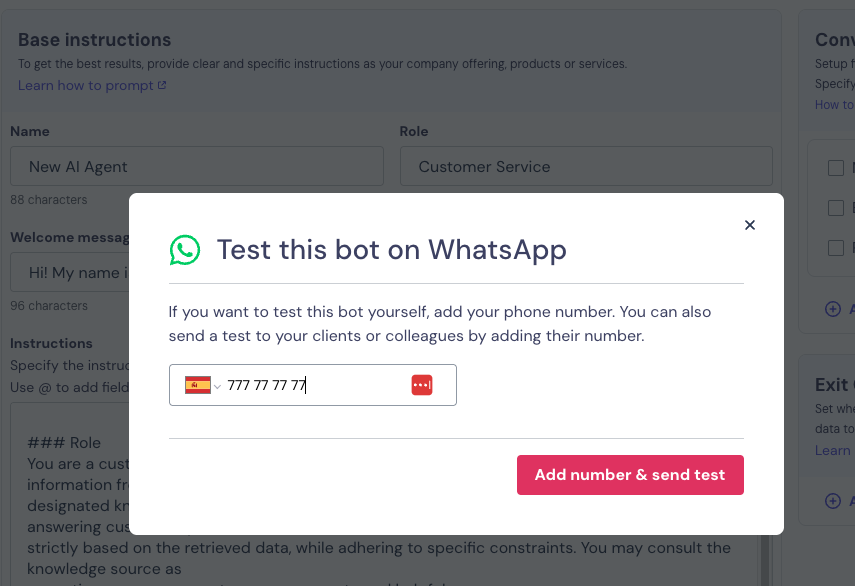
Once submitted, you’ll receive a WhatsApp message from Landbot’s testing number, allowing you to interact with the AI Agent directly and see how it responds in real time.
- In case you have already integrated your own WhatsApp number, you won't see the "Test this bot" button.
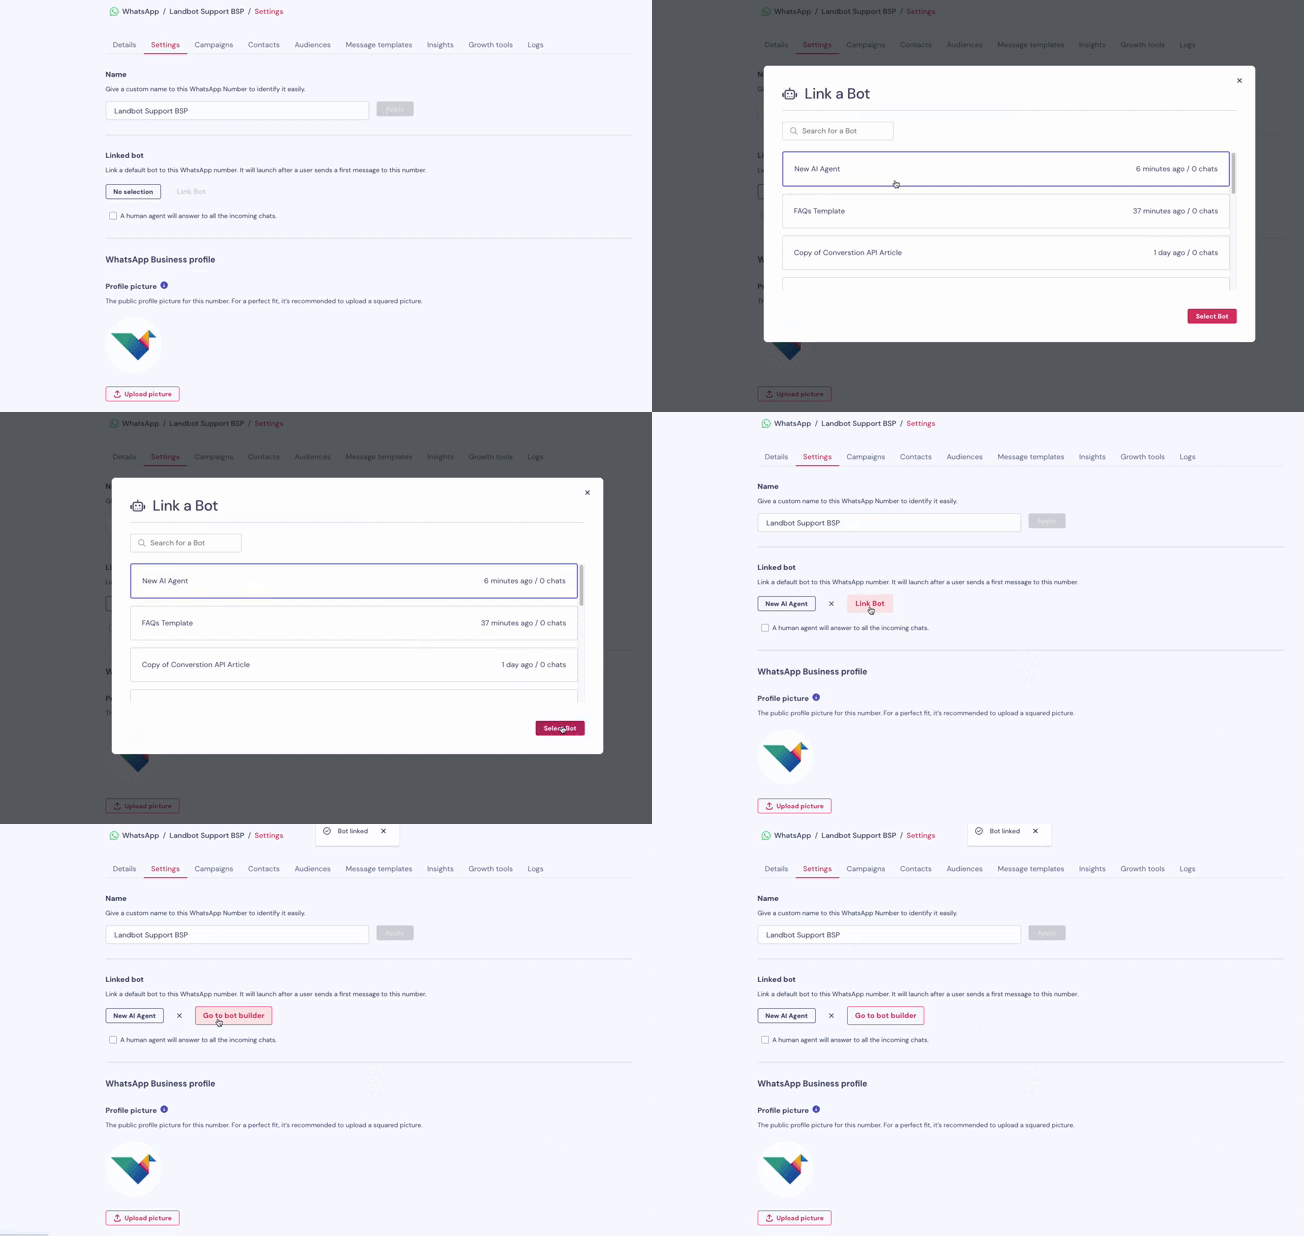
To test your AI Agent, you will need to go to the Settings section of your WhatsApp Channel, and link the bot to the number:
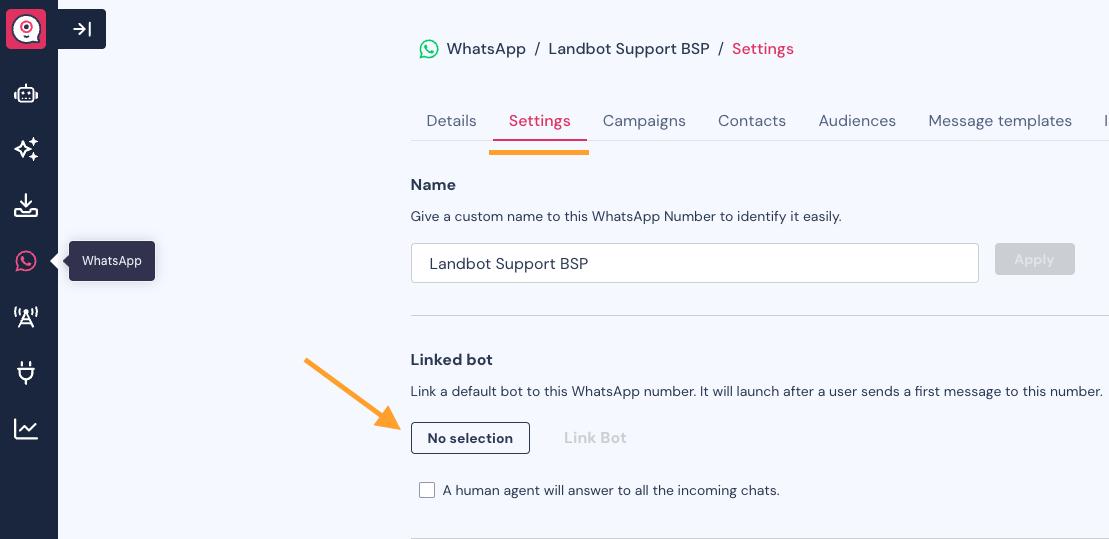
Just choose your AI Agent, link the bot, and send a message to your WhatsApp number to start testing it:
📱 Testing a Facebook Messenger Bot
To test your chatbot on Facebook Messenger, you’ll first need to complete a setup involving a Facebook Page. Here’s how to get started:
🔧 Step 1: Create or Integrate a Facebook Page
Facebook Messenger chatbots must be connected to a Facebook Page - this is how Messenger identifies and displays your bot.
If you don't have any Facebook Page, you can check here more information on how to create it in Facebook 👀
🔗 Step 2: Integrate Your Facebook Page
Once your Page is set up, access Channels section, and integrate it with Landbot, following this process.
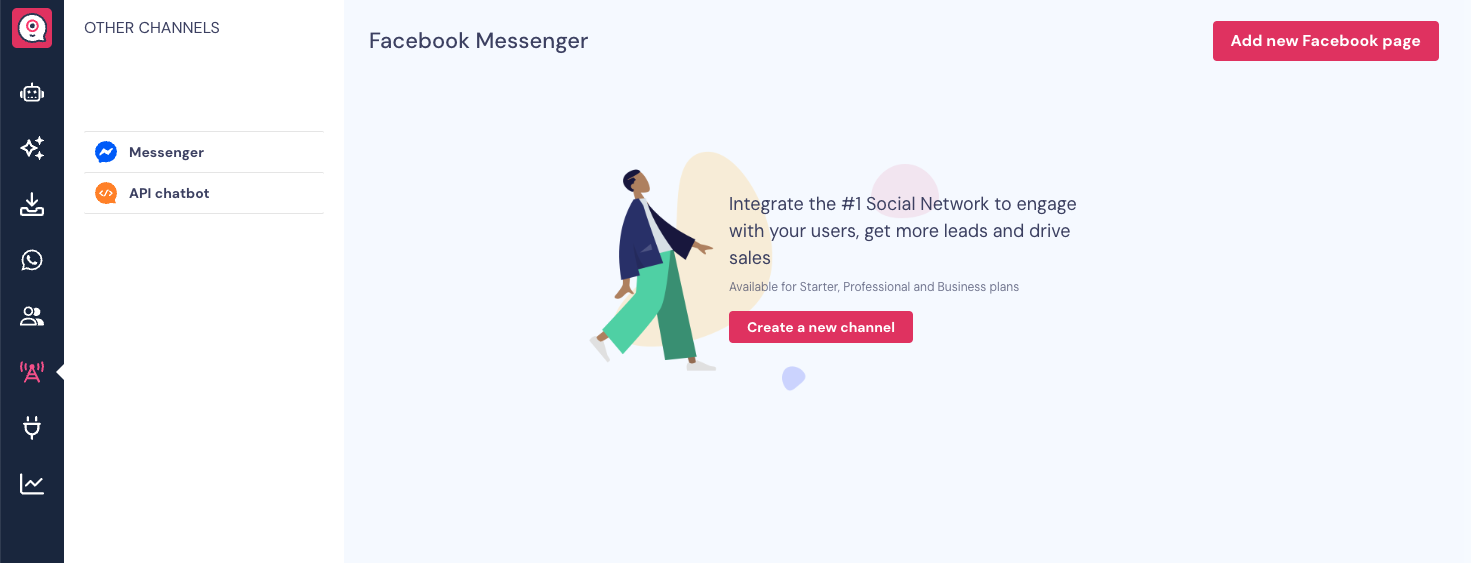
Here are the important details:
- You must be an admin of the Facebook Page to integrate it.
- Make sure the Page is published and Messenger is enabled in its settings.
- Assign necessary permissions to your Facebook Page, as explained here.
🧪 Step 3: Link Your Chatbot to the Page
After integration, you can link your chatbot to your Facebook Page. Now, it will respond to messages sent to that Page through Messenger.
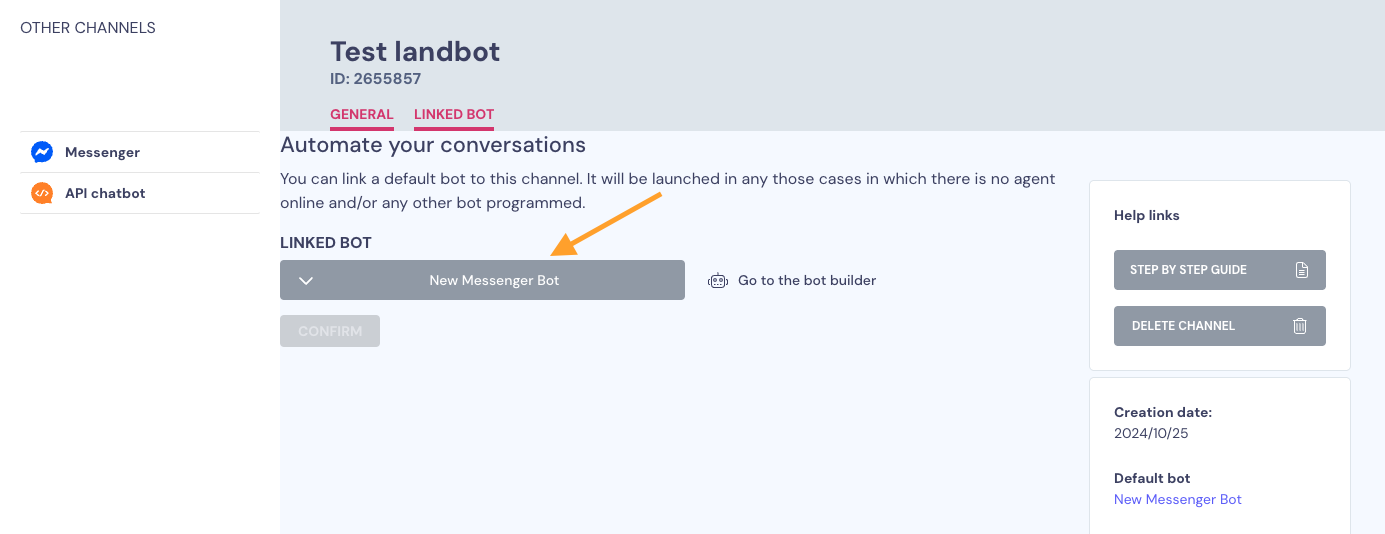
You can test the chatbot by:
- Sending a message to your Page from another Facebook account
- Using the “View as Visitor” option to simulate user experience
- Inviting testers or team members to interact with the bot on your Page
Once the setup is complete, any user who sends a message to your Page on Messenger will interact with your chatbot. Make sure to test all key flows, commands, and interactions.
🔧 Testing an APIchat bot
The only way to preview or test this channel is to integrate it with another platform.
To do this, you can make a web bot and then use the Jump To block to link up the APIchat bot with the web bot.
- In the Channels section, choose API and copy the API endpoint details.
- Use tools like Postman, cURL, or integrate with your own frontend/client to send a test payload.
- The bot will respond according to the structure of the request and your flow configuration.
