Table of Contents
- How to get URL (Airtable's App ID) and the Authorization (API Key)
- 1. Webhooks URL and Method
- 2. Webhook's Header (Authorization)
- 3. Save the Results of Airtable API response as Array
- 1. Request data (no filter)
- 2. One fixed filter
- 3. One user input filter
- 4. More than one filter
- 5. Search filter "contains" value in cell/column
- 6. Search filter numeric value bigger than X
- 7. Search for 2 conditions (less than and text)
- 8. Search filter by more than X days from Today
- 9. Filter by dates
- 10. Search checked (box)
- 11. Search this OR that
- 12. Filter a list to get 1 record, and GET after all the information from that specific record based on recordId
- 13. Search for an exact Match
- 14. Search for two (or more) exact Matches
- 15. Search for records that a specific field is empty
- 16. Set up a "pre-filter" based on a category, and a search pull after that category items.
- 17. Create and display a list of items
- 18. Get data sorted in ascendent or descendent order
- 19. Set up a Formula block to check if an email (or other value) exists in your Airtable
- 20. Search an event that is after/before today or a certain day
20 different ways to GET and filter data from Airtable
- How to get URL (Airtable's App ID) and the Authorization (API Key)
- 1. Webhooks URL and Method
- 2. Webhook's Header (Authorization)
- 3. Save the Results of Airtable API response as Array
- 1. Request data (no filter)
- 2. One fixed filter
- 3. One user input filter
- 4. More than one filter
- 5. Search filter "contains" value in cell/column
- 6. Search filter numeric value bigger than X
- 7. Search for 2 conditions (less than and text)
- 8. Search filter by more than X days from Today
- 9. Filter by dates
- 10. Search checked (box)
- 11. Search this OR that
- 12. Filter a list to get 1 record, and GET after all the information from that specific record based on recordId
- 13. Search for an exact Match
- 14. Search for two (or more) exact Matches
- 15. Search for records that a specific field is empty
- 16. Set up a "pre-filter" based on a category, and a search pull after that category items.
- 17. Create and display a list of items
- 18. Get data sorted in ascendent or descendent order
- 19. Set up a Formula block to check if an email (or other value) exists in your Airtable
- 20. Search an event that is after/before today or a certain day
Airtable is a handy resource to build a small database. It can work with many applications, and different types of data. In here we have listed 20 ways to retrieve data from your Airtable database, via API with the Webhook block.
As we will see in the different methods, Airtable offers us a method called "filterByFormula" that allows us to create formulas that are conditions. If the Conditions are met, that means, when they are True, it returns us the items (rows) that match those conditions.
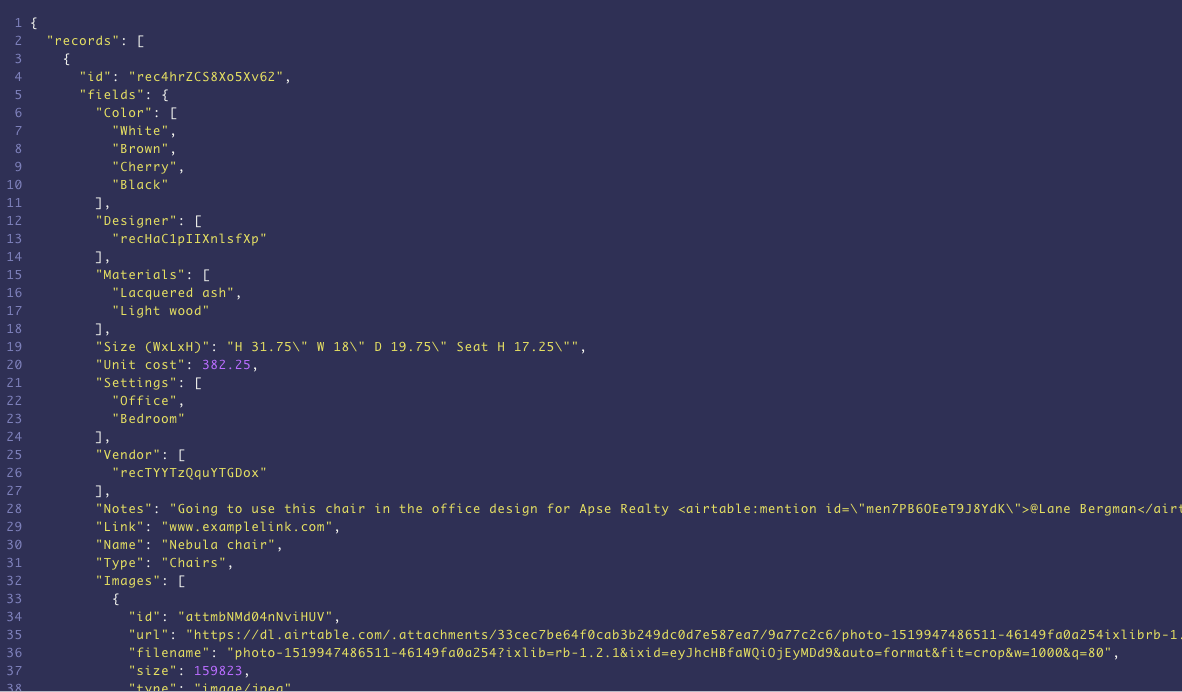
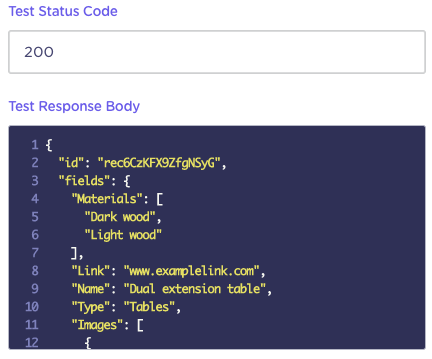
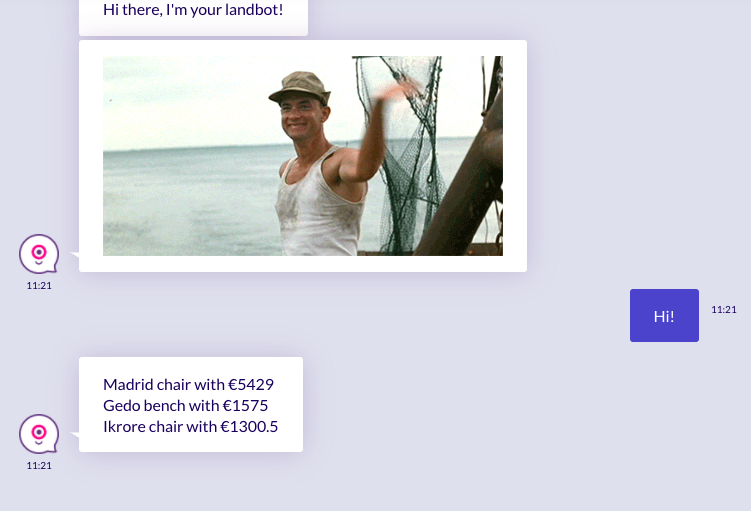
The API will return an array with every row, as a JSON object, like below:
How to get URL (Airtable's App ID) and the Authorization (API Key)
We will get the information from the Airtable API Documentation, and set it in the Webhook according to the steps we will show in this article.
In Airtable, first we need to go to the API documentation option in the Help section:
Then, once in the API documentation, click on the Authentication option:

1. Webhooks URL and Method
You must get the App ID in Airtable to build the Webhook's URL. It should look like the following:
https://api.airtable.com/v0/<app_id>/<nameofthebase>
In the examples below we used the following URL:
https://api.airtable.com/v0/appzYrKqRzqbYCGi9/Furniture
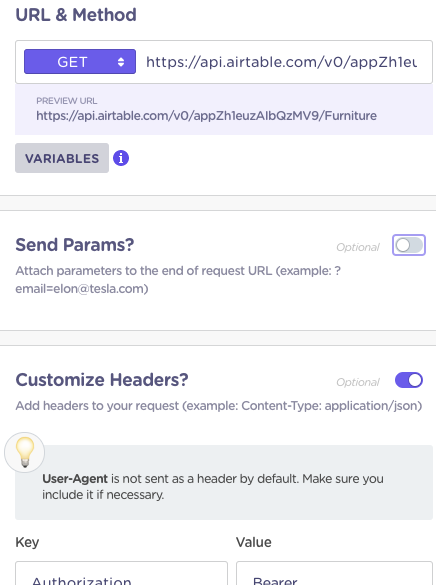
This is how it will look in your Webhook:

It consists of 2 parts:
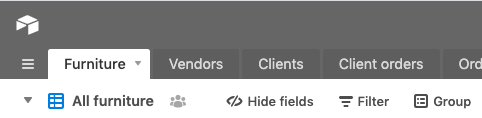
- The Base we are using is called Furniture, so the end of our URL is Furniture
- The Base App Id is appzYrKqRzqbYCGi9

2. Webhook's Header (Authorization)
To set up the Webhook's Header (Authorization), you must get the API Key in Airtable.

To get an Airtable API Key, repeat the same process to get to the API Documentation, but this time click on this option:
Then, under the line where you located the APP ID, you will see the API KEY just after "Authorization":
Please copy from "Bearer" until the end of the text:

This is how it should look in the Webhook block:

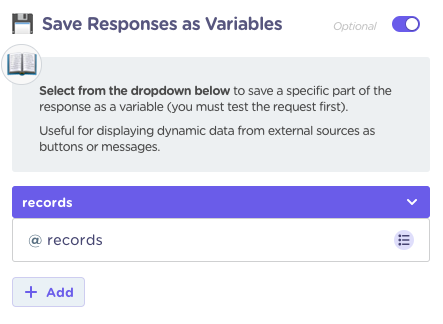
3. Save the Results of Airtable API response as Array
The next step is saving the Array of results from the Airtable API response, so that we can use this later in the Dynamic Data block.
As you can see, we can store the main array with all the results like in the picture below:

Here is how you would TEST and Set up the Save response section to be able to select the key "records" (that contains the array of results) and save it in the variable @records:
1. Set the URL, method (GET), the parameters section (with the variable) and the Header with the Authentication
2. In the Test section, add a sample value for the variable you want to use
3. Press TEST
4. Select the Key "records"
5. Select a variable (in this example @records) where it will store the content of the Key "records"
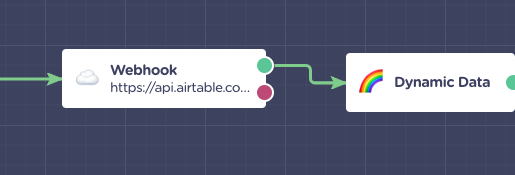
And now we will have the array with all the results based on the filter stored in the @records variable. Later we can use this variable for example in a Dynamic Data block:
Below there is a list of 11 ways to build the URL and/or the "Send params" section to get data filtered from your Airtable.
1. Request data (no filter)
In case we want to pull all the first 100 "items", without any filter
https://api.airtable.com/v0/<app_id>/<nameofthebase>
2. One fixed filter
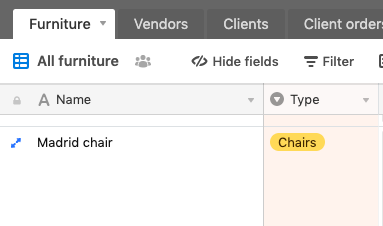
This is best used when we want to get content from one column (field) that matches completely (case sensitive and the whole string is equal).
In the example below the column (field) is "Type" and the string to match is "Chairs", in the base Furniture:

filterByFormula SEARCH("Chairs",{Type})https://api.airtable.com/v0/<app_id>/<nameofthebase>?filterByFormula=SEARCH("Chairs",{Type})
3. One user input filter
You should use this option if what you want is to filter based on the input or selection from the user that will be stored in a variable.
In the example below the column (field) is "Type" and the string to match is the landbot variable @type, in the base "Furniture":

filterByFormula SEARCH("@type",{Type})https://api.airtable.com/v0/<app_id>/<nameofthebase>?filterByFormula=SEARCH("@type",{Type})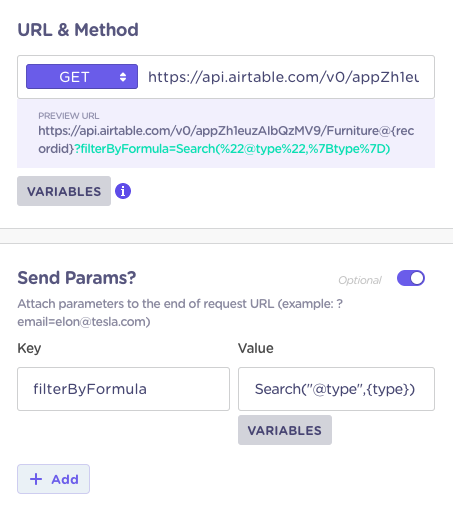
4. More than one filter
We use AND if we need to match 2 (or more) conditions with specific values.
In this example we check for items that match the landbot variable @color with the column (field) in Airtable "Color" and the landbot variable @type with the column (field) "Type":
Bear in mind that if we use "White" in the color and "Chairs" for type, it WILL NOT match the example above, because is has to be a full match, and color is "White, Brown, Black" in that object.
In case you want a case for "contains", where you are checking if "White" is one of the texts in the cell, please check the next filter:
filterByFormula AND({Color}='@color',{Type}='@type')https://api.airtable.com/v0/<app_id>/<nameofthebase>?filterByFormula=AND({Color}='@color',{Type}='@type')
5. Search filter "contains" value in cell/column
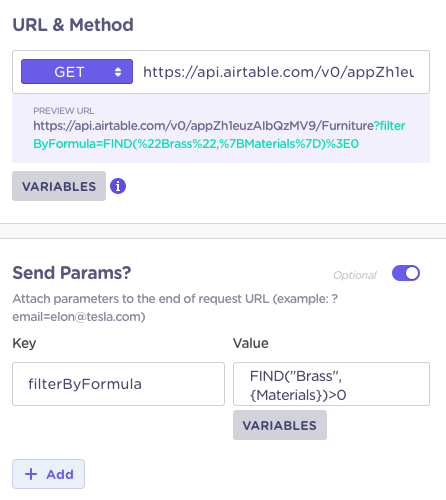
If the cell for example has more than one value or contains more text, we want to check if a string (text) is contained for that field like in the example below:
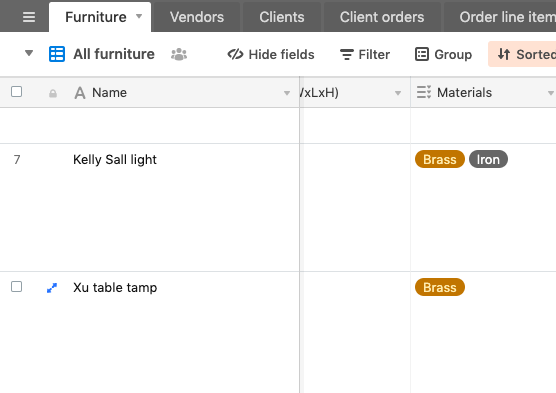
Here we use FIND to check if the string "Brass" is in any of the items of the column (field) "Materials".
It will match both items in the picture above.
filterByFormula FIND("Brass",{Materials})>0https://api.airtable.com/v0/<app_id>/<nameofthebase>?filterByFormula=FIND("Brass",{Materials})>06. Search filter numeric value bigger than X
This is very handy if we need to check for specific values that are greater (>) or smaller (<) than a specified value.
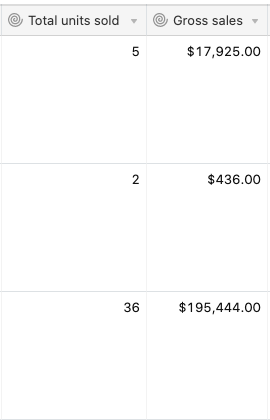
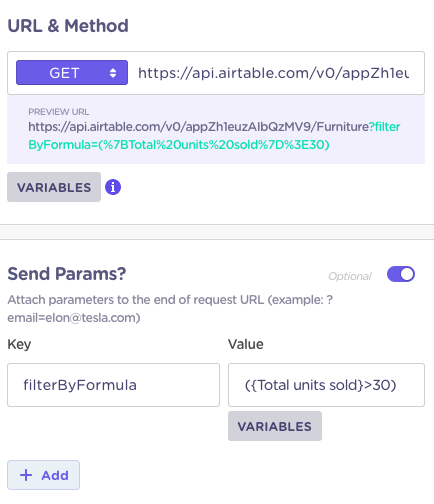
In this example we check in the column (field) "Total units sold" for items with a value greater than 30:
filterByFormula ({Total units sold}>"30")https://api.airtable.com/v0/<app_id>/<nameofthebase>?filterByFormula=(%7BTotal%20units%20sold%7D%3E30)
7. Search for 2 conditions (less than and text)
This case is an example that checks numeric values at the same time that checks for a specific string in a column field.
Here the filter is looking for items sold less than 2 times and that their color could be red:
filterByFormula AND({Total units sold}<"2",FIND("Red",{Color})>0)https://api.airtable.com/v0/<app_id>/<nameofthebase>?filterByFormula=AND({%7BTotal%20units%20sold}<"2",FIND("Red",{Color})>0)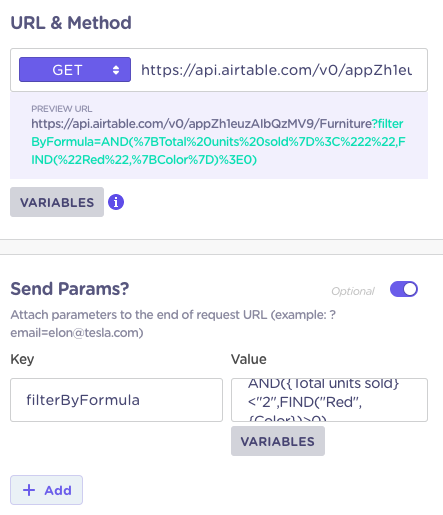
8. Search filter by more than X days from Today
This is a specific case that we might use to check for the difference of days compared with Today. The best case scenario would be if you want to make sure there is a difference of days between today and the date contained in a cell.
In the example below we check in the column (field) "Fulfill" for items fulfilled more than 60 days ago:

filterByFormula DATETIME_DIFF({Fulfill},TODAY(),'days')>-60https://api.airtable.com/v0/<app_id>/<nameofthebase>?filterByFormula=DATETIME_DIFF({Fulfill},TODAY(),'days')>-60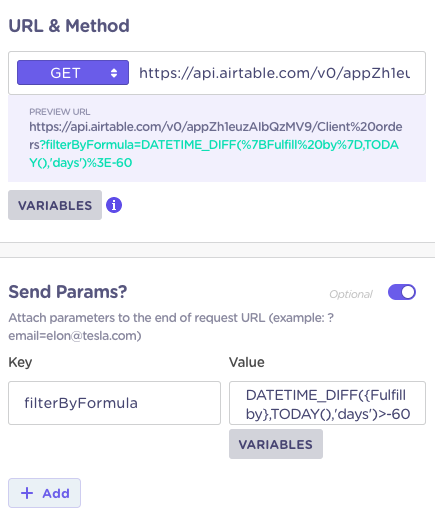
9. Filter by dates
Just like with numbers, we can check for dates (greater or smaller) with filters. Bear in mind that the date has to be set with the YYYY-MM-DD format.
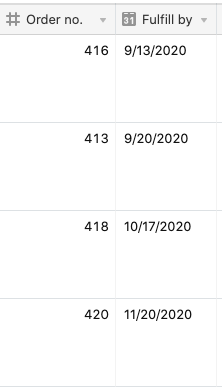
In the example we check for orders fulfilled after the 2020-10-17:
filterByFormula {Fulfill}>"2020-10-17"https://api.airtable.com/v0/<app_id>/<nameofthebase>?filterByFormula={Fulfill}>"2020-10-17"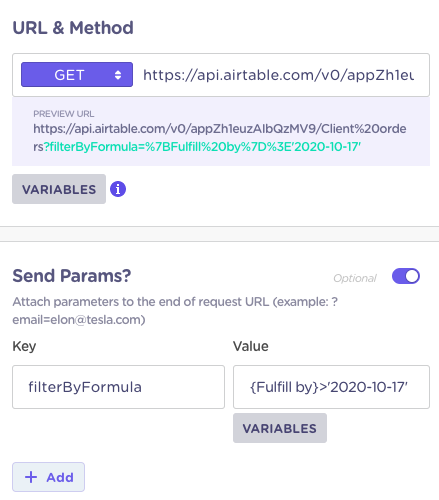
10. Search checked (box)
Checkboxes are handy for boolean values, we can verify if they are either checked (1) or not (0).
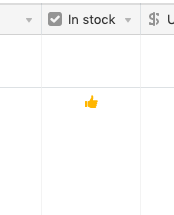
In the example we filter for items that in the column (field) were not checked (0):
filterByFormula {In stock}=0https://api.airtable.com/v0/<app_id>/<nameofthebase>?filterByFormula={In stock}=0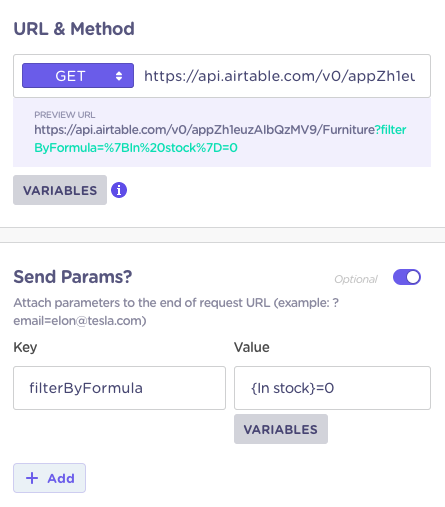
11. Search this OR that
It is similar to AND, but in this case, only one of the conditions is met. Let's say we want to search either by name or email, then we will need to use OR.
In the formula below we are checking either if a product is not in stock or if theirs gross sales is greater than 0:
filterByFormula OR({In Stock}=0,{Gross sales}>0)https://api.airtable.com/v0/<app_id>/<nameofthebase>?filterByFormula=OR({In Stock}=0,{Gross sales}>0)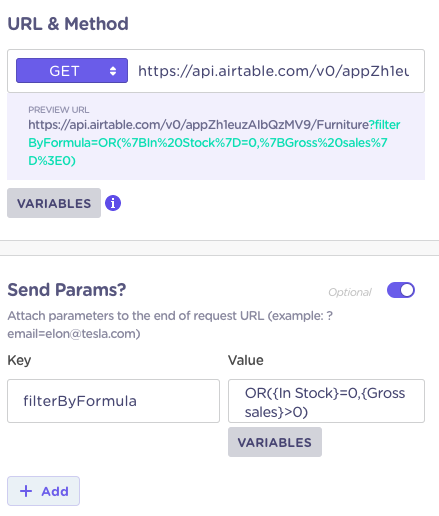
12. Filter a list to get 1 record, and GET after all the information from that specific record based on recordId
Sometimes we might need to let the user select one product (record/row) from a list, and after display all the information possible from that product (record/row).
This means we need the following steps:
1. Filter and get a list of product, and store the information in one array
2. Display the list of product with a Dynamic Data block
3. Based on the selection from the Dynamic Data block, make a second request to Airtable to get all the information from that product (record/row), and save it in Landbot variables
4. Display that information
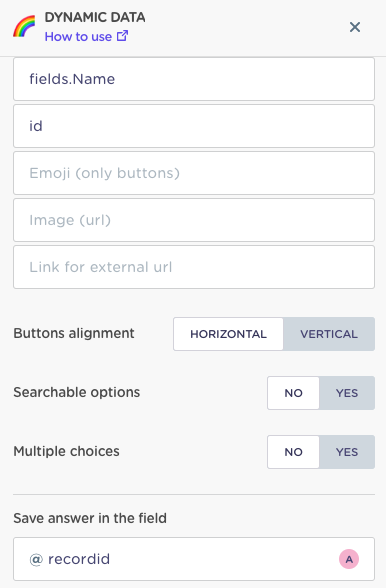
So the flow would be like this:
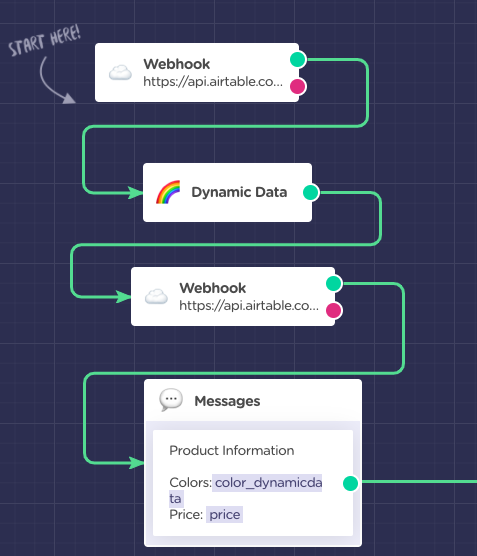
To get the id of the record, we need to set up the Dynamic Data to capture it and store it in the variable @recordid :
Now, we will use the @recordid in the following webhook to GET all the information from that specific record/row:
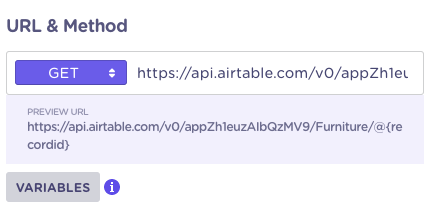
So, as an example we will set up a URL like this:
https://api.airtable.com/v0/appfQ7NnSyo70Z5E8/Imported%20table/@recordid
And we will need to test it like this:
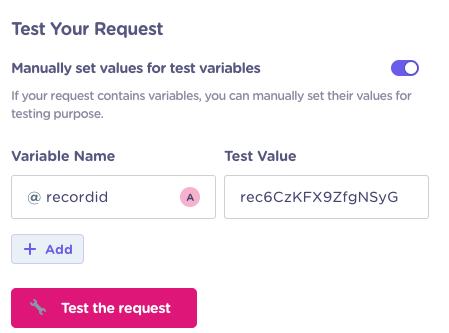
The code of the record for the example you can get it by testing the first Webhook:
Once the TEST is done you would be able to set the variables in the SAVE RESPONSE section below:

And display the data right after:
13. Search for an exact Match
In this case, we want that input from the user (@email) is in the Airtable base.
filterByFormula ({emails}='@email')https://api.airtable.com/v0/<app_id>/<nameofthebase>?filterByFormula=({emails}='@email')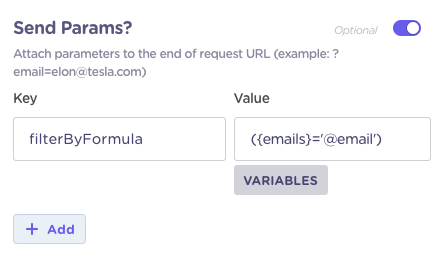
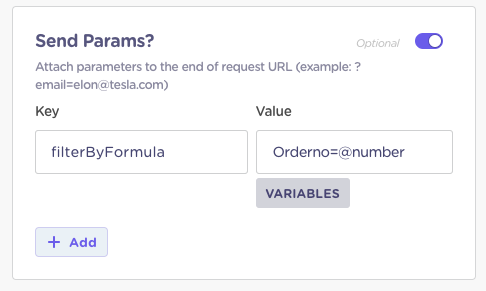
Or just simply:
https://api.airtable.com/v0/<app_id>/<nameofthebase>?filterByFormula=Orderno=@number
filterByFormula=Orderno=@number
14. Search for two (or more) exact Matches
In this case, we want that input from the user (@vendor and @phone) is in the Airtable base.
filterByFormula AND(({Phone number}='@phone'),({Name}='@vendor'))https://api.airtable.com/v0/<app_id>/<nameofthebase>?filterByFormula=AND(({Phone}='@phone'),({Email}='@email'))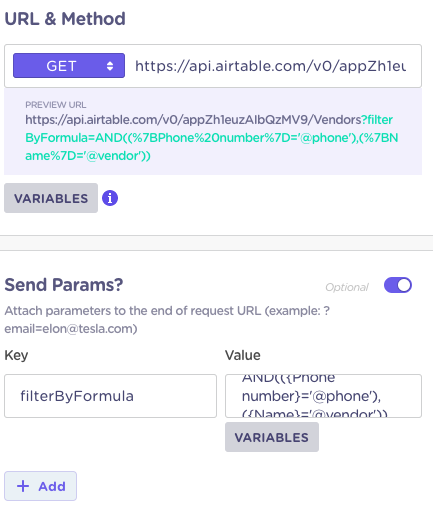
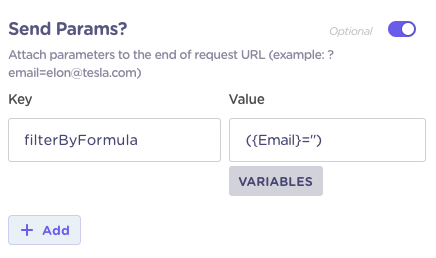
15. Search for records that a specific field is empty
In this case, we want that input from the user (@email) is empty in the Airtable base.
filterByFormula ({Email}='')https://api.airtable.com/v0/<app_id>/<nameofthebase>?filterByFormula=Email=''
16. Set up a "pre-filter" based on a category, and a search pull after that category items.
In this way we need:
- 2 Webhook blocks
- 2 Dynamic data blocks
Could be that you have a list of products, that each one is part of a "product category", but you want to offer them the user first to browser dynamically based on those product categories and then display only the product in such category.
What we need is first to set up in Airtable, a tab specific for the product categories

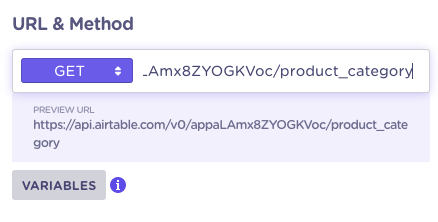
Then we need in Landbot a way to capture this whole list, with a simple GET that points to product_category will be ready:
And we store the records key:
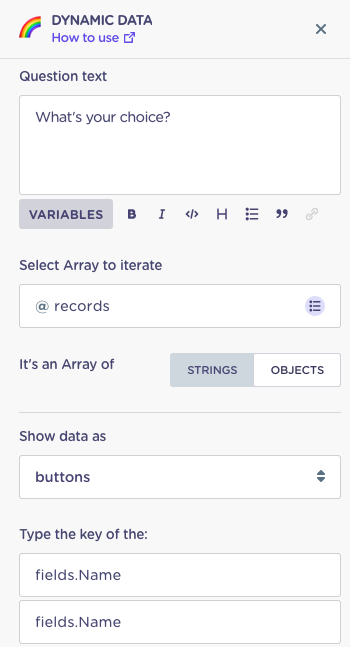
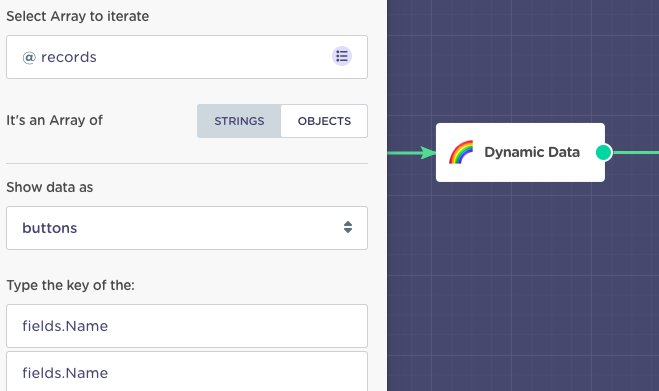
Then with Dynamic Data block, right after:
that's where we will work with the landbot variable that we have just created (@records), we will display the key "Name", and store the value of fields.name:
Don’t forget to save the response in the field, it will become the param to send for the next Webhook block:

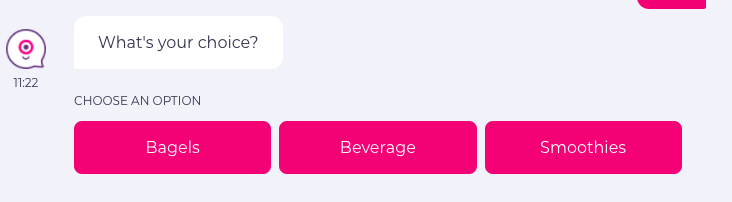
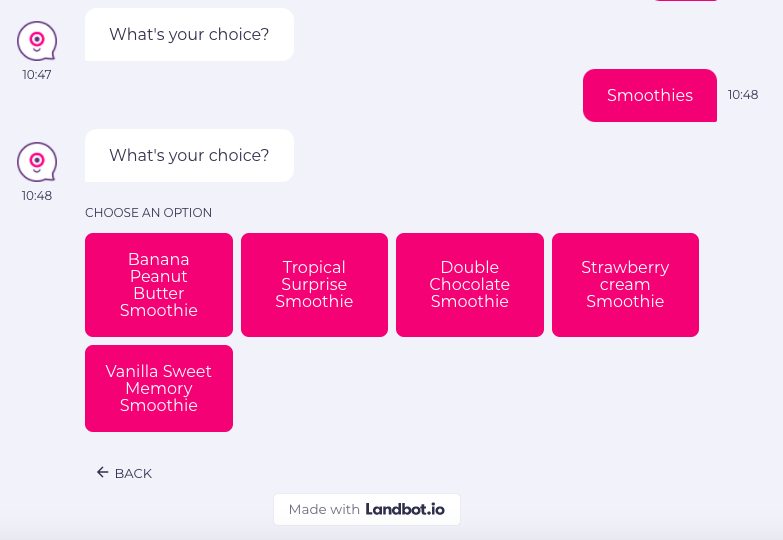
Then the bot will display according the Categories:
View on Landbot 2:
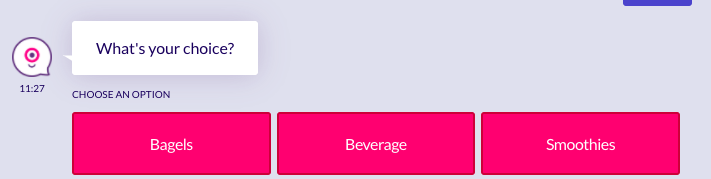
View on Landbot 3
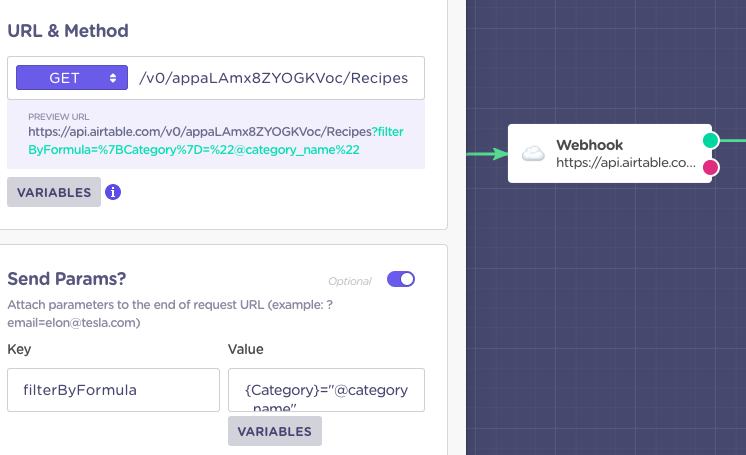
Then based on that selection you can search with another call for a list filtered based on that selection. So what we are going to do is set another Webhook block, to get the information from another tab which is named Recipes.
And here we should send the param, with the one we saved in the first Dynamic Data,
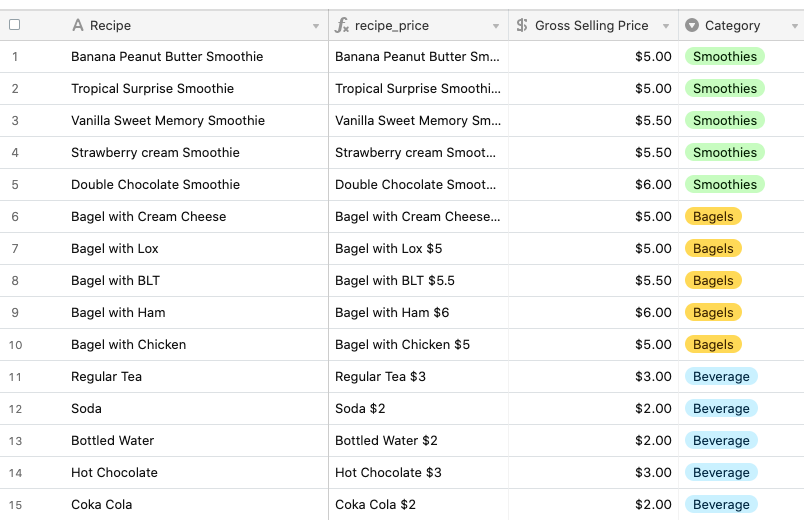
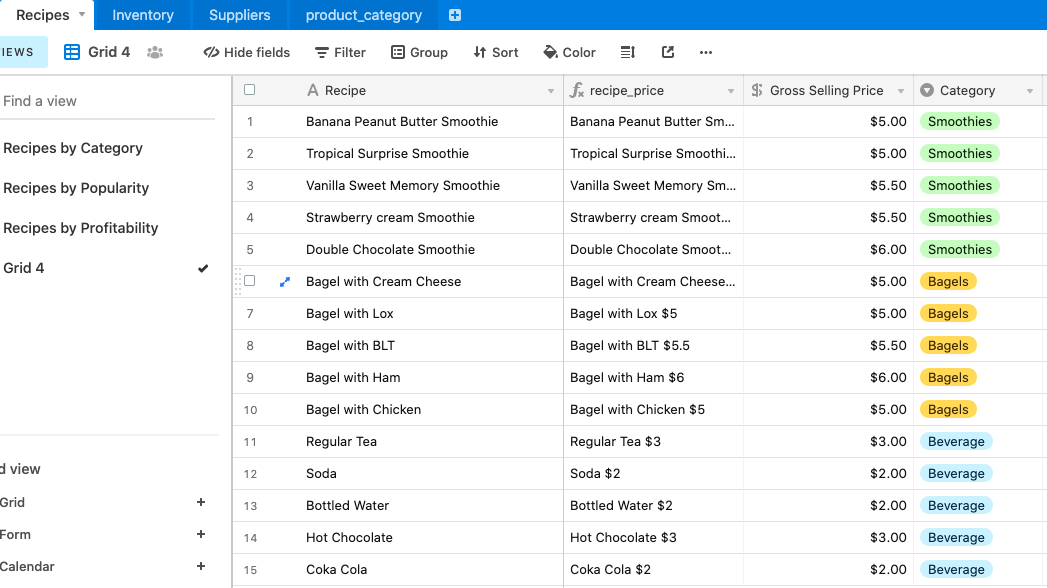
The tab includes all the information of our products:
Then we should test this Webhook, and save all of the records as an array(@records, or the other names if you don’t want to mess up with a bunch of variables).
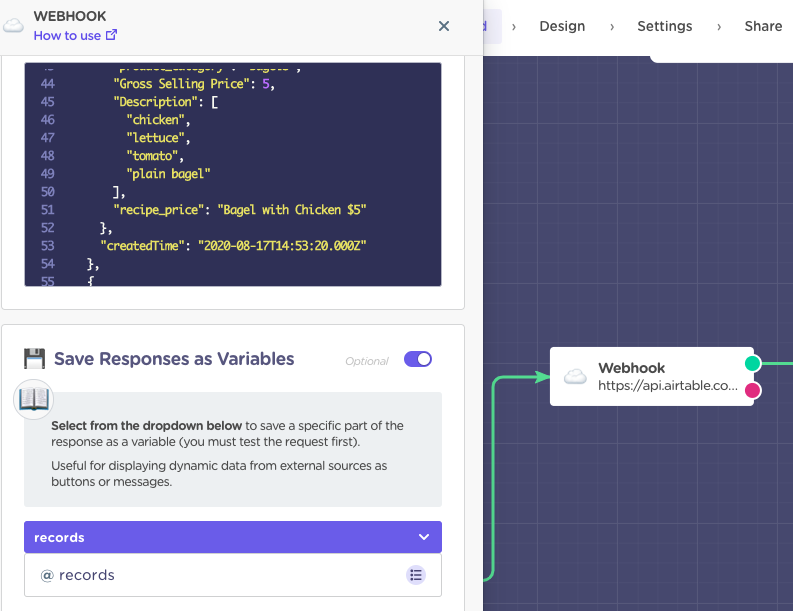
The final step comes! Now we are going to set another Dynamic Data, this time we iterate the records of the second Webhook block, and we use the Key “Recipes”(which is the name of the products column),
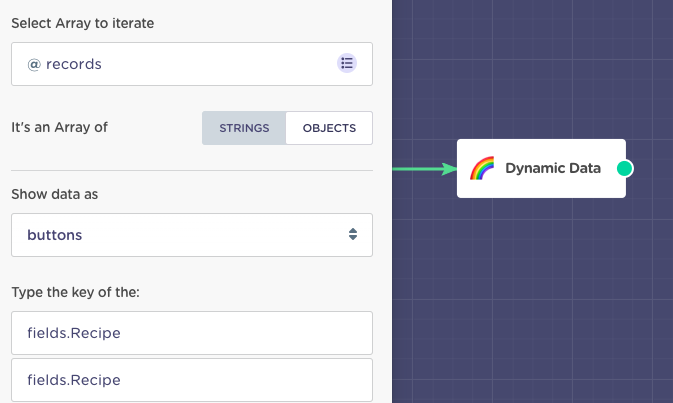
After that, it will show the specific list of products, according to the category that we chose at the first Dynamic Data.
View on Landbot 2:
View on Landbot 3
In this way, logically we just take the category choice(@category_name) that we have made at the first Dynamic Data as the reference for the second Webhook. In the second Webhook we just use GET for another tab in which we have all the products information, by sending a param (@category_name). And get the records for the second Dynamic Data, so the clients can choose a certain product.
17. Create and display a list of items
We might want to display a list of items, but not to be selected with Dynamic Data. In that case we need first to edit the data in Airtable to be ready to be displayed in Landbot.
First, we have to insert a new column in the tab which includes the information like product name, price or ingredients, etc.
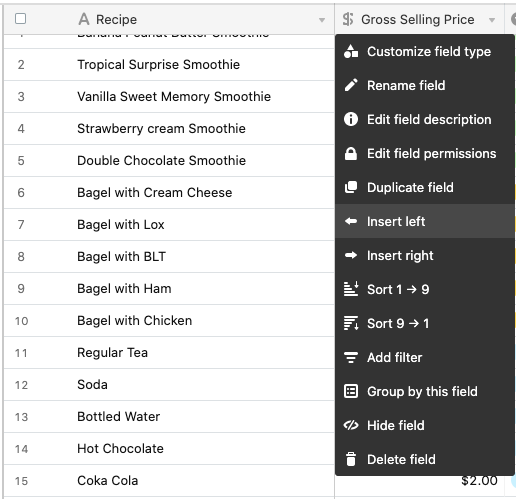
After insert a new column, click on Customize field type, choose Formula.
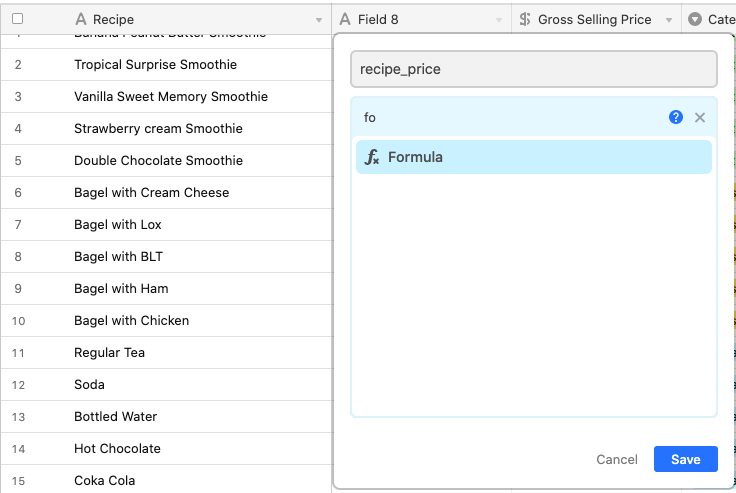
Next step we have to set a formula, to combine the information we want to show, like here if we want to show the product name and the price, we have to use the function CONCATENATE,
CONCATENATE(Recipe," ","$",{Gross Selling Price})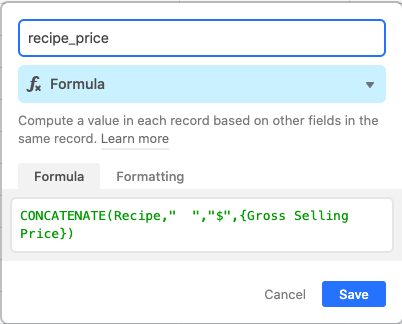
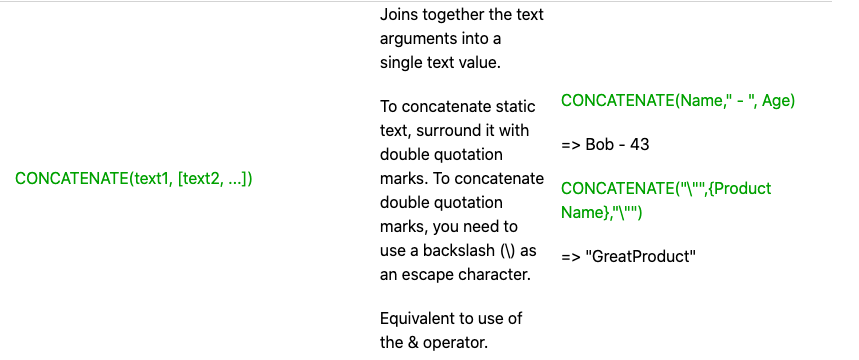
and a small tip of the use of CONCATENATE:
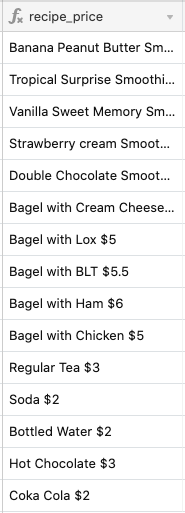
Now we have a complete column with the product name and price in it.
And then we are going to insert a new column in the tab of category, click on Customize field type, choose Link to another record, choose the tab where we put a formula before.

Next, we insert a new column at last, Customize field type>Rollup
The first field on this tab which has linked to another records is Field 3, so we choose it, and we have set up a column with formula, it includes the information of product name and price. Named recipe_price.
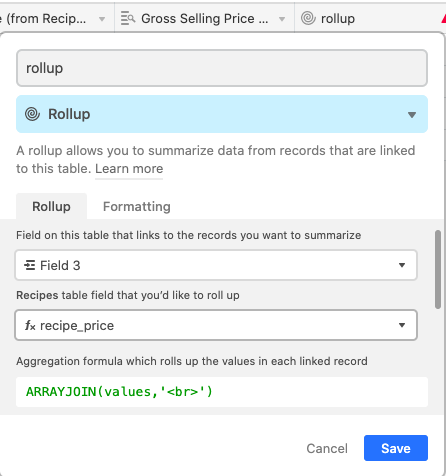
Where we use the Formula to add an html tag <br> to add give the format, that will be displayed in Landbot
ARRAYJOIN(values,'<br>')

In Airtable it’s displayed this way:

Now we have set up well the part of Airtable, let’s turn to Landbot.
In Landbot we need 2 Webhook blocks and 2 Dynamic Data blocks.
- In the first Webhook we get all the information from tab product_categories(the one includes categories of product and Rollup). After test, save responses as Variables(@records).

- Set a Dynamic Data block, iterate to @records, and we use the name of category, which called Name. Then save the answer in the field.
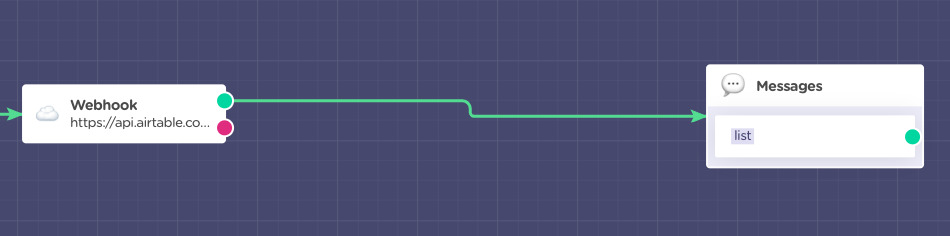
- Now that we have a reference, we set another Webhook block, get from the category tab. This time we send a param, which is the variable we have saved. A certain category. After test, we save fields.rollup as a Variable(@list
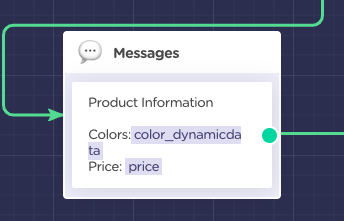
- To see the whole list, we are going to set a Messages block, in the text we put only @list.
So finally in Landbot is displayed this way:
Final view on Landbot 2:
Final view on Landbot 3
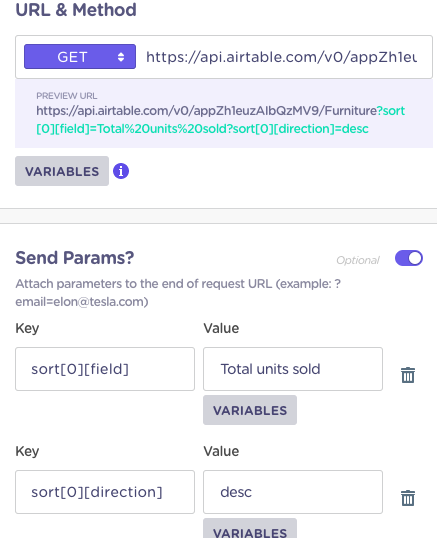
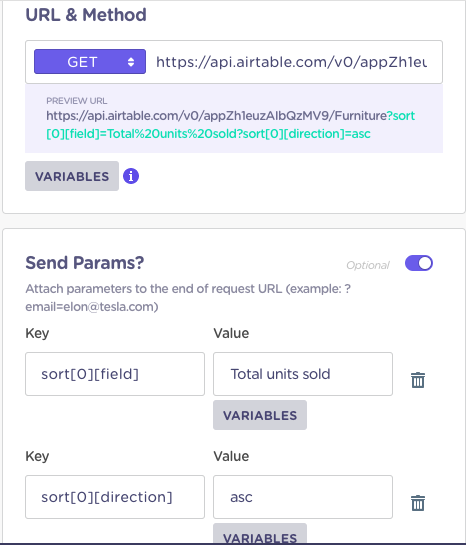
18. Get data sorted in ascendent or descendent order
Could be that we need to display the data based on a specific order. Let's say we want to do in based on a field (column) called “Total units sold”, from most sold product to less sold product (desc). Here is how:
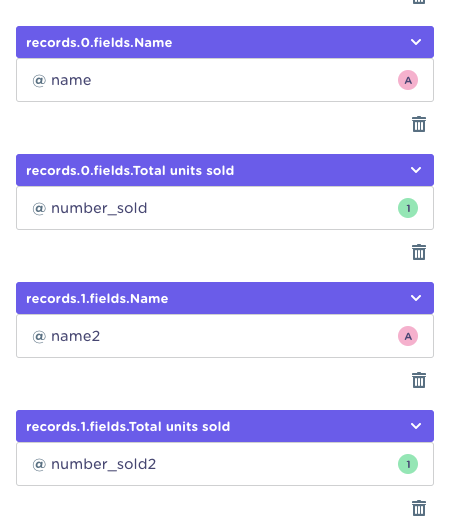
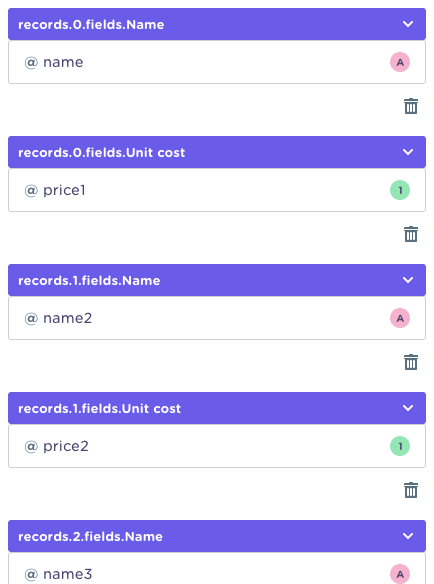
After the test, if we want to show the result of what the most sold brands are, we also have to save the responses as Variables.
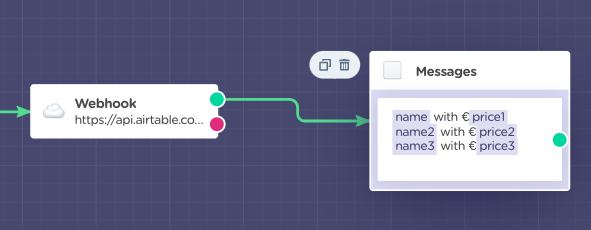
To see how is the result, we also can put a Message block right after Webhook:
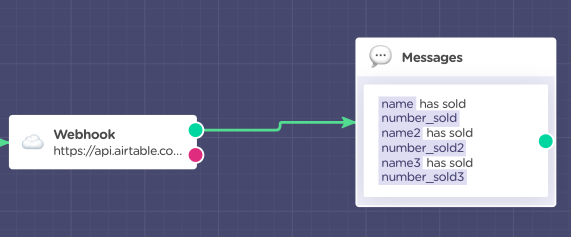
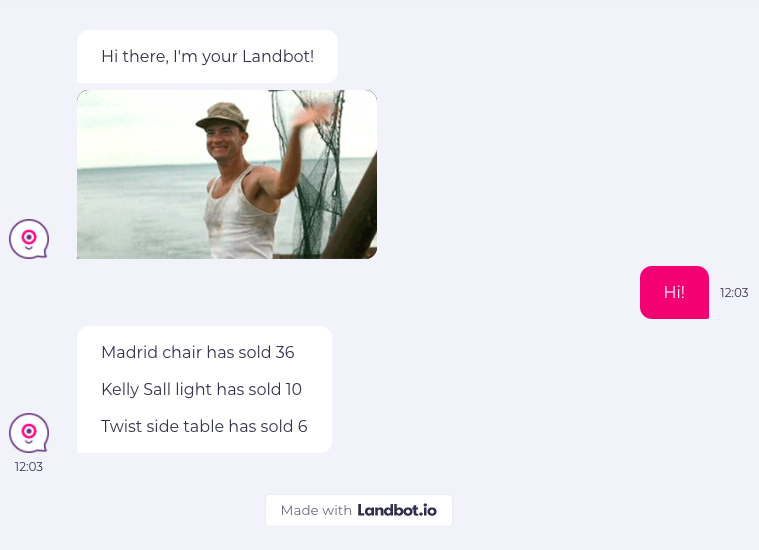
And now we can see the result more clearly, the 3 most sold brands!
In case you want to do it in the other order from less to most (asc):
Of course, with this way, we also can list the records by other elements with a certain order, like price, size, even the date.
Here is a small expansion with the order SORT. If you have checked No.2 and No.3 in this article about the order SEARCH, we can combine it with SORT.
Now we want to check how is the price of chairs, from the most expansive to the cheapest, we can do it in this way:
Send another param:
filterByFormula SEARCH(“Chairs”,{Type})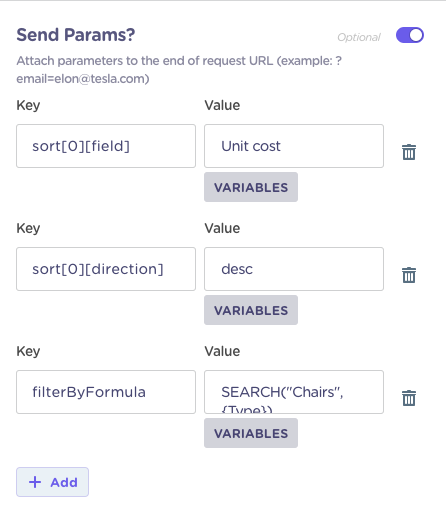
Also, we have to save the responses as Variables, because we have changed the content we want.
And also we can put a Message block with Variables we have set right after Webhook to see how is the result.
View on Landbot 2:
The result view on Landbot 3

19. Set up a Formula block to check if an email (or other value) exists in your Airtable
With Airtable you can search for values (for example with the method 15), where email is the name of the field/column

But if those values are not in your Table and the request is set up correctly it will return an empty array.

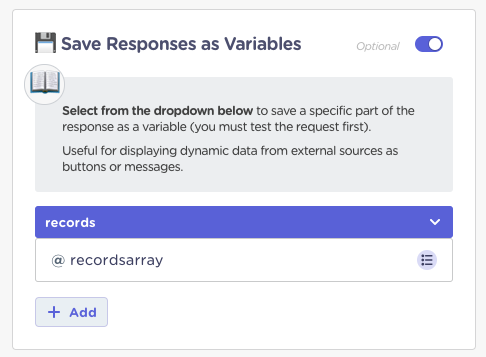
We are going to use such empty array to validate if the email is present or not. To do it, we want to select the key "records"
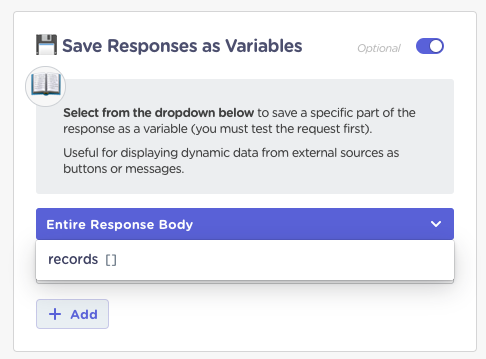
And save it in Landbot variable (recordsarray) as an array in the Save Response section.
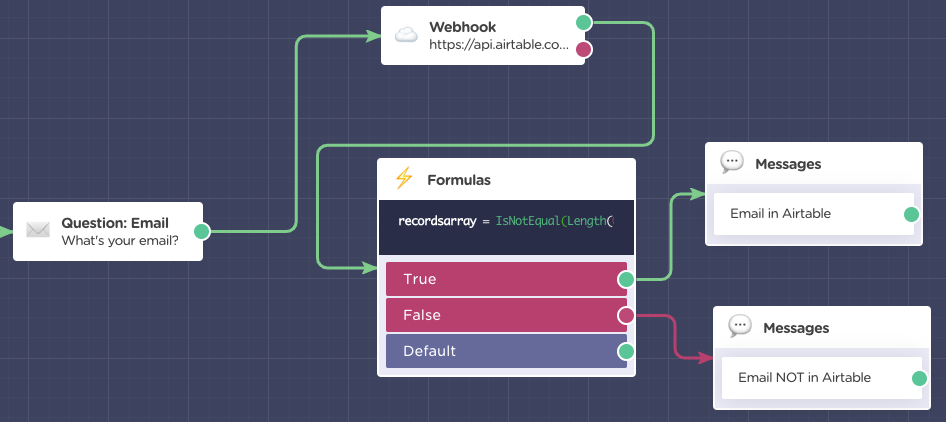
After that, we will use Formulas to check if the Array is empty (length of the array is 0) or if the Array contains any value (length of the array is more than 0)
We will use this nested Formula to get a True and False output, in case we want to redirect the user to a specific flows. True, means there is a record and False means there is no records that matches your criteria as Airtable response was empty (records array)
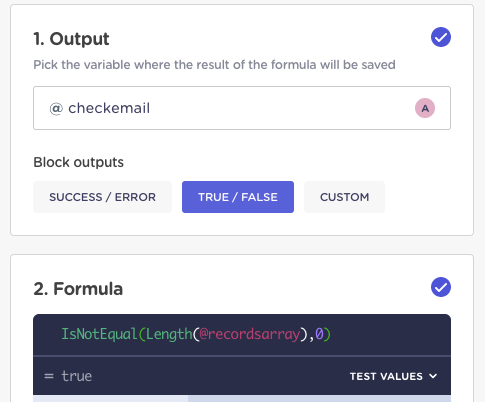
IsNotEqual(Length(@recordsarray),0)
This same principle can be used with other filters above. Array of length 0, means no records that matches your criteria.
Bear in mind, that if the request in the params section is not set up correctly it will return all the records.
20. Search an event that is after/before today or a certain day
Sometimes we might want to hold a series of events, everyday or every few days we will hold a certain event, and what if the event has passed but the visitors still click on the button of those activities? That will be very misunderstanding, so in this way, we will show the visitors available events, by using the formula IS_AFTER() in Webhook, and use Dynamic Data right after it.
Firstly here is a tab of some charity events:

In Landbot we set a Webhook block and a Dynamic data block:
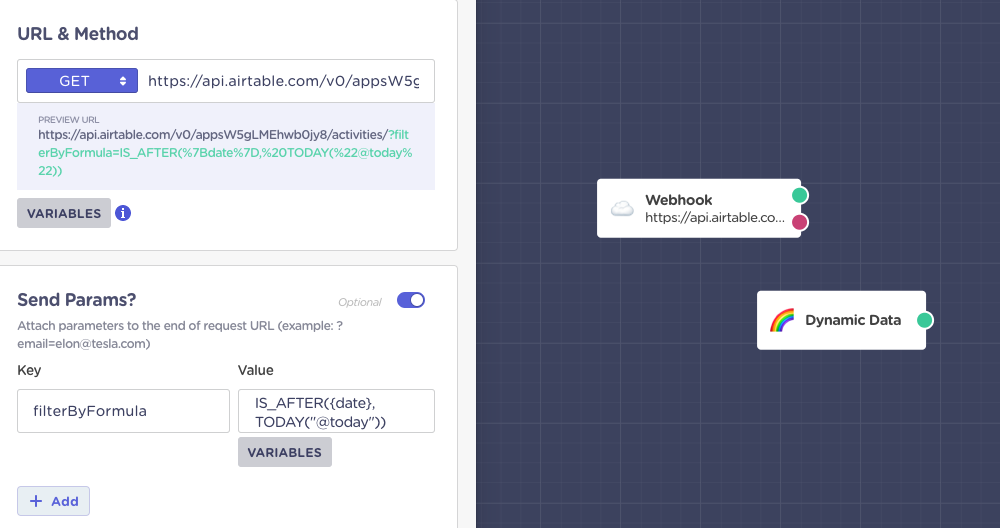
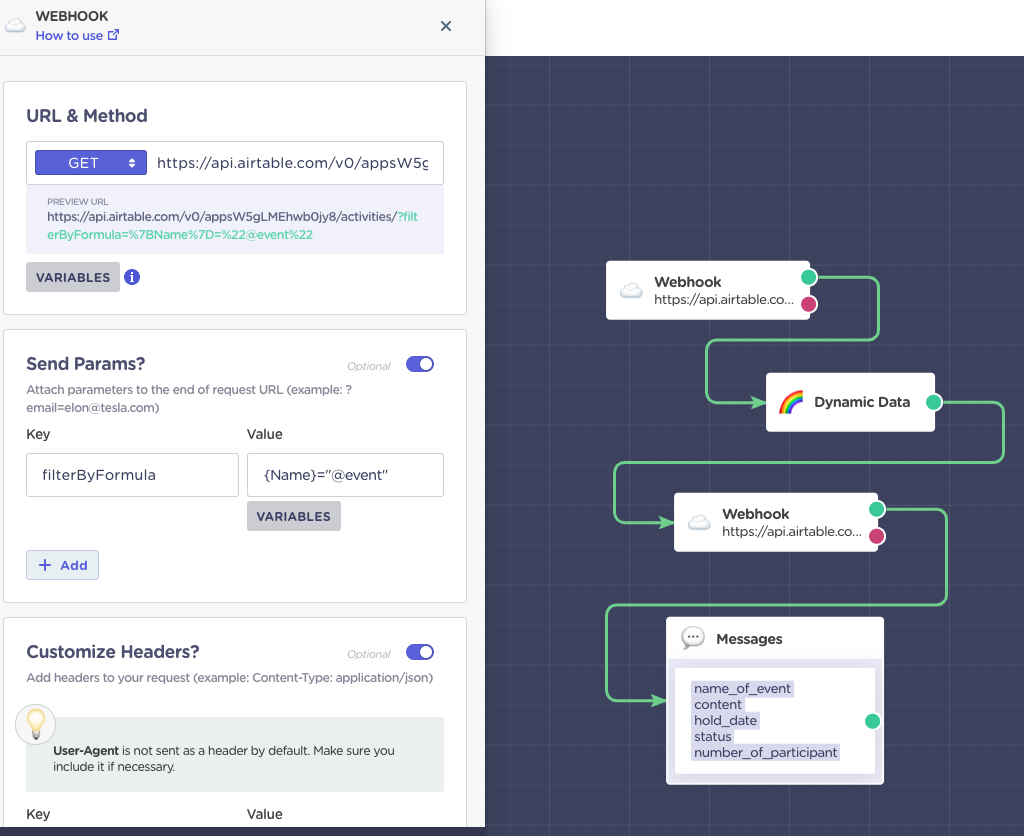
As you can see, firstly we used GET and the API key of that tab, in Send Params we set key as filterByFormula and the value as IS_AFTER({date}, TODAY()), after used this formula, in the response it will only show the events with date that is after today.
Let’s have a test:
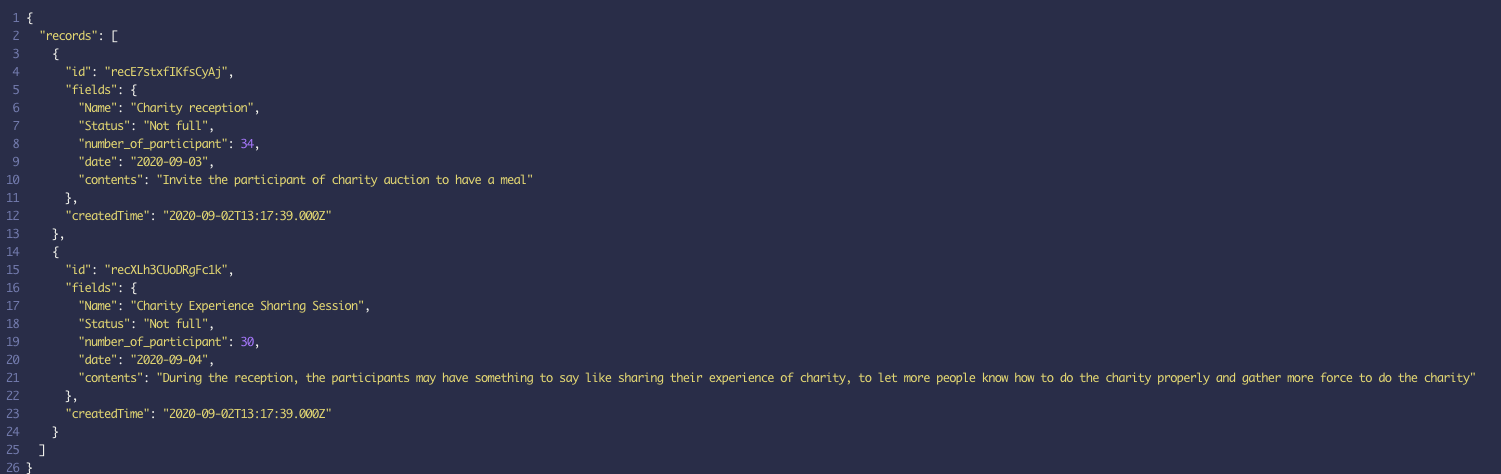
Today is 2020-09-02, so it only shows the events that will be held in following days, like Charity reception, which will be held on September 3rd, and Charity Experience Sharing Session will be held on September 4th, these are the dates right after today.
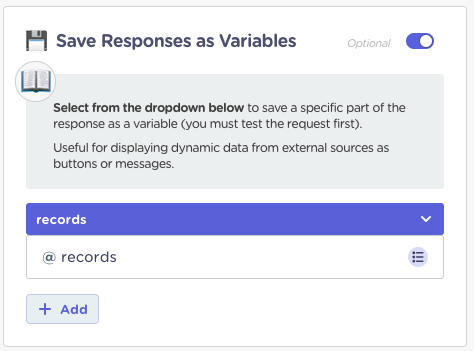
Now we go to Save the Responses as Variables, and save records as @records . Because we are going to iterate it in the Dynamic Data,
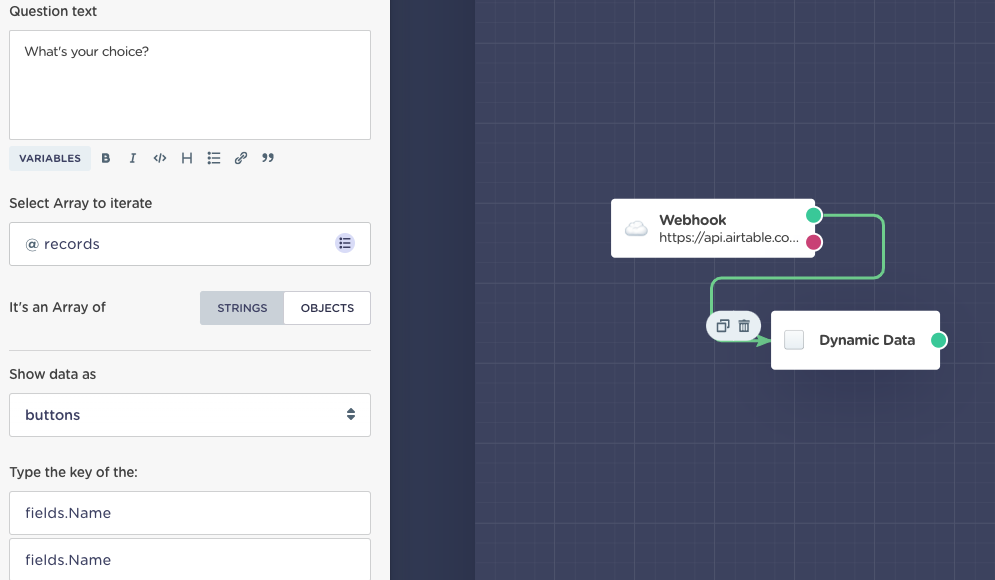
Now let’s turn to Dynamic Data, we have to iterate @records, then in the text of button we put fields.Name, and in the value to store put the same, fields.Name. Then save the answer in the field.
Finally, if you need to show the information according to visitors’ choice, you can also set another Webhook block, and take the answer of Dynamic Data as reference, to list all or some information of the event.
A small expansion with the 19th way, by using Formulas-Conditions combo to check if there’s any available event.
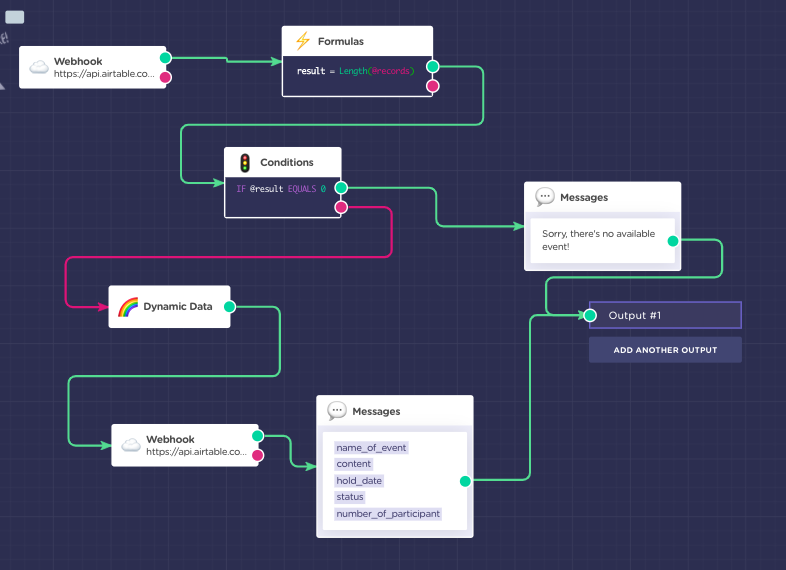
In Formulas block we set
@result = Length(@records)
to get the length of array @records. And in Conditions block we set
IF @result equals 0
Because if there’s any available event, the length won’t be 0. But if there isn’t, it equals 0. The flow will go through the Messages block and tell the visitors “Sorry, there's no available event!”
View in Landbot 3: (The whole list of buttons)
(After filtered):
(No available events)
Also, it should be mentioned that IS_AFTER() is just for giving an example, also we can use IS_BEFORE(), or IS_SAME() to filter some events. For example, if we want to show some events which were held already, we can use IS_BEFORE, if we want to show one or some events in a single day, we can use IS_SAME.