Here's how to implement a hybrid AI bot that combines AI-powered quick-reply buttons with optional text input to maximize engagement.
We recommend first downloading the template, testing it and then using this article as a reference to customize it to your needs - you find the template here
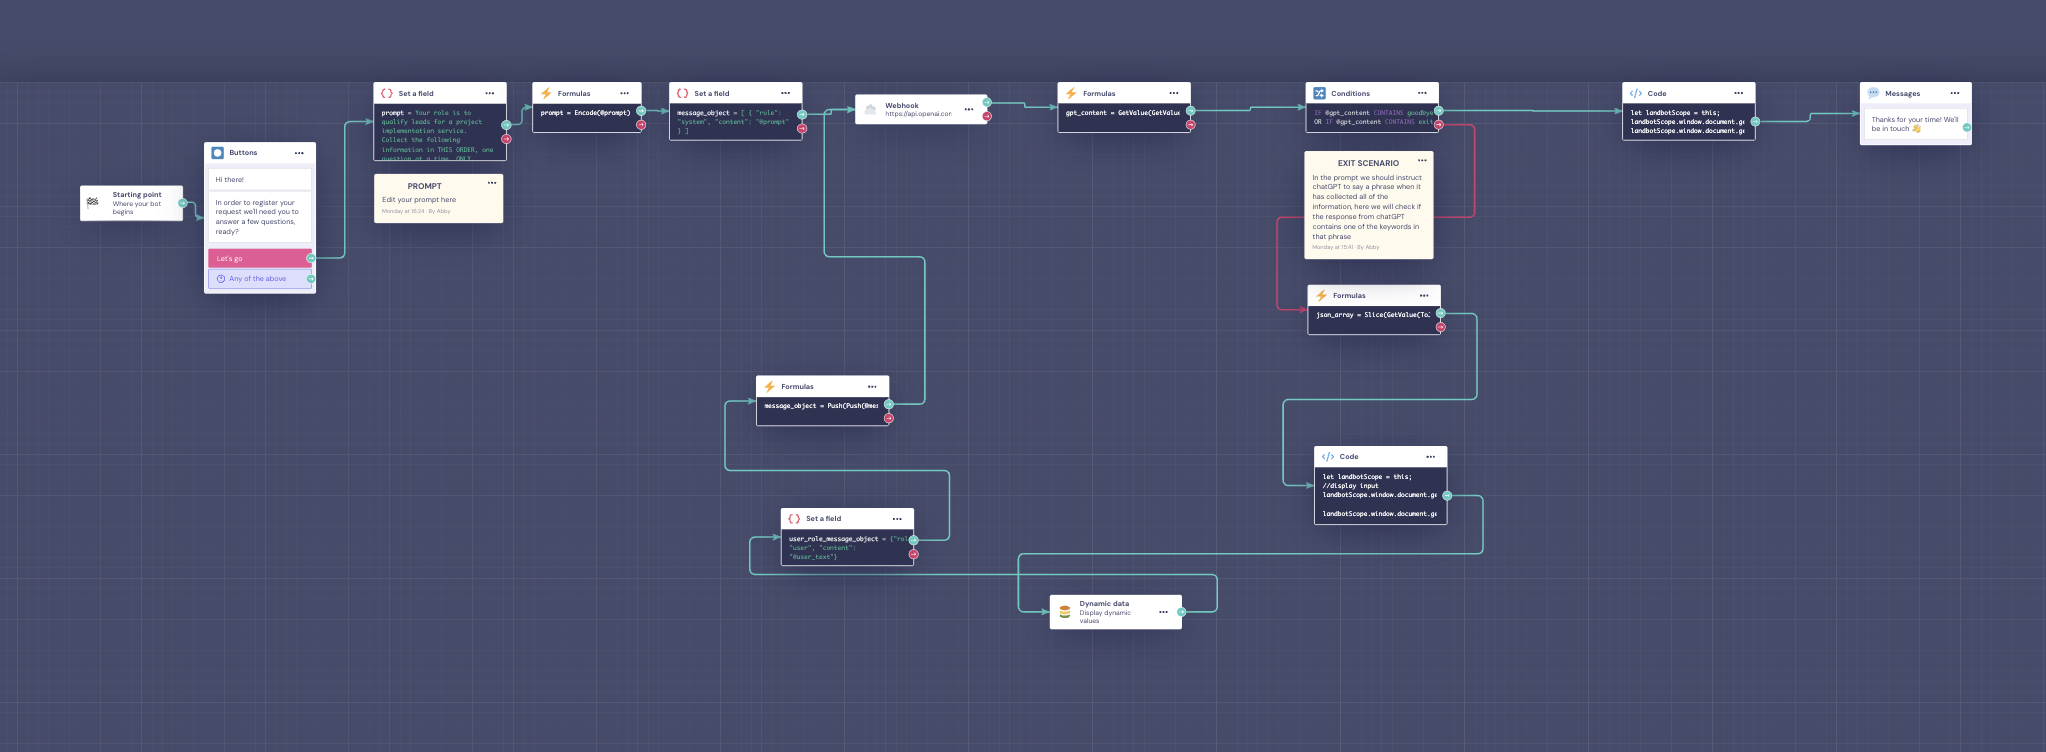
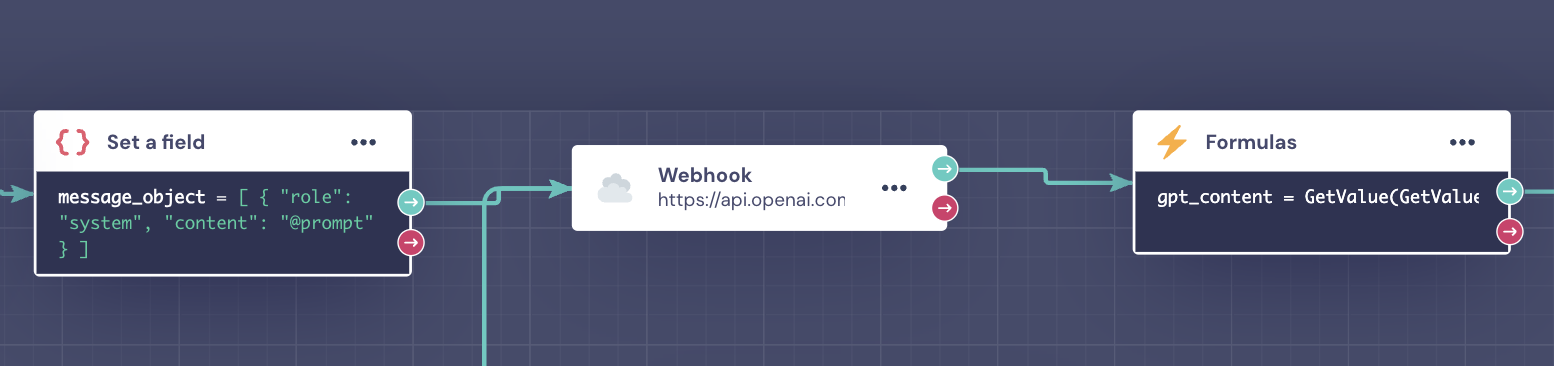
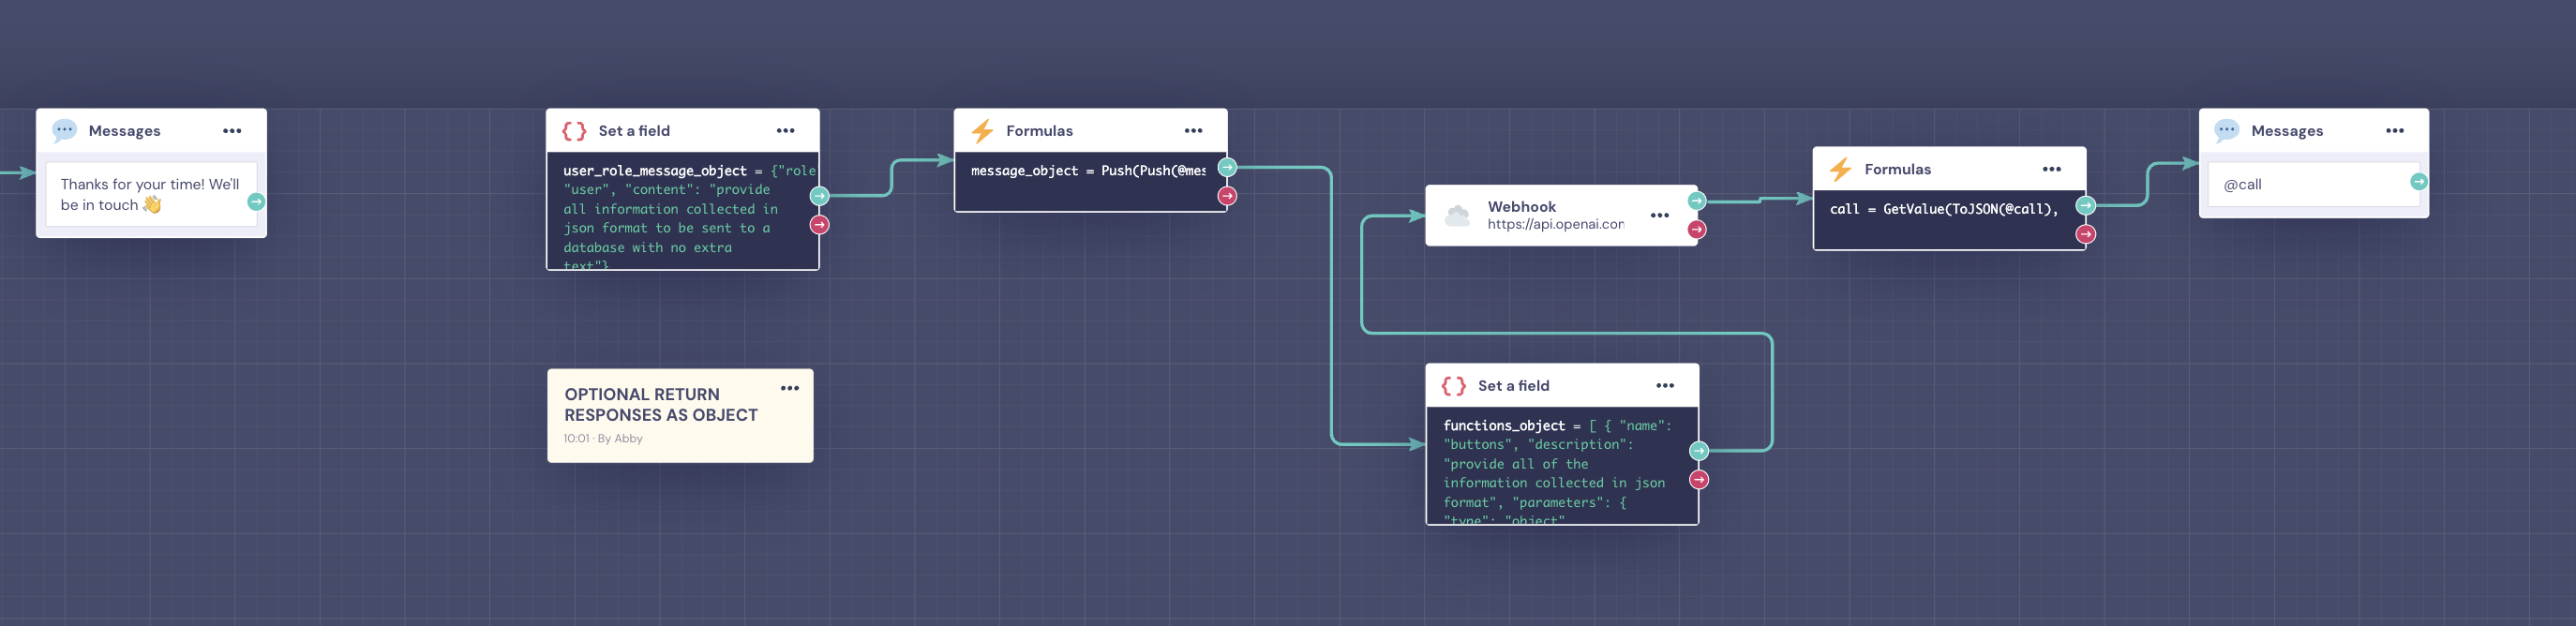
The Flow
If you've previously used any workaround in Landbot with chatGPT this loop driven flow should look somewhat familiar, however, if this is your first time don't panic! We'll break it down.
How It Works: Hybrid Input, users respond via: AI-generated buttons (fast) or Free text (flexible)
Both inputs feed into the same AI loop, pushing responses to a shared 'container' (object).
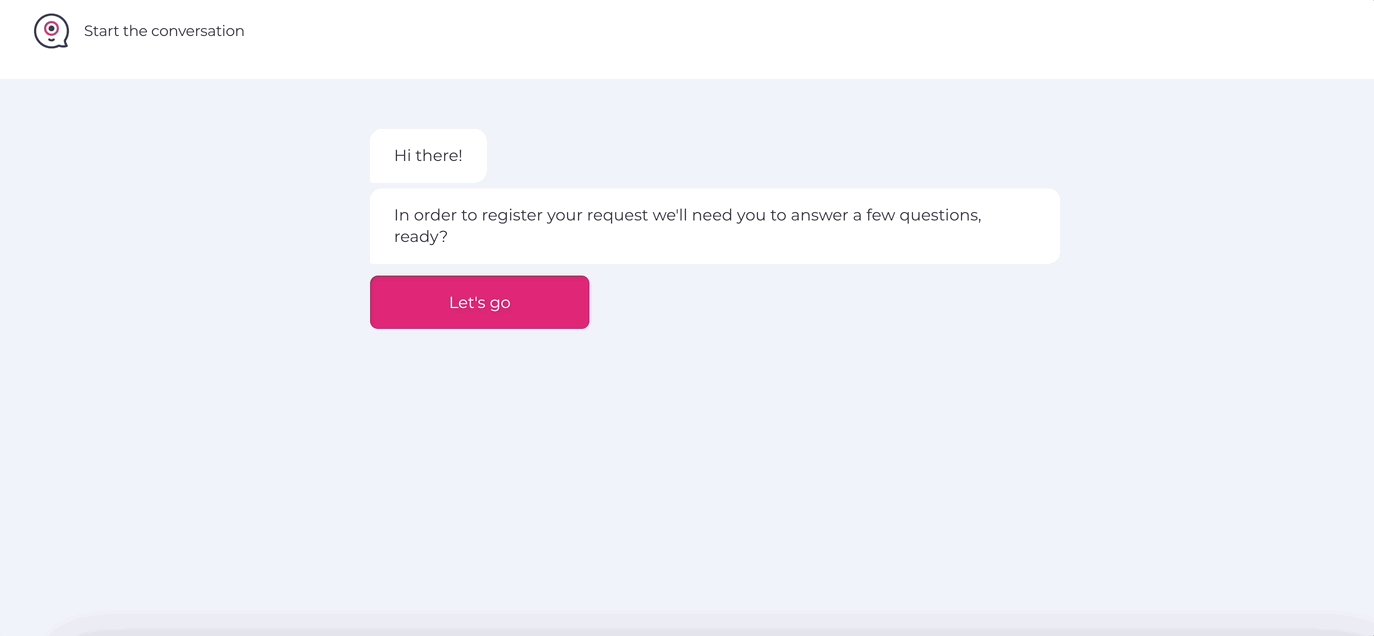
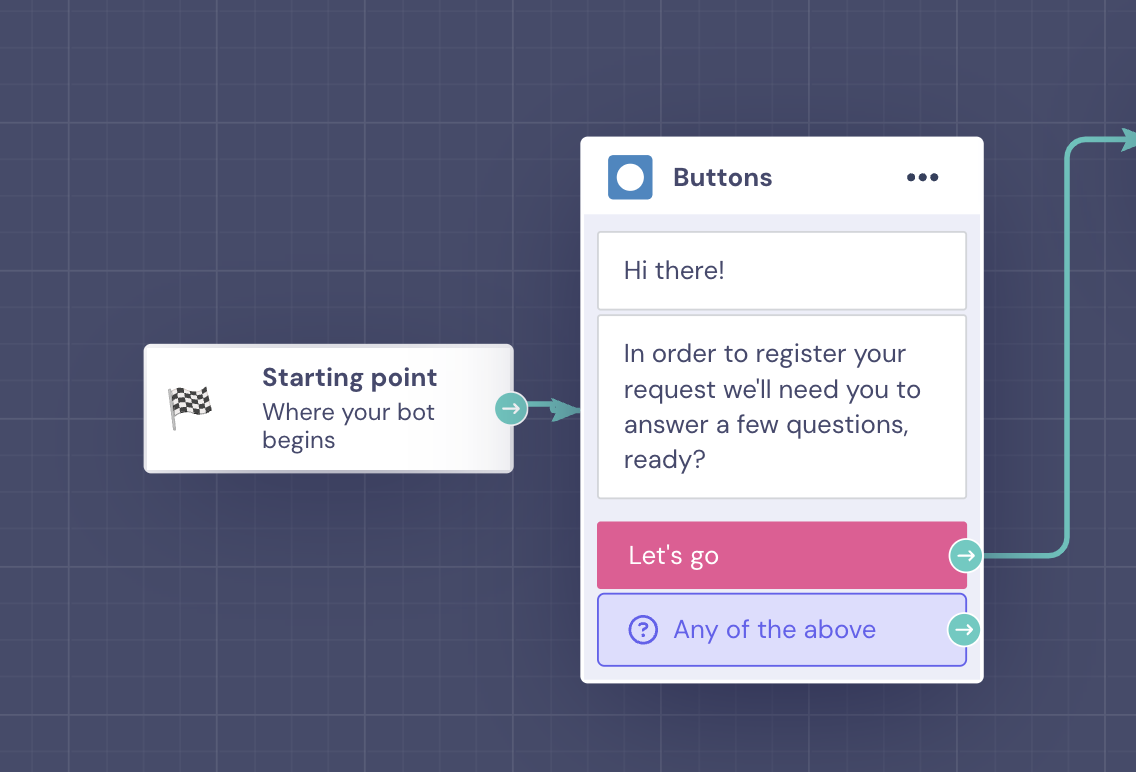
Starting point
As always, we'll start with a user input, here we've used a button but you could use a Text Input block instead
We're also going to include the fixed text in the AI prompt, so it knows that the interaction has already begun
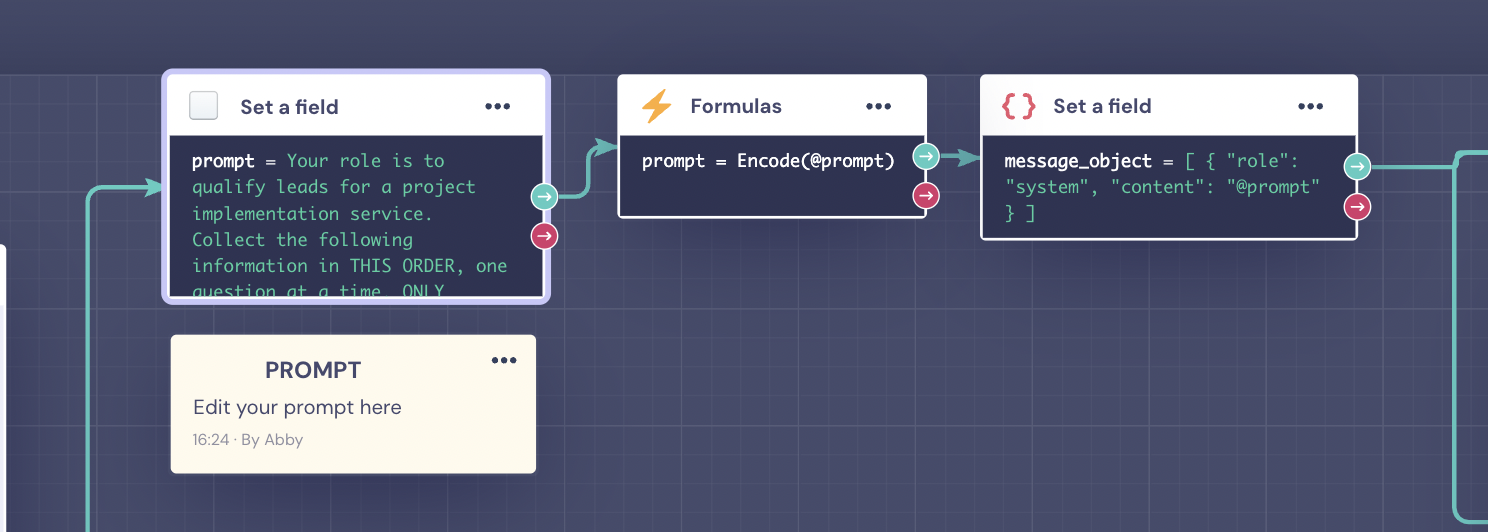
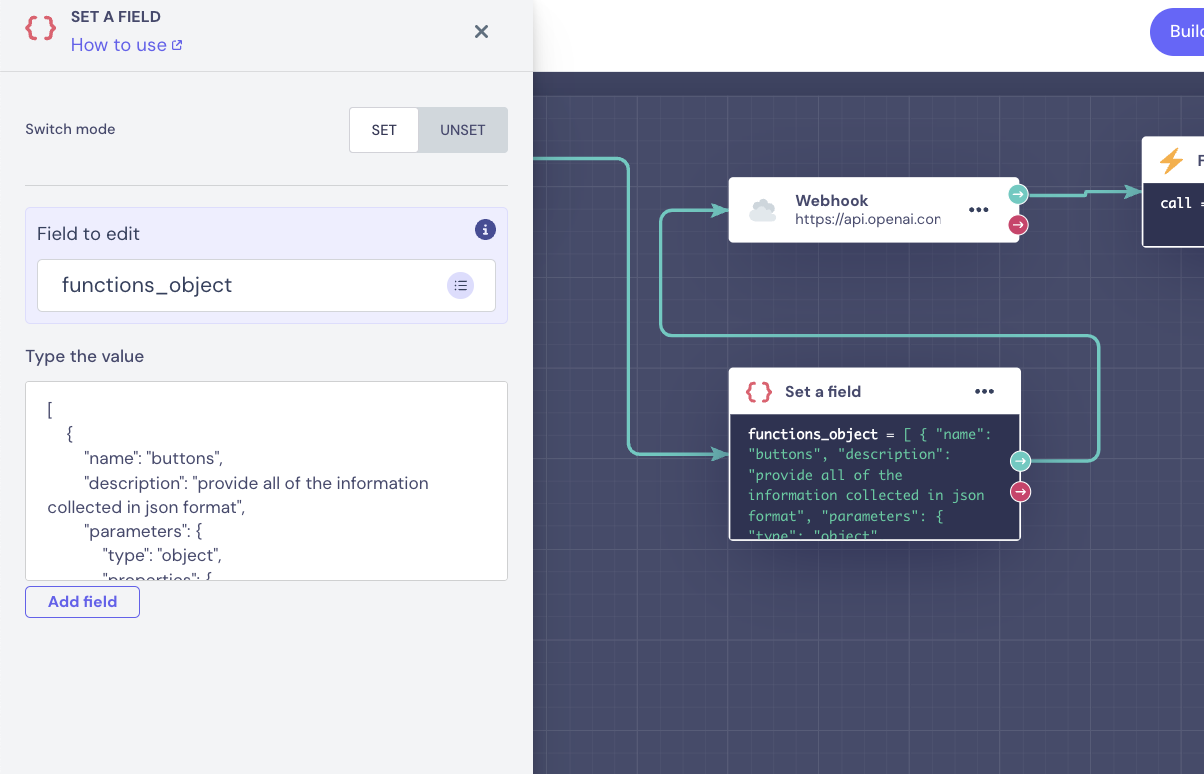
Let's set some fields
The prompt, where you'll add your instructions including the exit keyword, this is saved as a string called prompt while we recommend keeping the same format for the prompt (Q1. Q2. etc) the instructions are completely up to you! In order to populate the buttons correctly they should remain in the format - ['first', 'second', 'etc'] you can have as many buttons as you want per question - or no buttons at all (free text) Here's an example of our prompt:
Now we'll use the Encode formula to encode our prompt, here's the formula you'll input: Encode(@prompt) the output is saved as the same string called prompt
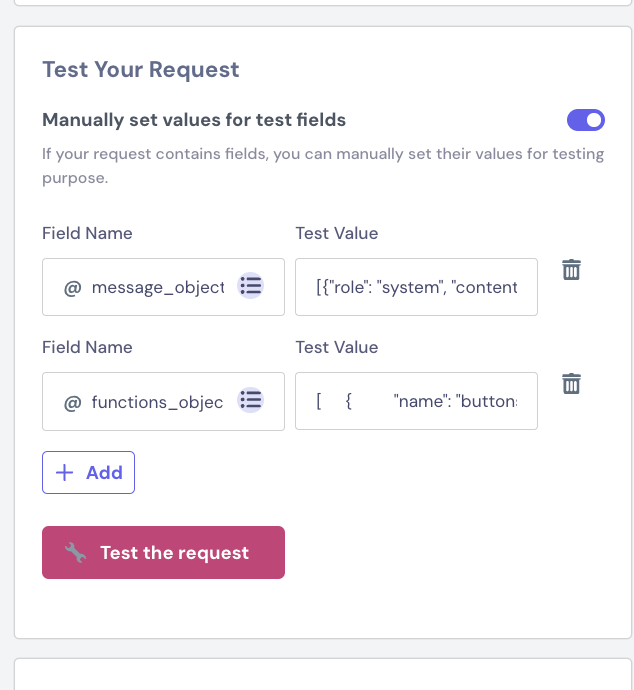
The message object - this will be saved in an array called message_object Here we include the prompt, the user input and the chat history:
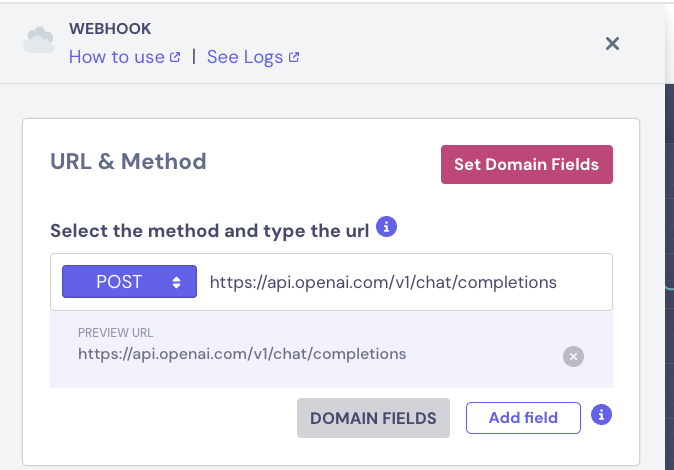
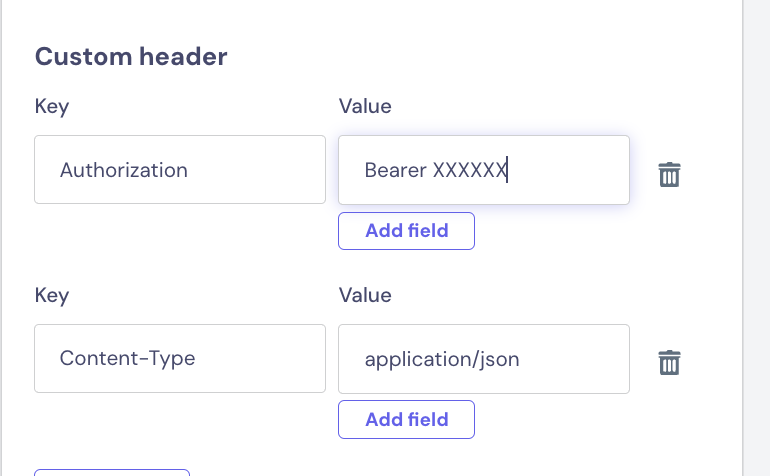
Here are the headers, add your OpenAI API key after Bearer:
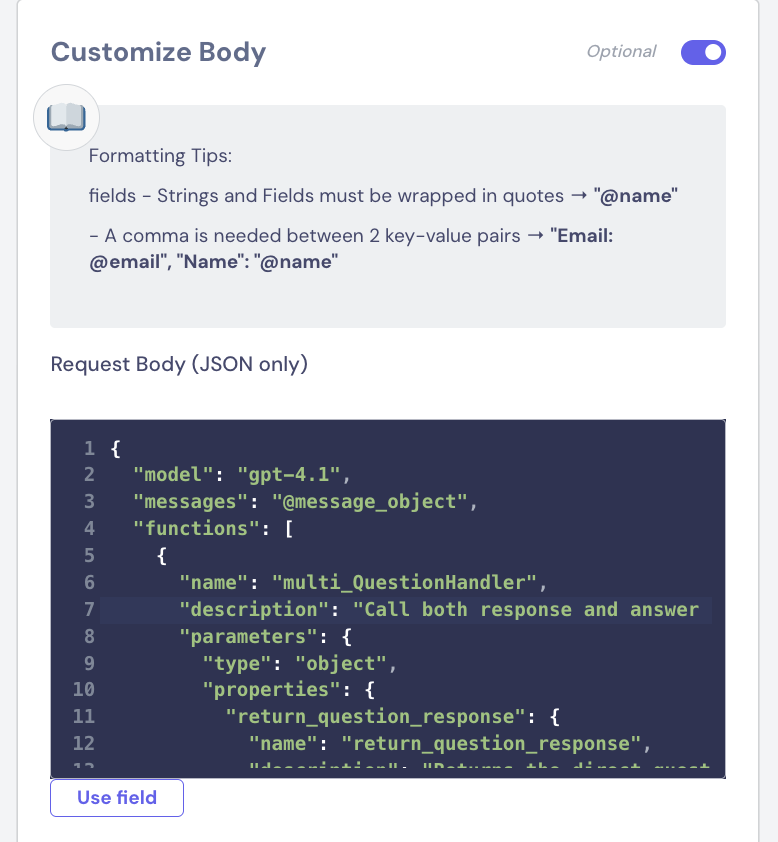
We'll need to customize the body adding the following:
{
  "model": "gpt-4.1",
  "messages": "@message_object",
  "functions": [
    {
      "name": "multi_QuestionHandler",
      "description": "Call both response and answer functions in one call. Omit answers if the question is open-ended.",
      "parameters": {
        "type": "object",
        "properties": {
          "return_question_response": {
            "name": "return_question_response",
            "description": "Returns the direct question/response as a string.",
            "parameters": {
              "type": "object",
              "properties": {
                "response": {
                  "type": "string",
                  "description": "The question or response to the user's input."
                }
              },
              "required": ["response"]
            }
          },
          "return_possible_answers": {
            "name": "return_possible_answers",
            "description": "Returns possible answers (otherwise return empty array).",
            "parameters": {
              "type": "object",
              "properties": {
                "answers": {
                  "type": "array",
                  "items": {
                    "type": "string"
                  },
                  "description": "Array of possible answers."
                }
              },
              "required": ["answers"]
            }
          }
        },
        "required": ["return_question_response", "return_possible_answers"]
      }
    }
  ],
  "function_call": {"name": "multi_QuestionHandler"}
}
The functions object is a secondary set of instructions that tells OpenAI to return the information from the prompt in a very specific format (that we can use to create buttons), we're also telling it that the first item that it returns should be the response and/or question and the rest of the items should be buttons
This is what it will look like:
If you're creating the bot from scratch you will need to 'test the request' including the fixed values for both the message and functions objects (you can copy and paste the ones from earlier)
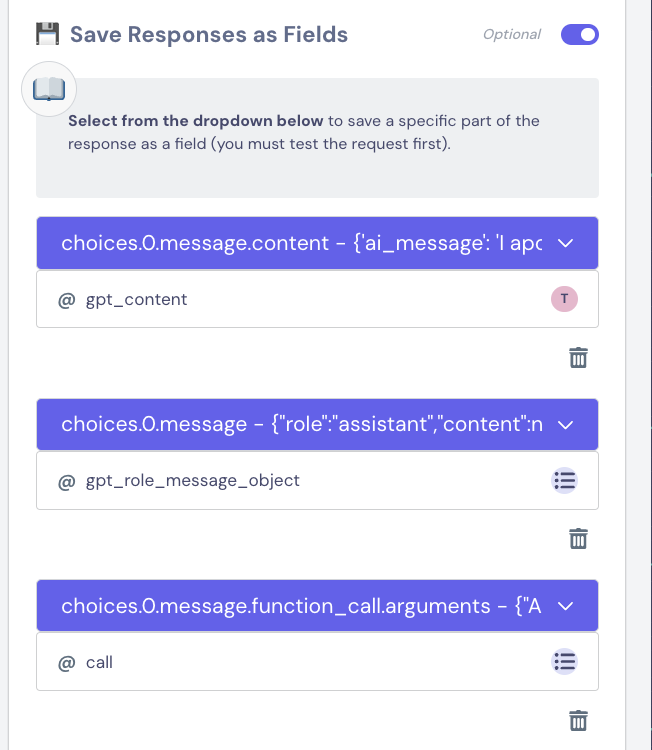
Otherwise you just need to click 'create' in the response section:
It's very important to keep the original formats (gpt_content = string, gpt_role_message_object & call = array)
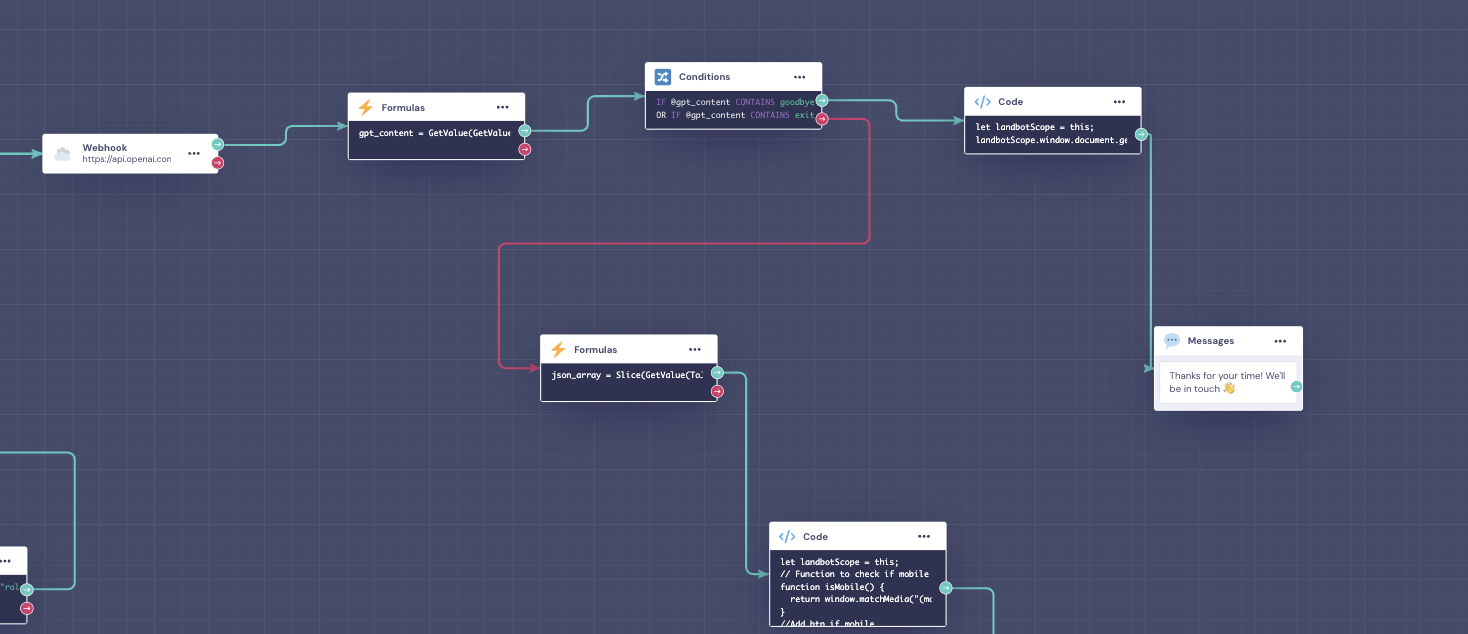
Logic and technical blocks
Now that we have our data we need to run it through some blocks before we can display it
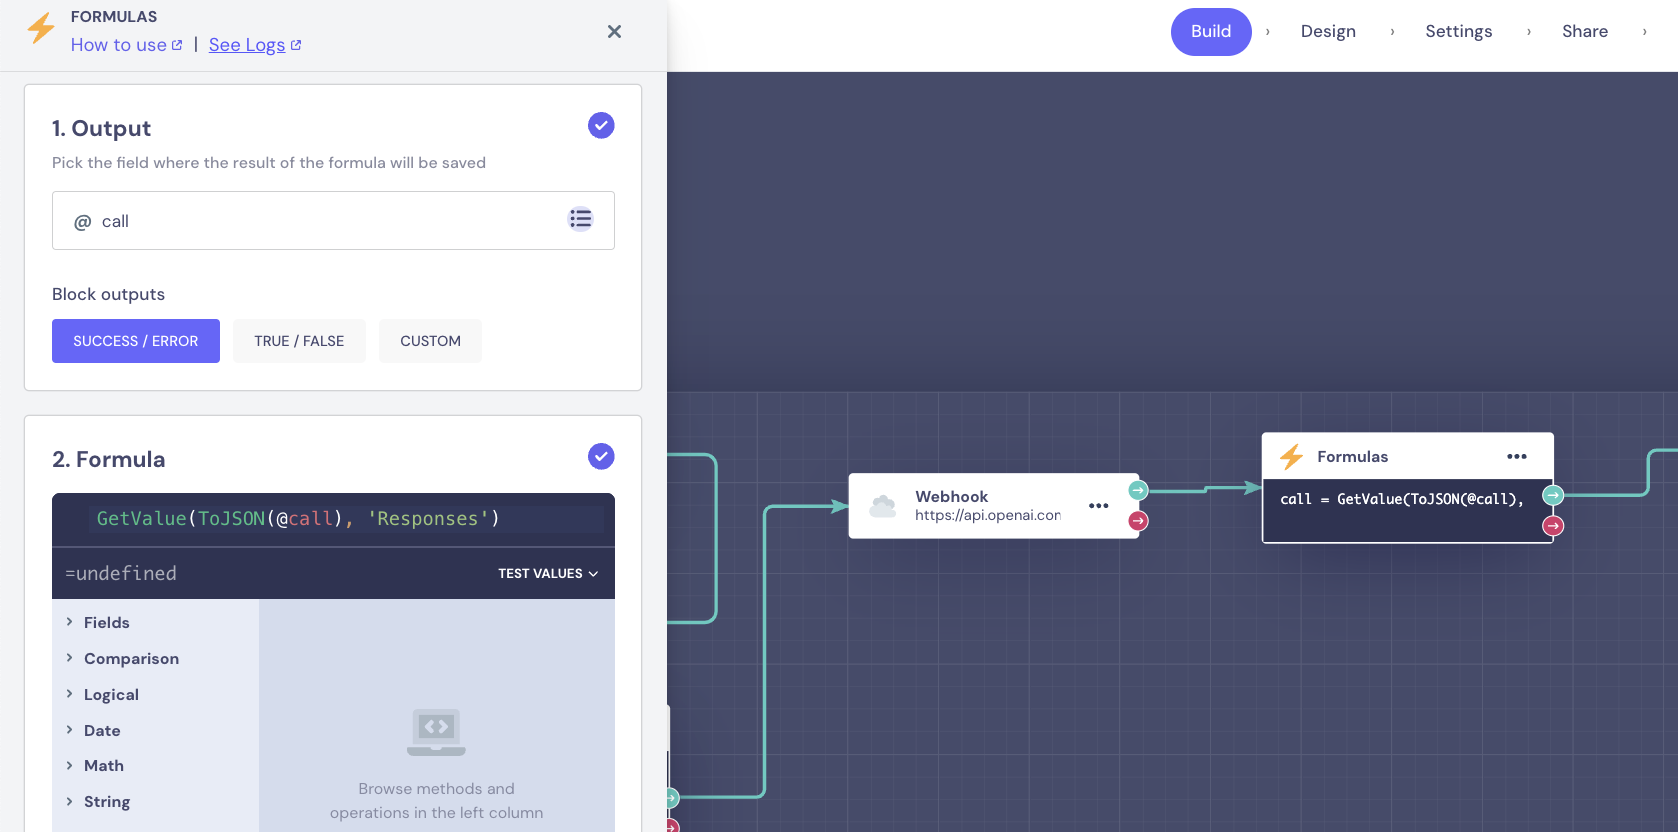
Block 1: Extract question/response with Formulas Remember when we told chatGPT in the prompt that the first item of the array should always be the response or question? Here's how we can access that response: GetValue(ToJSON(@call),'return_question_response')We're converting the response into a valid JSON object, then extracting the first item, we should save the output as a string called gpt_content
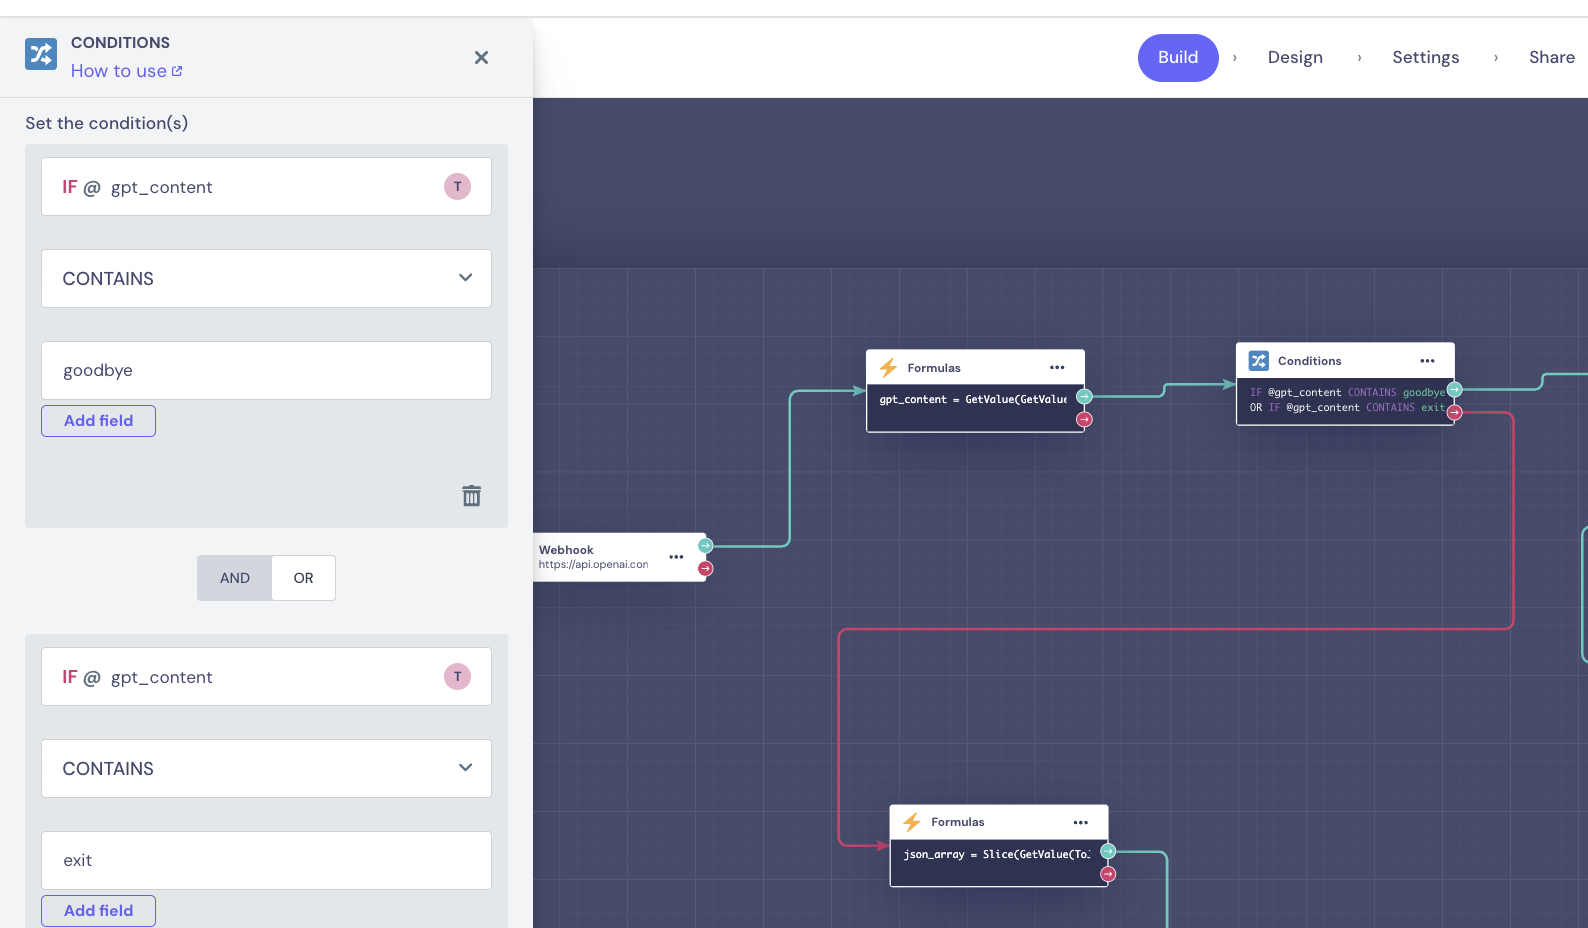
Block 2: Check if flow is complete if not continue to block 3 We instructed chatGPT to respond with exit OR goodbye when all of the information is collected, so here with a Conditions block, we're checking if gpt_content contains either keyword If all of the information is collected it will go through the green output (see flow complete), otherwise it will go through the red output (see flow not complete)Case: Flow complete:
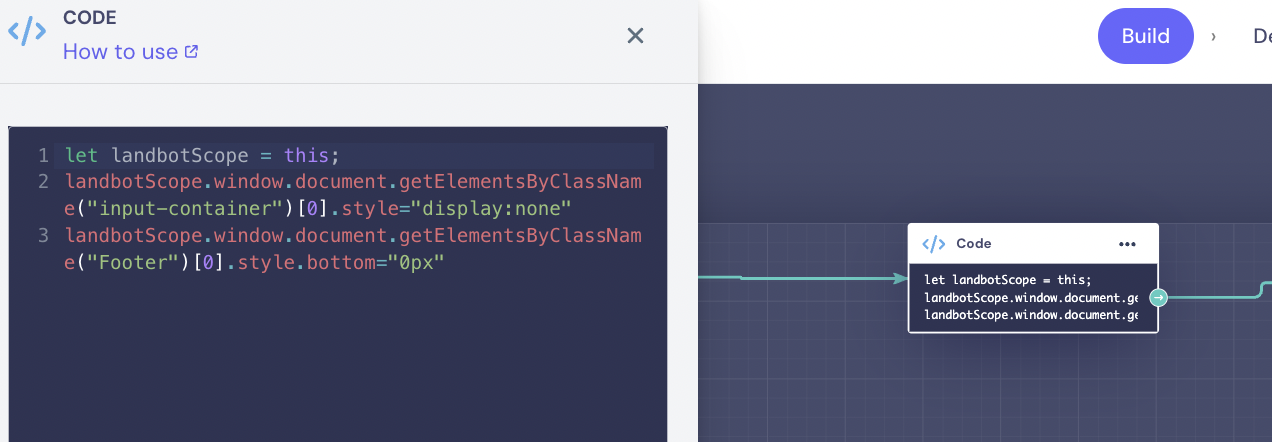
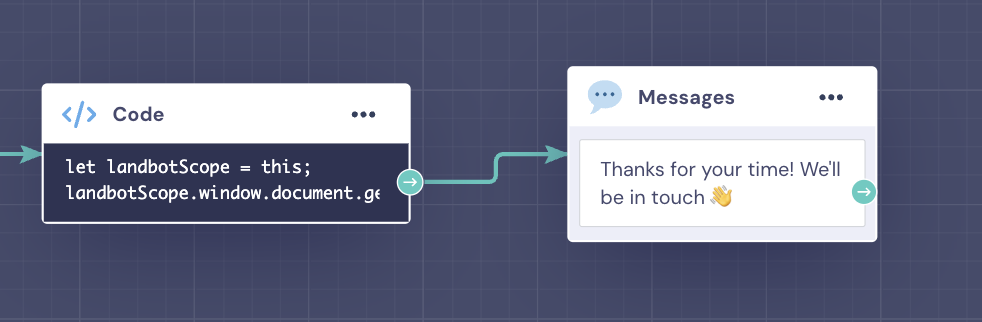
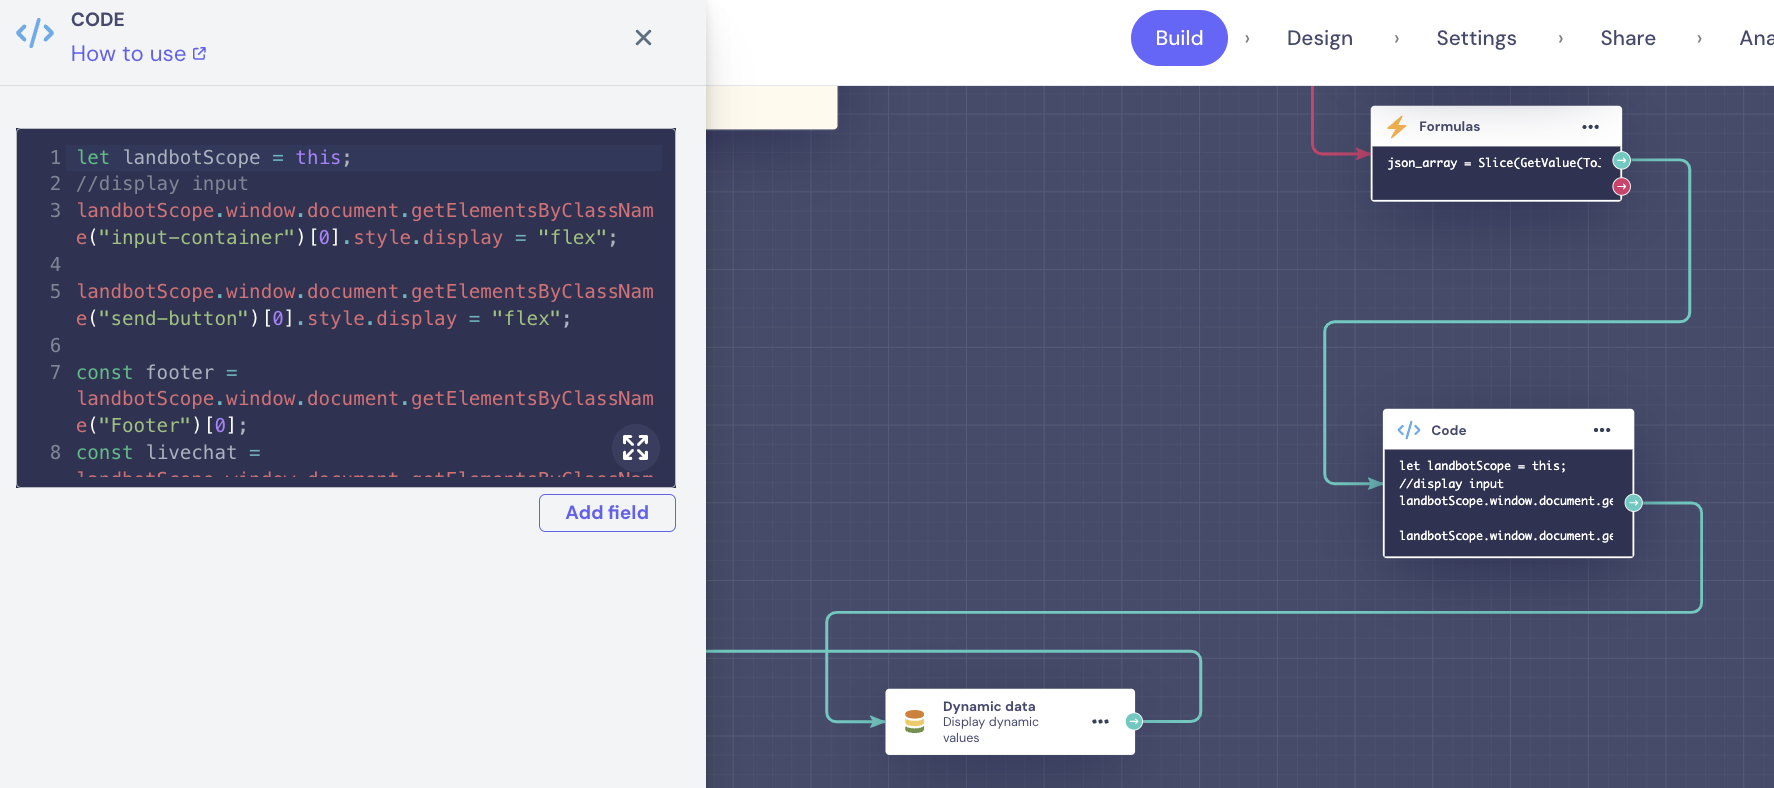
Remove text input element with a Code block (not Code Set!) We'll use the following Javascript to remove the text input:
let landbotScope = this;
landbotScope.window.document.getElementsByClassName("input-container")[0].style="display:none"
landbotScope.window.document.getElementsByClassName("Footer")[0].style.bottom="0px"
Say goodbye
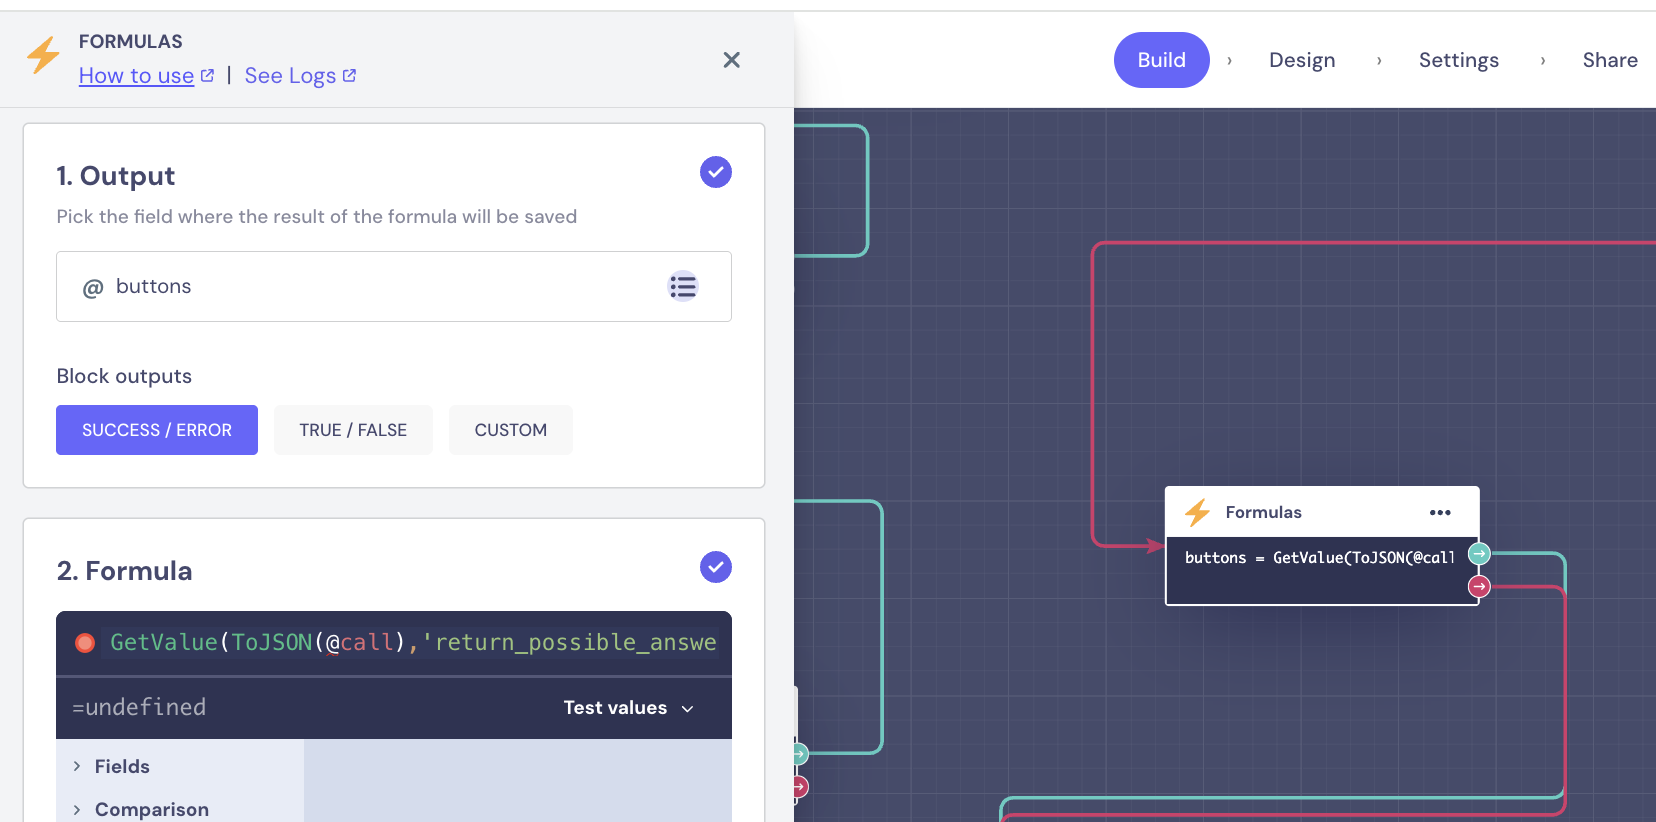
Block 3: Extract buttons In the case that we will have information to collect, we'll use a Formula block to extract the buttons GetValue(ToJSON(@call),'return_possible_answers') This formula gets all of the elements of the array after the first item (the question), the output should be saved as an array called buttons
Block 4: Display text input element The text input element is currently hidden (we don't want it to be visible before they even interact with the bot) so let's display it now by changing display:none to display:block You'll need a Code block (not Code Set!) with the following JS:
let landbotScope = this; //display input landbotScope.window.document.getElementsByClassName("input-container")[0].style.display = "flex";
function isMobile() { return window.matchMedia("(max-width: 767px)").matches; } // Only proceed if footer exists if (footer) { // Check for livechat first if (livechat) { footer.style.bottom = '45px'; } // Fallback to device detection else { footer.style.bottom = isMobile() ? '60px' : '80px'; } }
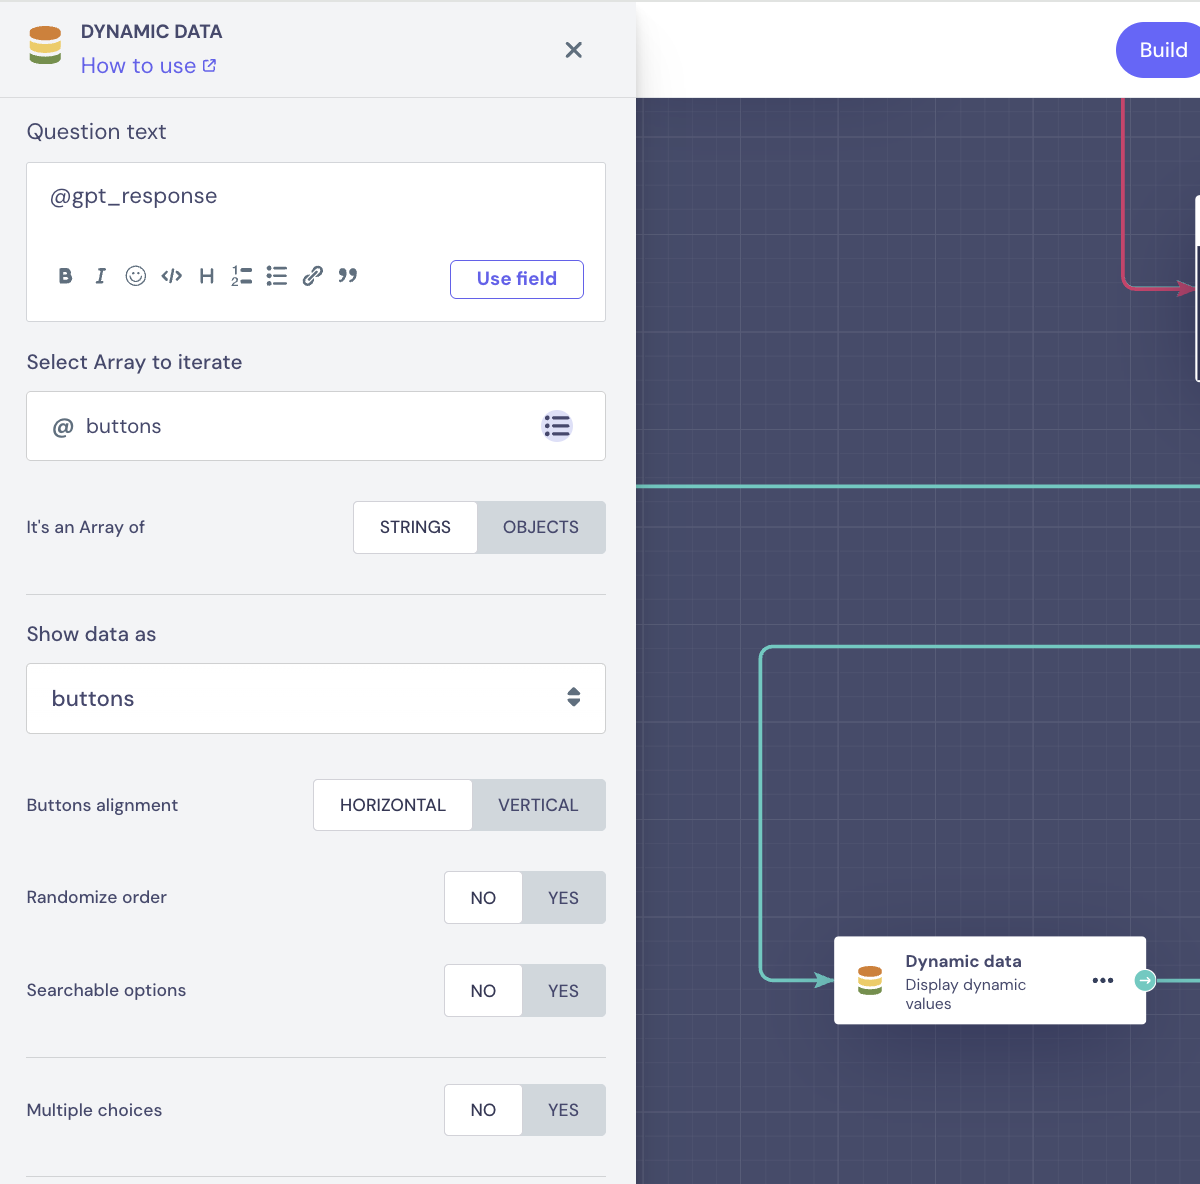
Displaying the buttons
Now we can (finally) display our buttons! (or just the question if there are no buttons)
We'll need a Dynamic Data block, the text displayed will be the question/response we extracted (gpt_content):
In 'Select Array to iterate' we'll select buttons which is an array of strings, we'll show the data as buttons and save the user selection as user_text
Text input flow
Now, what happens if the user inputs a text rather than selecting a button? It will automatically be saved in the @user_text variable and the flow will continue 🙌
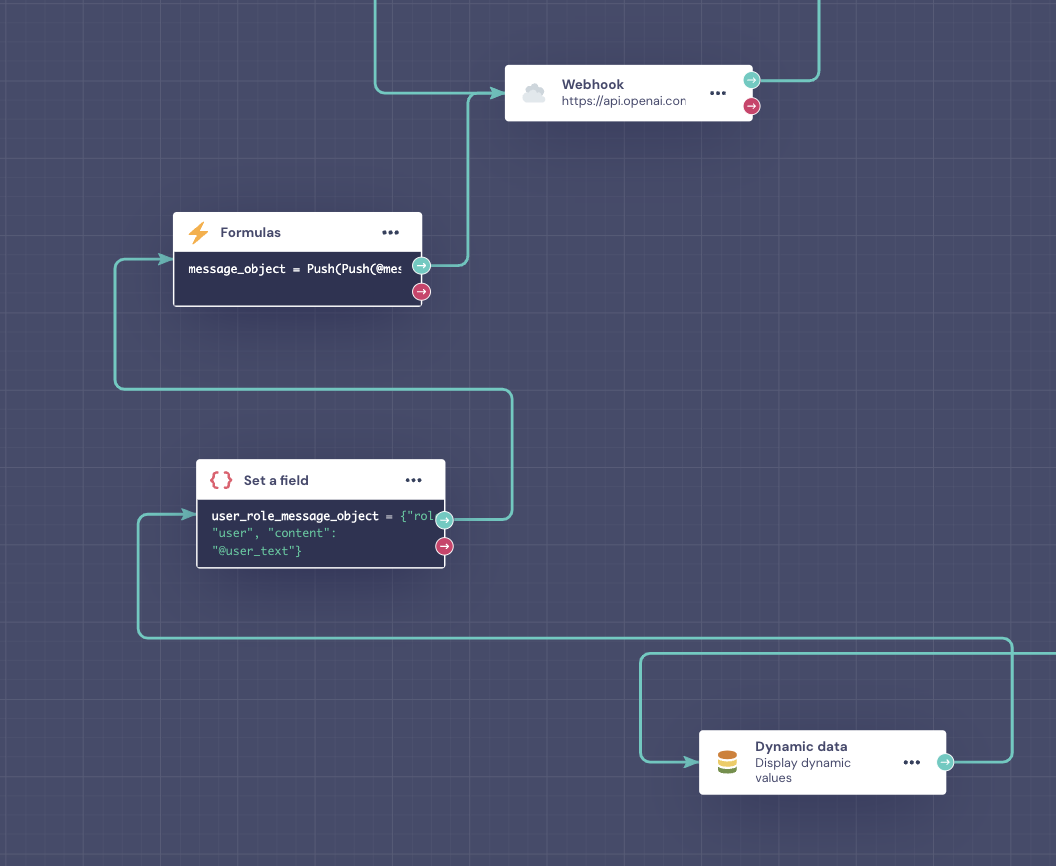
Looping back
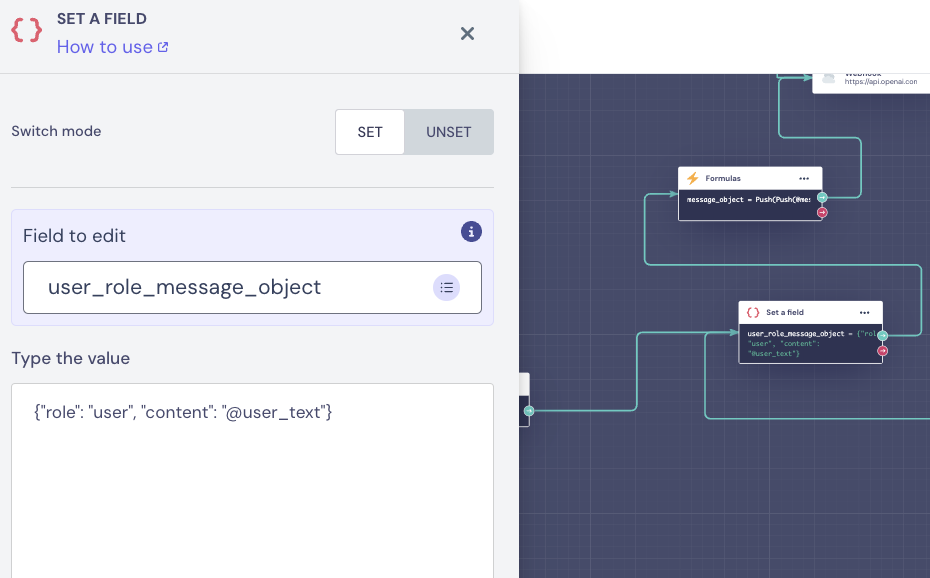
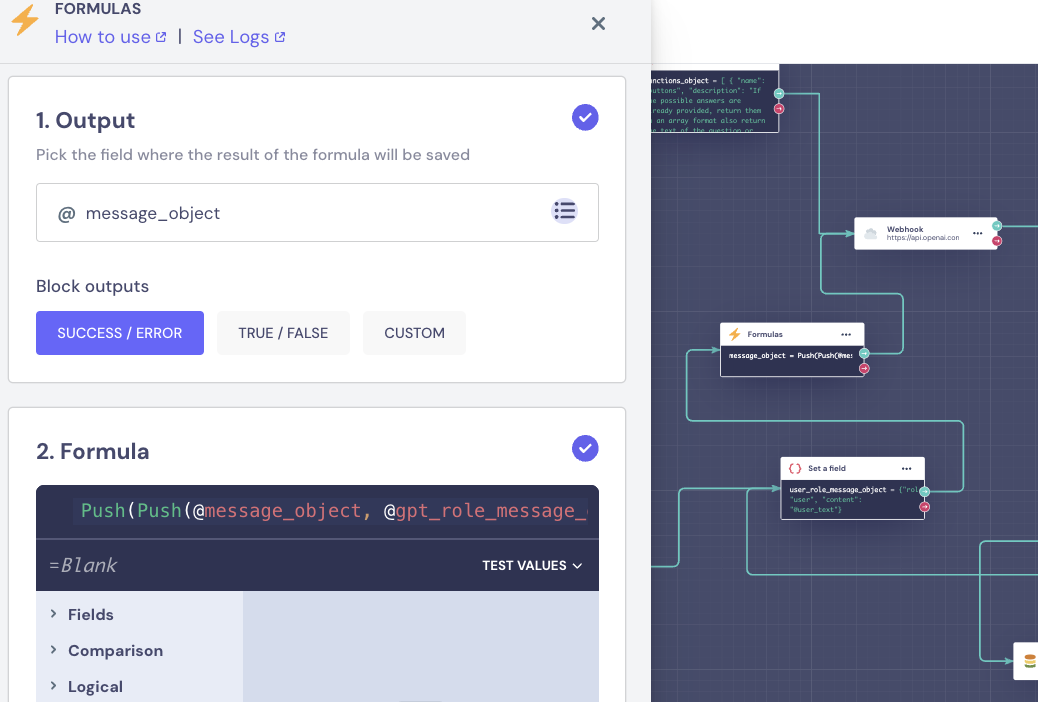
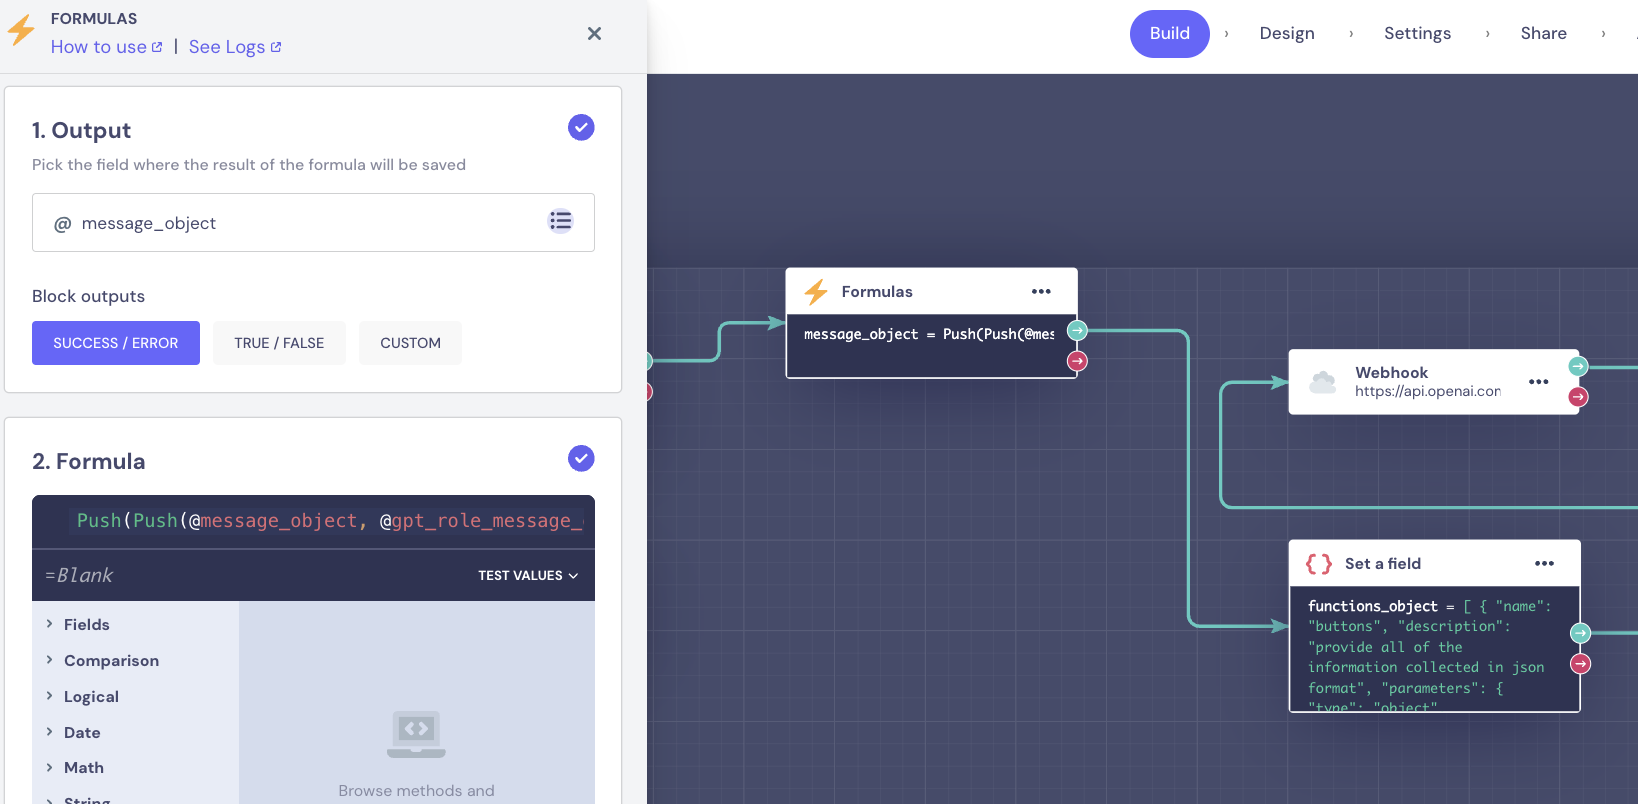
Now we can loop back to the AI! In order to have a continuous conversation, we'll need to push our response into a 'container' (object) using a Set a field block and a Formulas block
We'll connect the Dynamic Data block to the Set a field block
In the Set a field block we'll add the following: {"role": "user", "content": "@user_text"}
The output should be saved as an array called user_role_message_object
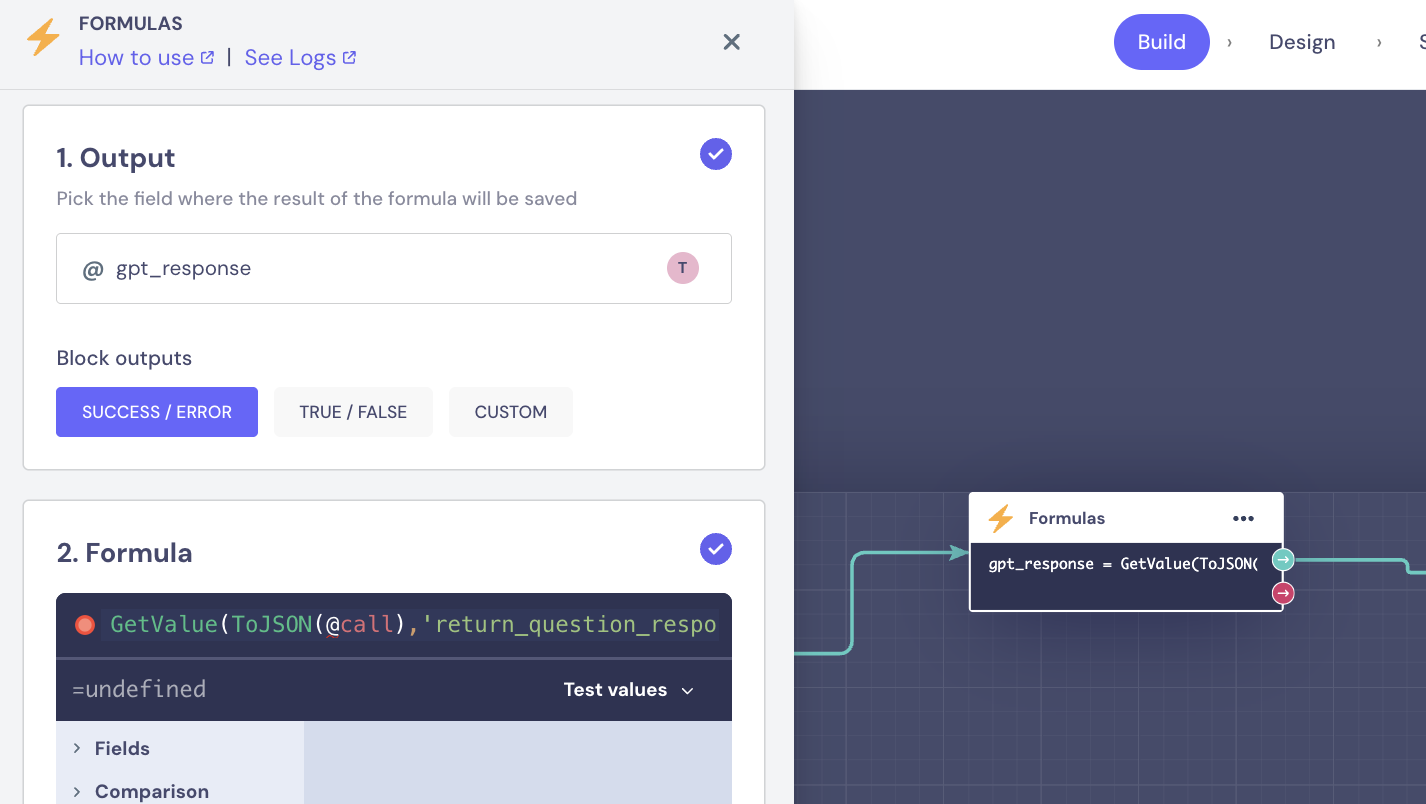
Now we can push that into our container with a Formulas block
Here's the formula: Push(Push(@message_object, @gpt_role_message_object), @user_role_message_object)
The output is the message_object array
We'll link this back to the webhook block!
Custom Code
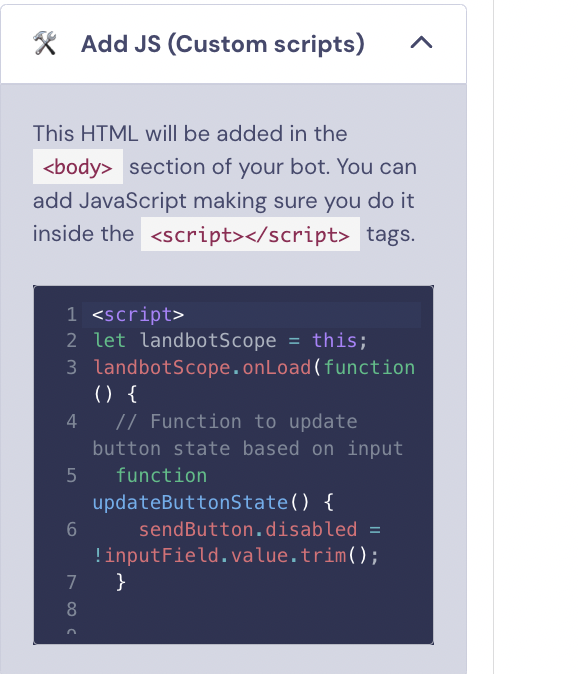
The custom code should not be customized, you just need to copy and paste!
You can find this section in the Design section of your bot in 'Custom code'
<script> let landbotScope = this; landbotScope.onLoad(function() { // Function to update button state based on input function updateButtonState() { sendButton.disabled = !inputField.value.trim(); }
landbotScope.window.setInput = function(u_i) { landbotScope.sendMessage({ type: 'button', message: u_i, }); // Clear input after sending landbotScope.window.document.getElementById('input_dynamic').value = ''; // Update button state after clearing updateButtonState(); }
 Updated
by Abby
Updated
by Abby