Getting Started with Landbot
Introduction to Landbot 🌍
Creating & Setting Up Your Account 👥
How to create your Landbot account, set it up and invite teammates
Common reasons for not receiving account activation email
Trial period
Account Settings
Build Your First Bot 🛠️
Builder Interface Tour
Getting started - build a bot
Managing Data in Your Chatbot: A Guide to Using Fields
Languages and Translations in Landbot
Organize your flow with Bricks
Using Flow Logic in Landbot
How to Test Your Bot - Complete Guide 🧪
How to "debug" (troubleshoot) your bot's flow to spot possible errors (for non coders)
Starting Point
How to Import a Chatbot Flow Without JSON – Use "Build It For Me" Feature
Launch and Share Your Bot 🚀
Build a bot
Bot's Settings
Bot General Settings
Web bots: Second Visit Settings
Custom System Messages
Hidden Fields (Get params / UTMs from url and use it as variables)
Landbot native SEO & Tracking tools
Typing Emulation (Message Delay)
Messages, Questions and Logic & Technical blocks
Messages
Media Block
Media block
How to display images with a variable URL source
How to embed a .gif file inside a message
Different ways to embed Videos in Landbot
Display video and hide button to continue until video has ended
Send a Message block - Simple Message
Goodbye block
Question blocks
Date Block
Scale Block
Buttons block
Ask for a Name block
Ask for an Email block
Ask a Question block
Ask for a Phone block
Forms block
Multiple-Choice Questions with the Buttons Block
Question: Address block
Question: Autocomplete block
Question: File block
Question: Number block
Question: Picture Choice block
Question: Rating block
Question: URL block
Question: Yes/No block
Logic & Technical blocks
Code Blocks
Dynamic Data
How to Use the Dynamic Data Block in Landbot
Get the array's index of the user selection and extract information from array
Formulas
How to Perform Basic Calculations
Get started with the Formulas block
Formulas Blocks Dashboard
Formulas - Regex
Formulas - Date
Formulas - String
Formulas - Logical
Formulas - Math
Formulas - Object
Formulas - Comparison
Formulas - Array
Persistent Menu
Trigger Automation
Webhook
How to Use the Webhook Block in Landbot: A Beginner's Guide
Webhook Block Dashboard
Webhook Block for Advanced Users
Landbot System Fields: Pre-created fields
Set a Field block
Any of the above Output
Global Keywords 🌍
Keyword Jump
Lead Scoring block
Jump To block
AB Test
Conditions block
Conditions block II (with Dates, Usage and Agents variables)
Close Chat block
How to ask a question based on a variable not being set (empty URL params)
Business Hours block
Custom Goals
Note block
Share & Embed
Redirect Users
How to open a new URL in another tab (window)
How to redirect visitors to a URL (web only)
How to add a Click-to-Call/Email/WhatsApp button
Redirect User Based on Language Input (DeepL)
Generate a URL that has variables from user answers
Popup on Exit Intent
Share
Customized Embed Actions
How to redirect user to another url in your site with Livechat open to continue conversation
How to Detect Visitors Browser
Customize and embed your WhatsApp Widget
Modifying Embed Size
Detect if bot was opened
Customized Behavior in Mobile Browsers
Load script and display bot on click button
Launch Bot On Exit Intent
Display Bot During Business Hours Only (Livechat & Popup)
Open / Close a Web bot (embedded)
Launching a bot depending on browser language
How to pass WordPress logged in user data to Landbot
Set the flow depending on the url path (for embedded landbots)
How to launch a Landbot by clicking a button
Open LiveChat bot as soon as page loads
Detect if a visitor is on Mobile/Tablet or Desktop
Embed
Embed your bot into your website and use a custom domain
Embed Landbot in an iframe
Landbot in Wix
Landbot in your web with Google Tag Manager
Landbot in Webflow
Embed in Sharetribe
Landbot in Shopify
Embedding Landbot in Carrd
Landbot in Wordpress
Landbot in Squarespace
Customizing the Proactive Message
Design section (web bots)
Verification & Security
Validate phone number with SMS verification (with Vonage Verify)
Cookie consent banner (full page / full page embed)
Add Captcha Verification (Non-Embedded Bots)
Bricks
How to disable a bot
Account Settings and Billing
Billing
Privacy and Security
Teammates
Agent Status and Log out
Roles & Permissions for Teammates
Manage Landbot Teammates - Add and Customize Agents
Startup Discounts
NGOs and Educational Organizations Discount
AI in Landbot
Landbot AI Agent
AI Agent - Interactive components
AI Agent Block
AI Agent Setup - Best Practices
Tips to migrate from old AI Assistants to AI Agents
How to create custom Instructions for your Landbot AI Agent with AI (ChatGPT, Claude...)
AI Agent In Action - Live Implementation Example
Capture, generate and use data with AI Agents
Structuring your AI Agent Knowledge Base
Custom AI Integrations
Create a JSON format response from OpenAI in WhatsApp
Responses API
Connect OpenAI Assistant with Landbot
AI in WhatsApp
How to build a FAQ chatbot with GPT-3
GPT-4 in Landbot
OpenAI
Prompt Engineering for GPT-3
Build a Customer Service Bot with ChatGPT and Extract Information
Google Gemini in Landbot
Build a Chatbot with DeepSeek
AI Task block Overview
Integrations with Landbot
Native Integrations
Airtable
Airtable integration block
Get data filtered from Airtable with a Brick- Shop example
20 different ways to GET and filter data from Airtable
How to add/update different field types in Airtable (POST, PATCH & PUT)
How to Create, Update, Retrieve and Delete records in Airtable (POST, PATCH, GET & DELETE)
Get more than 100 items from Airtable
Insert Multiple Records to Airtable with a Loop
How to Get an Airtable Token
Advanced filters formulas Airtable block
Airtable usecase: Create an event registration bot with limited availability
Update Multiple Records in Airtable Using a Loop
Reservation bot with Airtable
Calendly
Dialogflow
Dialogflow & Landbot course
Dialogflow & Landbot intro: What is NLP, Dialogflow and what can you do with it?
Dialogflow & Landbot lesson 1: Create your first agent and intent in Dialogflow
Dialogflow & Landbot lesson 2: Get the JSON Key
Dialogflow & Landbot lesson 3: Setting up of Dialogflow in Landbot
Dialogflow & Landbot lesson 4: Training phrases and responses for a FAQ
Dialogflow & Landbot lesson 5: Entities and Landbot variables
Dialogflow & Landbot lesson 6: Redirect user depending on Dialogflow response parameters (intent, entities and more)
Learn more about Dialogflow - Courses and communities
Integrations > Dialogflow Block
How to extract parameters from Dialogflow response with Formulas
Dialogflow Integration Dashboard
Dialogflow in Unsupported Languages (& Multilingual)
Dialogflow - How to get JSON Key
Google Sheets
Google Sheets Integration: Insert, Update and Retrieve data
How to use Google Sheets to create a simple verification system for returning visitors
How to Upload Document & store link
How to give unique Coupon Codes (with Google Spreadsheets)
Google Sheets Integration Dashboard
How to insert a new row with data and formulas in Google Sheets
How to use Google Spreadsheet as a Content Management System for your bot
Hubspot
MailChimp
Salesforce
Segment
SendGrid
Send an Email
Sendgrid Integration Dashboard
How to create a custom SendGrid email - (Custom "from" email)
Slack
Stripe
Zapier
How to Configure the Landbot and Zapier Integration Using the Zapier Block
Zapier Integration Dashboard
How to insert a row to Google Spreadsheet by Zapier
How to generate a document with PDFMonkey by Zapier
Send WhatsApp Templates from Zapier
How to Send Emails from Your Landbot Using Gmail via Zapier
Get Opt-ins (Contacts) from Facebook Leads using Zapier
How to extract data from an external source with Zapier and use it in Landbot
Zapier trigger
How to complete a digital signature flow by Zapier
Make a survey with Landbot and display the results in a Notion table using Zapier
Custom Integrations
ActiveCampaign
Google Calendar
Google Fonts
Google Maps
Embed Google Maps
Google Maps API Key for Address block
Extract Data With Google Maps Geocoding API
Calculate Distances With Google Maps API
Google Meet
IFTTT
Integrately
Intercom
Make
Connecting MySQL with Make.com (formerly Integromat)
Send WhatsApp Message Template from Make
Make Integration With Trigger Automation Block
How to send an email through Sendinblue by Make.com (formerly Integromat)
Get Opt-ins (Contacts) from Facebook Leads using Make
How to extract data from an external source with Make.com and use it in Landbot
OCR
Pabbly
Paragon
Pipedream
PDF Monkey
Store Locator Widgets
Xano
Zendesk
Send an Email with Brevo
How to integrate Landbot with n8n
How to Integrate Landbot with n8n using Webhooks
WhatsApp Channel
Getting started!
WhatsApp Testing
Build a WhatsApp Bot - Best Practices and User guide
Build a WhatsApp Bot - Best Practices for Developers
Types of Content and Media you can use in WhatsApp 🖼
1. WhatsApp Article Directory
WhatsApp Integration & Pricing FAQ
Adding & Managing your WhatsApp Channel
Facebook Business Verification - Best Practices 🇬🇧
WhatsApp Number Deletion (WA Channel management)
Adding a WhatsApp number to your account
WhatsApp’s Messaging Policy: New Accepted Industry verticals
Meta processes guide: Meta Business Verification, Official Business Account (OBA) requests, Appeals
Additional Number integration: Limitations and Requirements (Number integration)
Existing WhatsApp Number Migration
Key Insights for Migrating to WhatsApp Business API Cloud
How to's, Compatibility & Workarounds
WhatsApp bots - Feature Compatibility Guide
WhatsApp - How to direct a user through a different bot flow on their second visit
WhatsApp - Get user out of error message loop
How to do Meta ads conversion tracking in WhatsApp bot using the Conversion API
Getting Subscribers: Opt-in, Contacts
How to get Opt-ins (Contacts) for your WhatsApp 🚀
WhatsApp Quality - Best Practices
Opt-In block for WhatsApp 🚀
Opt-in Check Block
Contact Subscribe Block: Manage Opt-ins and Audiences
New Contacts: Import, Segment, and Organize Easily
WhatsApp Channel Settings
Parent Bot/Linked Bot - Add a main bot to your WhatsApp number
WhatsApp Channel Panel (Settings)
Growth Tools for WhatsApp
Messaging and contacting your users
WhatsApp Campaigns 💌
WhatsApp's Message Templates
Audience block
WhatsApp Marketing Playbook: Best Practices for Leadgen
WhatsApp Error Logs: Troubleshooting guide
Audiences
WhatsApp for Devs
How to calculate the number of days between two selected dates (WhatsApp)
Creating a Loop in WhatsApp
Recognise the users input when sending a Message Template with buttons
Trigger Event if User Abandons Chat
Calculate Distances in WhatsApp
Send Automated Message Templates based on Dates
How to Let Users Opt-Out of Your WhatsApp Messages via API
reply from Slack: How to create an integration to allow agents reply WhatsApp users from Slack (with Node JS)
Set Up a Delay Timer in Bot
Notify Teammates of Chat via WhatsApp
Native blocks for WhatsApp
Reply Buttons block (WhatsApp)
Keyword Options 🔑 Assign keywords to buttons (WhatsApp and Facebook)
List Buttons Block (WhatsApp)
Collect Intent block
Send a WhatsApp Message Template from the Builder
WhatsApp Changes to Message Limits starting October 7, 2025
Other Channels - Messenger and APIChat
Facebook Messenger
The Facebook Messenger Ultimate Guide
Types of content you can use in Messenger bots 🖼
How to Preview a Messenger bot
API Chat (for Developers)
Human Takeover & Inbox
Metrics and Data Management
Metrics Section
How to export the data from your bots
Export data: How to open a CSV file
Bot's Analyze Section
For Developers & Designers
JavaScript and CSS
CSS and Design Customizations
Design Customizations
Advanced (Custom CSS & Custom JS)
Components CSS Library Index
Background Class CSS
Identify Blocks CSS
Buttons Class CSS
Header Class CSS
Media Class CSS
Message Bubble Class CSS
Miscellaneous Classes CSS
CSS Customization Examples: "Back to School" Theme
Get started guide for CSS Design in Landbot
CSS Customization Examples: Call To Action: WhatsApp
CSS Examples: Lead Gen
CSS Customization Examples: "Translucid"
CSS Customization Examples: "Minimalist" Theme
Dynamic Data CSS
Form Block CSS
CSS for Typewriter Effect
CSS Customization Examples: Carrd Embed Beginner
Dynamically Change a Bot's Background
Proactive Message Customizations with Javascript and CSS
Landbot v3 - Web CSS - RTL
CSS Customization Examples: Video Bubble
Dynamically Change Any Style
CSS Customization Examples: CV Template
Change Landbot custom CSS dynamically from parent page onload
Widget/Bubble Customizations with Javascript and CSS
JavaScript
How to change Avatar dynamically
Javascript in WhatsApp
Landbot JavaScript Integration
Different ways to format numbers with JS
How to display an HTML Table and a List in Landbot v3 web
Trigger a Global Keyword with JS (web v3)
Create Dynamic Shopping Cart with JS and CSS
Add a Chart (with Chart JS library) in your Landbot
Different ways to format numbers with JS (WhatsApp)
Pop up modal to embed third party elements
Landbot API
Send WhatsApp Messages with Landbot API
How to "send" a user to a specific point in the flow with Javascript and with the API
APIs
Get Opt-ins (Contacts) using Landbot API
MessageHooks - Landbot Webhooks
Resume flow based on external process with Landbot API (Request, Set, Go)
Tracking
Google Analytics - Track Events (Not embedded)
Google Analytics - Track Events (Embedded)
Meta Pixel - Track Events (only Embedded)
How Track Google Analytics Events in Landbot with Google Tag Manager (GTM)
Google Adwords - How to track Google Adwords in Landbot
Set a timer to get the time spent during the flow
Workarounds and How To's
Workflows
How to build an event registration Landbot (to be used in one screen by many attendees) (web only)
How to let user select a time of booking (with a minimum 45 minutes notice)
Send Files Hosted in Landbot to Your Google Drive with Make
Two-Step Email Verification
Fixing Web Bot Loading Issues for iOS Devices in Meta Campaigns with Disclaimers
Progress Bar Workaround
How to Add User Verification to Your Chatbot
How to set up questions with a countdown
HTML Template for Emails
Creating a Simple Cart in WhatsApp
Creating Masks for User Input (2 examples)
More Topics
Table of Contents
- All Categories
- WhatsApp Channel
- Getting Subscribers: Opt-in, Contacts
- How to get Opt-ins (Contacts) for your WhatsApp 🚀
How to get Opt-ins (Contacts) for your WhatsApp 🚀
What is the Opt-in process and when and why do I need it?
The opt-in process refers to the consent you need to obtain from your users before contacting them proactively through your WhatsApp channel.
To this day there are two different types of messages on WhatsApp:
- Reactive messages - messages are considered reactive when the final user initiates the conversation for a period of 24 hours since the user's last message.
- Proactive/Push Messages - messages are considered proactive when they are initiated by the company outside of this 24-hour window.
Before you can send these proactive messages to your users; they must previously give you their consent. This consent is the opt-in and is part of WhatsApp's policies to avoid SPAM to users.
Guidelines to follow
We kindly ask that you follow these guidelines when obtaining opt-in consent:
- Please make sure to clearly inform your customers that they are opting in to receive communication from your business.
- It's important to also state the name of your business so that customers know exactly who they are opting in to receive messages from.
- Lastly, please ensure that you are in compliance with all relevant local laws and regulations.
Sending messages to users without their consent may be perceived as unsolicited or spam, increasing the chance of your number being reported. Such reports can negatively impact your quality rating on Meta. Opt-ins not only help ensure your customers view your messages as relevant and welcome, but they also protect your brand’s reputation, prevent potential bans on Meta, and help you maintain a High Quality Rating.
Tips to consider
We also recommend you follow these tips for optimizing your user's experience while obtaining opt-in:
- It's important you set clear expectations for the messages that customers will receive. This can be achieved by:
- Obtaining an opt-in that covers all types of messages your business may send, such as order updates, relevant offers, and product recommendations (for more information on the categories of the message you can send proactively, please click here)
- Obtaining separate opt-ins for each message category to avoid customers blocking the business due to receiving unsolicited messages.
- Providing easy to-follow instructions for opting out of specific message categories.
- Make sure that the opt-in and opt-out processes are user-friendly and easy to understand (click here on more information on how users can opt-out)
- Clearly communicate the benefits of receiving this information to customers.
- Monitoring the Quality Rating of your account, especially when implementing new opt-in methods. (click here for more information on how to check and keep track of your Quality Rating on Meta)
Collecting opt-in from your users
It's really up to you to decide the method of opt-in, the important is to obtain that opt-in in a manner that complies with laws applicable to the communications you will send to your users.
As long as the opt-in method meets the above requirements, it will be policy compliant. These are examples of supported opt-in methods:
- SMS
- Website
- By phone (using an interactive voice response (IVR) flow)
- In person or on paper (customers can sign a physical document to opt in
Opt-in methods in Landbot
Opt-in Snippet
Once you have an active Official WhatsApp channel, you'll be able to enter the Growth Tools section.

Within that section, you will find the options to:
1. Generate an opt-in form that you can use to get opt-in in many different ways
2. Manage and edit your current Opt-in forms

To see the list of all subscribers to your WhatsApp channel, you should check the Contacts section instead:

1. Creating an opt-in form

This is our former snippet, a programming term for a small region of re-usable source code, machine code, or text, let's explain it with some more context.
For example:
You've just had your number approved by WhatsApp, integrated with Landbot, and want to start opting in users so you can reach out to them proactively in the future.
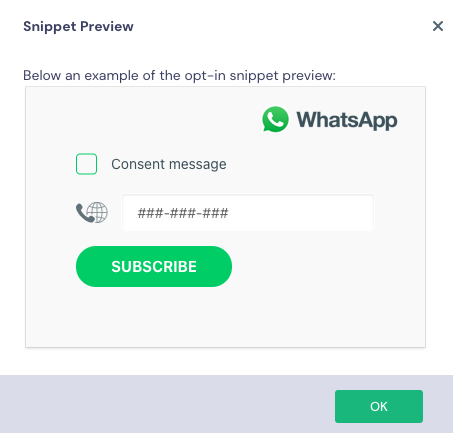
So if visitors of your website leave their phone number in this form, and tick the consent checkbox, they will be automatically registered as new subscribed contacts.

Here are the steps to follow:
- Opt-in form name: Choose a name to identify your forms.
- Opt-in confirmation message- select a message template: If you want to send a WhatsApp message immediately after the user has opted in. The most common use for this section is sending a "thanks for subscribing message". You'll also be able to add a pre-approved Message Template
If you click on Select message template it will bring up a modal with all your approved template messages. Select the one you'd like to send.
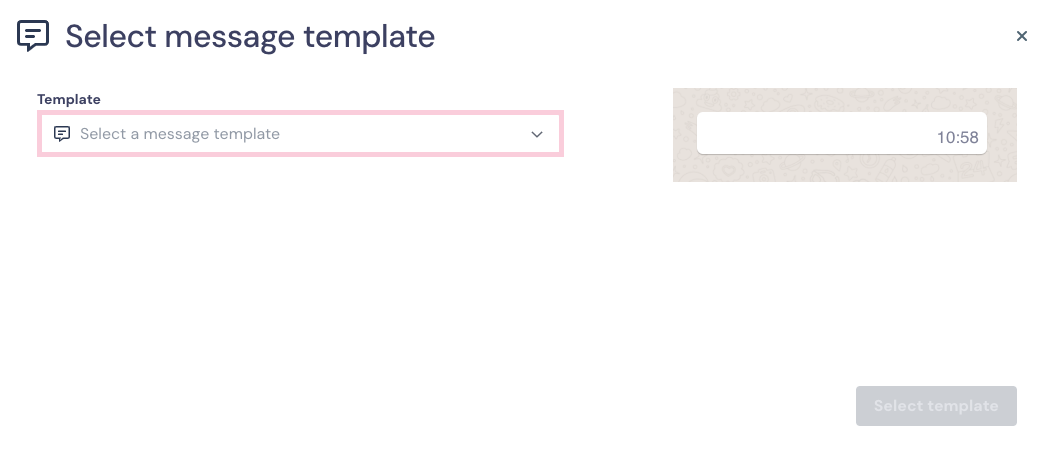
If the selected template message contains variables (parameters saved in Landbot) in the content, you'll have to fill out the blank with the variable of your choice.
The variables are going to be displayed as numbers surrounded by double brackets:
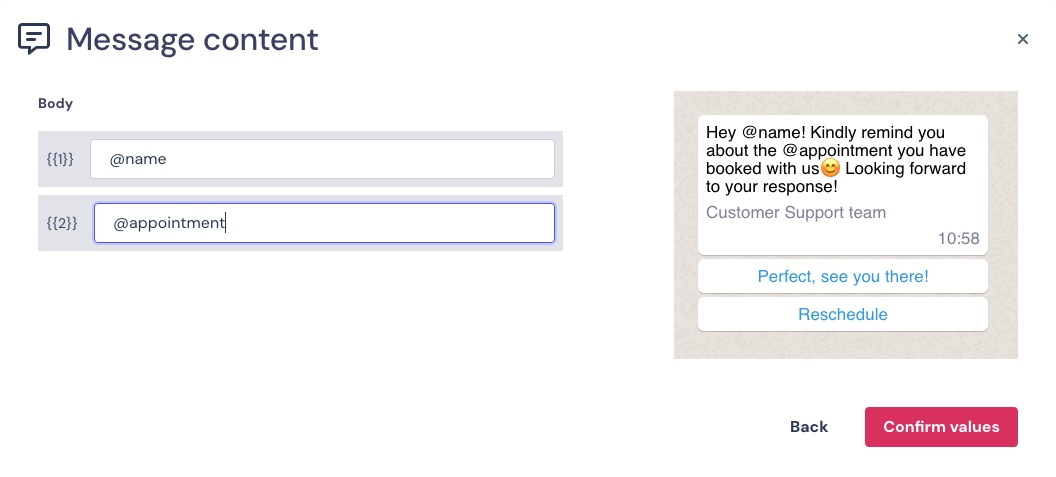
In this particular example you could use the variable @name to replace the {{1}} with the name of the person.
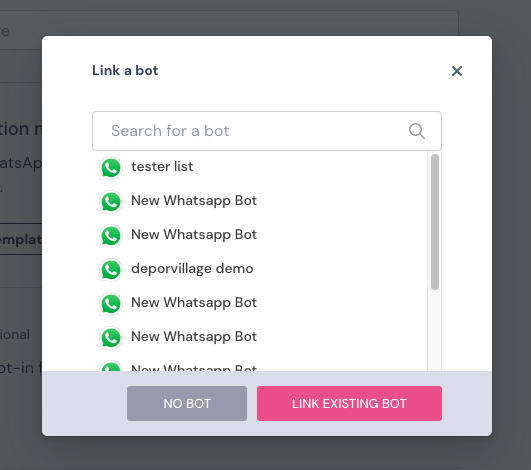
- Choosing the Bot (optional): You are also able to choose a bot that will be linked to the message template. It will be triggered only if the user replies to the message template.
If you don't link a bot in this section and the user sends a message to your integrated number, the main bot linked to your account will be triggered.
When you click on Choose the bot, this is what you'll see:
- Customise the consent message: Add a message for your customers to know they must tick the checkbox in order to be registered as subscribed contacts.
“In order to send a WhatsApp message to a person, you must receive opt-in permission in-line and contextually during the relevant user flows. For example, to receive a receipt via WhatsApp, a person must opt-in during a purchase flow.
Opt-in obtained without context and in any manner not related to an action the user is already taking, does not comply with this policy.“

- Once you've filled everything out, click on SAVE CHANGES and you will have successfully configured your snippet.
- You can preview the snippet by clicking on the "eye looking" icon to see what it would look like if you posted it on your website (more information about that in the next chapter).
2. Using and embedding the Snippet
Now that you've generated the snippet, you can use it to get your users to opt-in in many different ways. We'll highlight the most common ones below.
- Get Opt-ins using the snippet
- Get Opt-ins with a Web bot
- Get Opt-ins with a custom form on your website
- Obtain the Opt-in directly through a WhatsApp bot.
We will explain each one of those methods in this article, so that you can choose the Opt-In option that works best for your case 😉
1. Get Opt-ins using the snippet
This is probably the quickest option, however, it's the one you can personalise the least.
Below are some of the characteristics:
- The snippet option can only be set up in English
- Only the fields explained in the previous chapter can be personalised
- Parameters other than the phone number cannot be sent with this option
If this option is your choice you just need to copy and paste the snippet code onto your website.

2. Opt-in Using a Web bot
If you still want to get opt-in from users on your website but want to have the option to personalise it, using a web bot is a great option!
You'll have to set it up in a similar way as the snippet. In other words, your bot must:
- Be contextual and explicit about its purpose
- Ask the user for their phone number in a specific format country code + phone number
For example, the country code in Spain is +34
A random phone number in Spain could be 612345678
The format for the number on Landbot should be 34612345678
To ease the process, we've prepared the following Brick workaround called Opt-in WhatsApp v3
Ask for consent with the Opt-in Brick Workaround
This option will allow users from different countries (different country codes) to Opt-in.
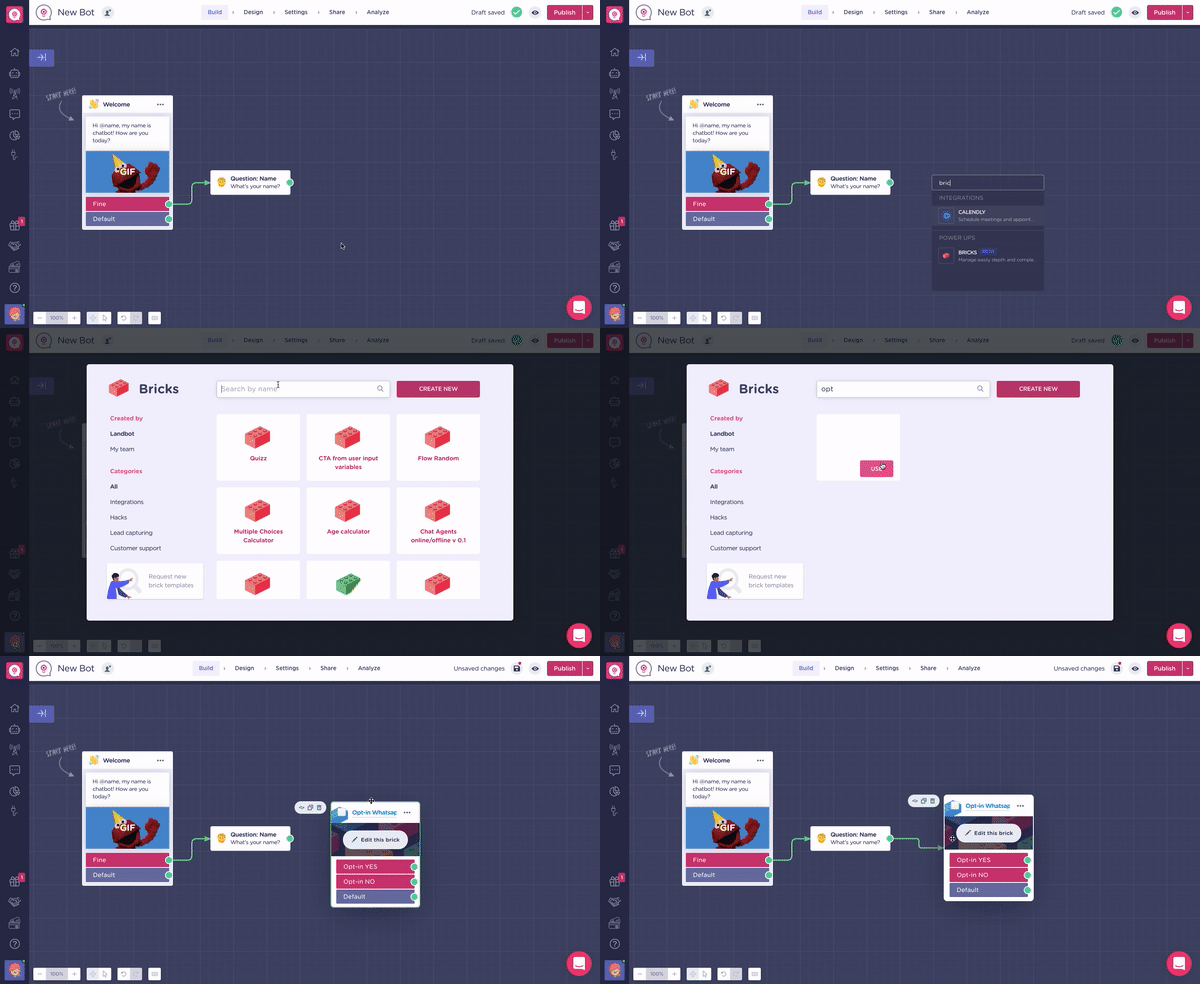
For this option, you should build a web bot from scratch, and use the Opt-In Brick Workaround to validate the phone number and opt it in.
To use this option you should:
- Start building a bot from scratch
- Import the opt in brick from the Brick selector
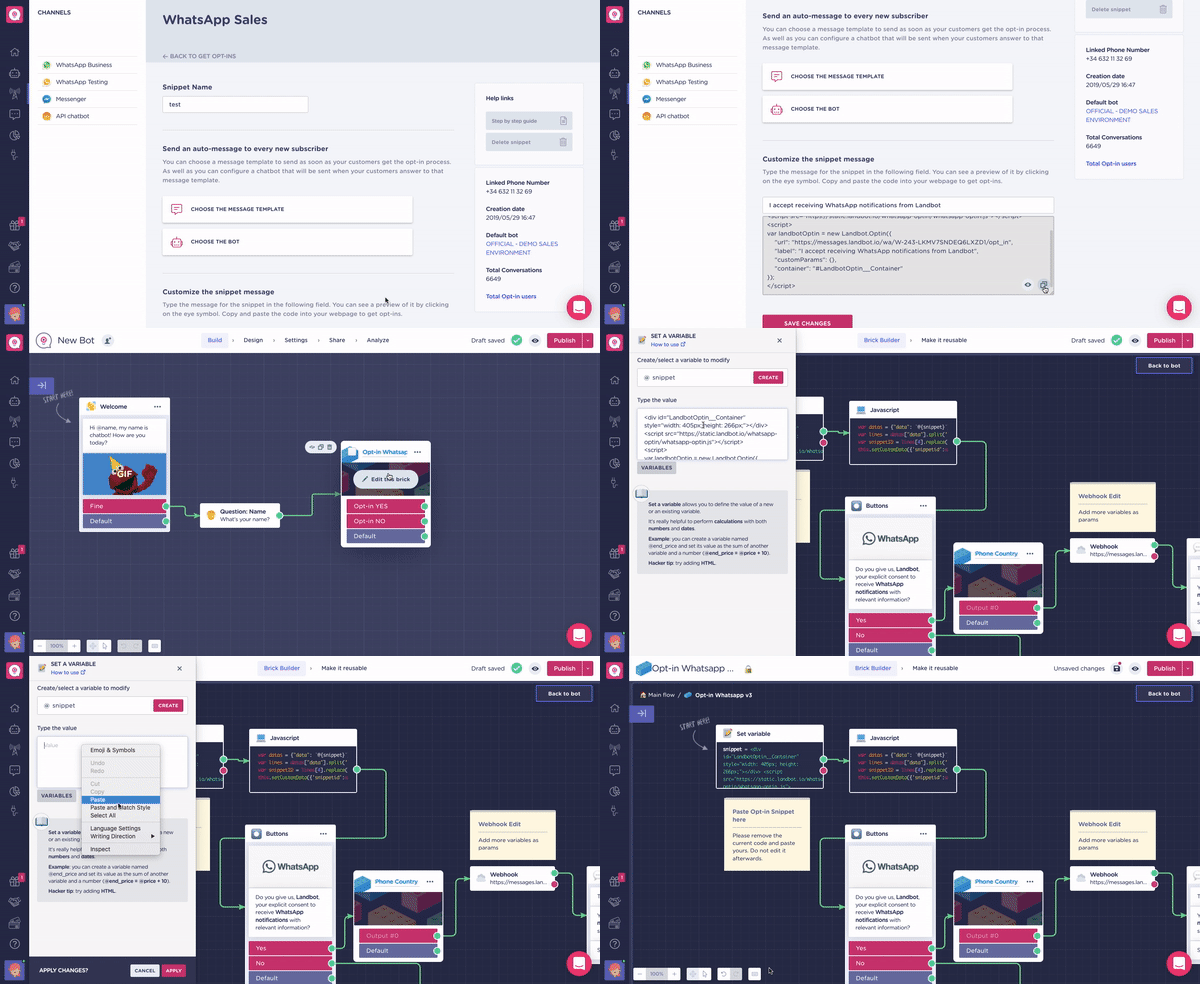
- Go to the Get opt-ins section in Channels
- Copy the snippet code
- Travel back to the bot and open the opt in brick
- Paste the code in the first Set Variable block
2.1 Sending Variables collected by the web bot to WhatsApp
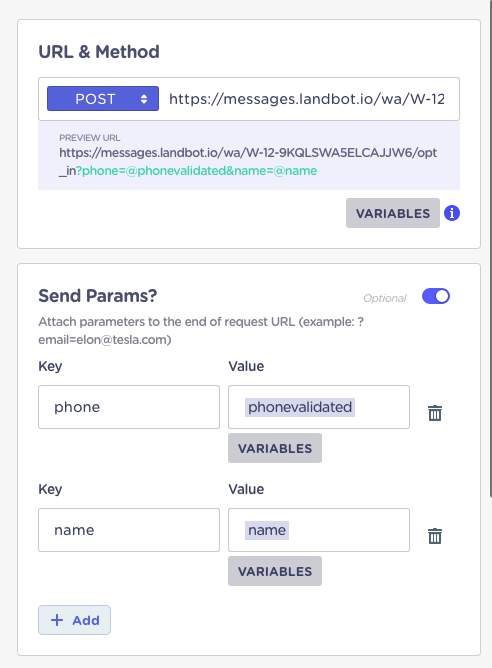
If you'd like to send the data collected by your web bot to WhatsApp and assign them to the opted in user so you don't have to ask them for the details again, you can do it from the Webhook block under the note titled Webhook edit.
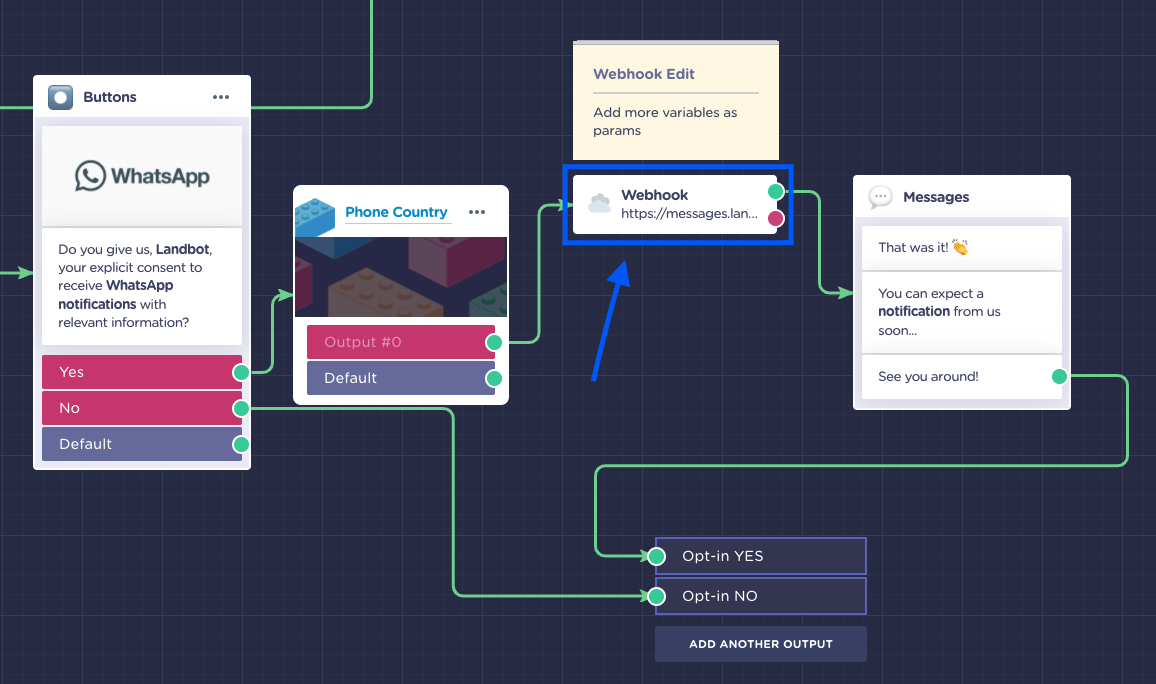
- Open the Webhook block
- Add the variables you have added to your bot flow in the Send Params section
For example, if you asked a user for their name during your bot flow, you can add the Key: name and the variable @name in the Value field.
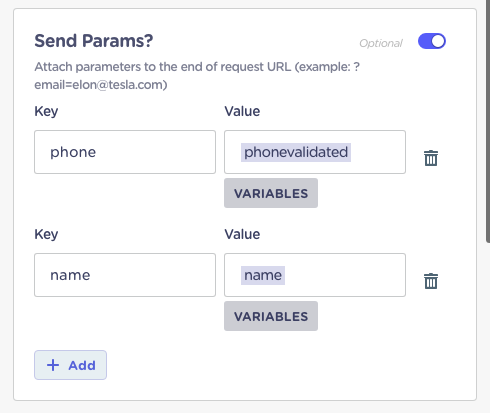
- Once you have added the Params, you will see that the Preview URL will add these variables automatically, appearing right under the Webhook's URL & Method Field we have previously set up:
Save and finish
Don't forget to Apply the changes in the Webhook and save the bot. And there you have it 🚀
3. Opt-in using WhatsApp bot
It is possible to get Opt-ins directly through a WhatsApp bot. This is the most immediate, easy-to-use and frictionless option.
By following an initial flow to Opt-in, users will be able to give their consent to receive future notifications through WhatsApp.
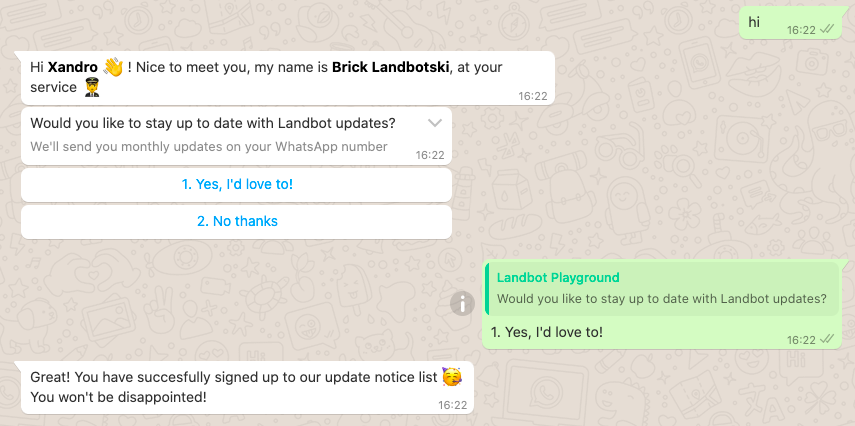
How to create a WhatsApp Opt in bot:
a. Ask for consent using Opt-in block
Now it's easier than ever to get opt-ins through the WhatsApp bot with our new Opt-in block🤩
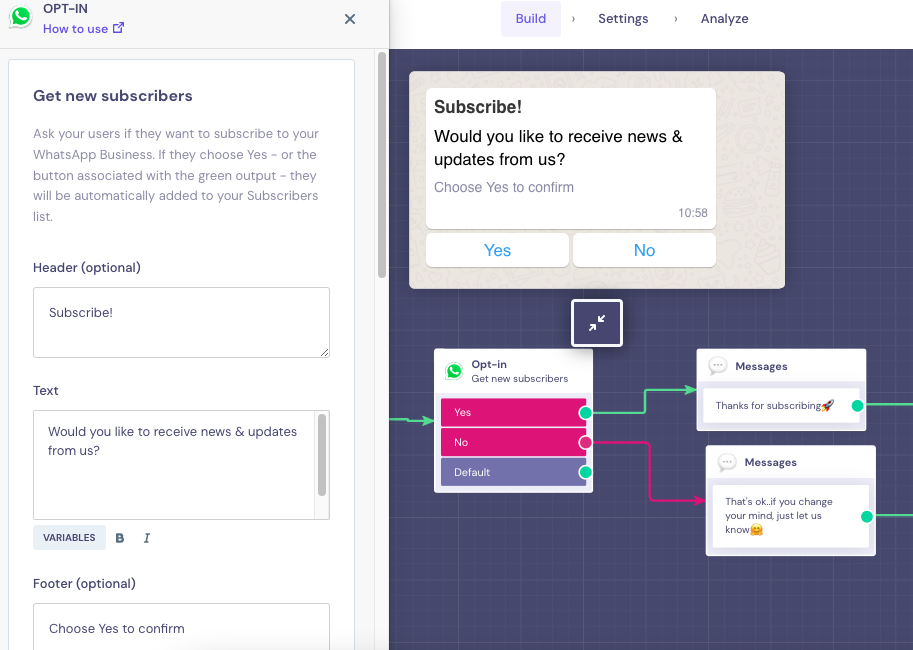
For more information on how to configure it, please check this article.
b. Ask for consent (Keyword Options or Reply Buttons block) with Webhook block
First of all, we must ask for the User's consent to be contacted proactively by your company.
To do that, after the first Welcome or simple Message Blocks, just add a simple question asking for the user's consent to receive WhatsApp notifications, using a Keyword Options or a Reply Buttons block.
Make sure to differentiate the flow, leading the user to a different path if they do not accept to Opt-in.
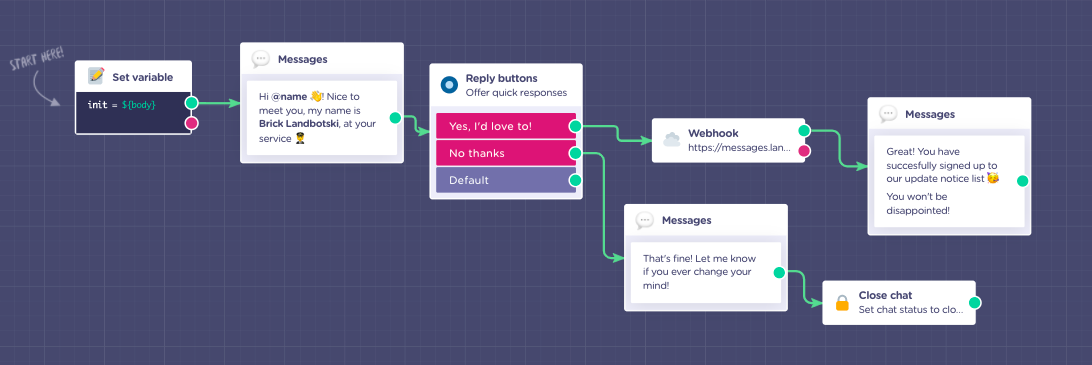
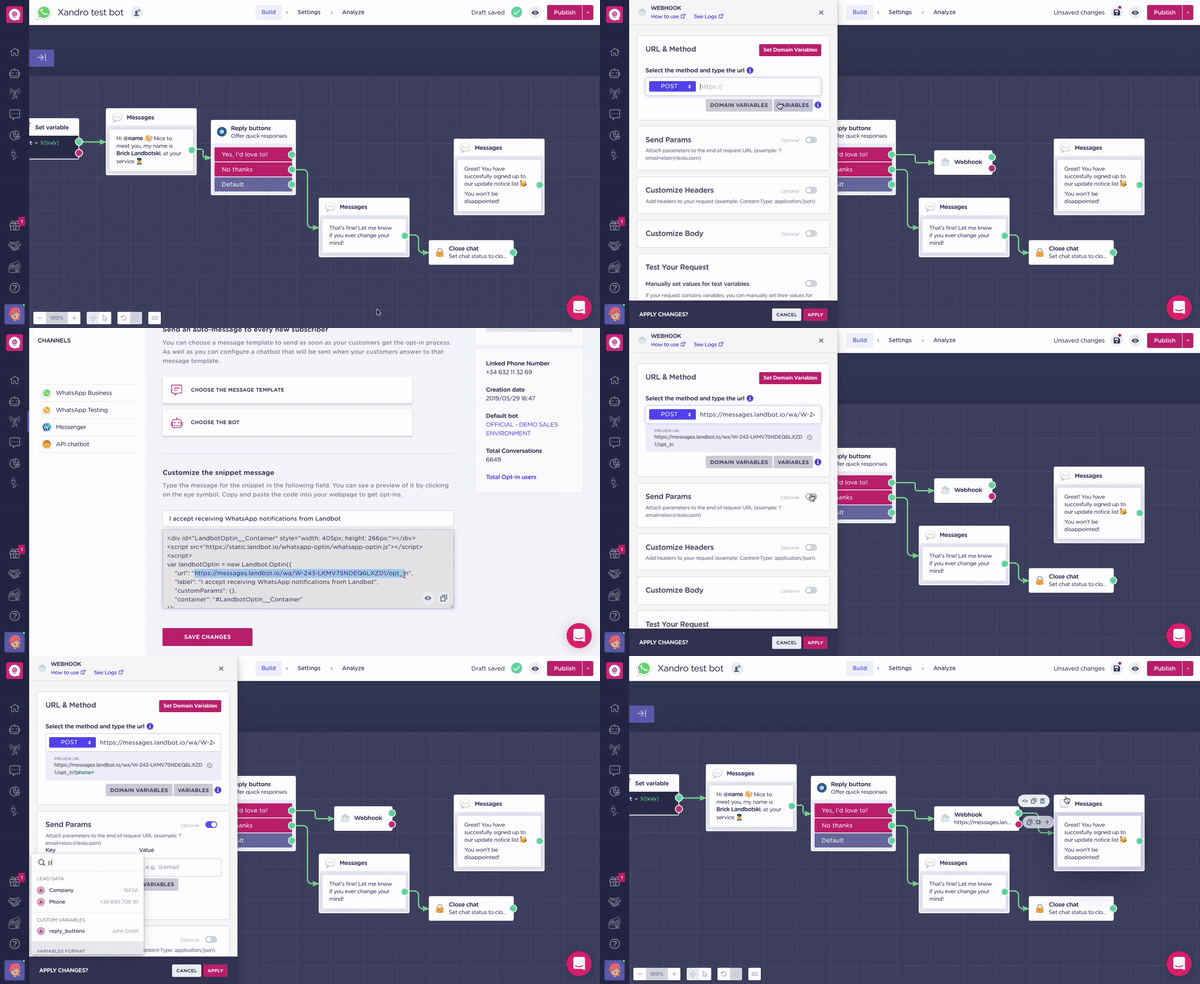
Adding a Webhook block to validate the opt-in
Add a Webhook block and follow the steps below:
- Keep the URL method as POST
- Go to the Opt in section in Channels
- Create a snippet as explained in chapter 1 of this article
- Copy the URL in the code and go back to the WhatsApp bot
- Paste the URL into the top field
- Open the Send params subsection in the Webhook block
- Add the word "phone" to the Key field and the variable @phone to the Value field
Your Webhook block should look something like this:
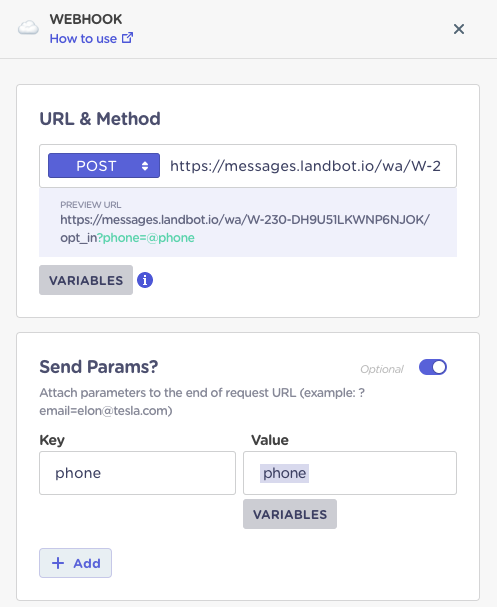
And that's it, your WhatsApp opt in bot is ready! Easy right? 😉
How to use Contacts Subscribe block
The Contact Subscribe block lets you create or update contacts directly from your WhatsApp bot, and allows you to add contacts to one or more audiences. At least one channel must be selected, if your brand only has one, it will be chosen automatically. When the information is valid, the contact is saved; if something’s missing (for example, the phone number format is wrong), the flow will follow the error path instead.
👉 Check the detailed article here: Contact Subscribe.
How to view your subscribers list
New integrations
- Click on the WhatsApp logo on the left dashboard
- Select your channel
- Click on the Contacts section

You will be able to export a CSV file with all your subscribers by clicking on the Export CSV button.

You will see two metrics:
-> Total Contacts - the total number of numbers who have subscribed to your WhatsApp channel;
-> Valid Subscribers - the total number of subscribers who have successfully interacted with your number and can exchange messages.
User Opt-out
In case a user does not want to receive notifications from you anymore, you must make the Opt-out.
By accessing the Contacts section, you will find a button with the option "Opt Out" at the user's details.
By clicking on it and accepting the Opt out, this user will be removed from your list and you will no longer be able to contact this use proactively.


